Showing posts with label ZYPPER. Show all posts

Saturday, 15 August 2020

Use your Android phone to control your Linux machine

 Use your Android phone to control your Linux machine

 If you watch lot of videos on your big computer monitor by sitting at some distance away from screen, it becomes a pain to get up each time and change the videos. Sometimes i wished I had a remote control for my computer. I  found that i could use a tool called WiFi Mouse to operate my computer remotely from my phone. This post is about how i could successfully configure and use WiFi Mouse. I am using WiFi mouse on an Android phone, but according to WiFi Mouse website Apple products like Iphone and Ipad are also supported. Using WiFi Mouse i could use my phone as mouse as well as keyboard for my computer. The user interface of  WiFi Mouse is pretty intuitive and easy to use. The only issue i found is that it is not supporting letters in CAPS when using keyboard mode on the App.

Steps to configure Android phone as remote control / remote mouse for your Linux machine

  • Ensure that both the computer and phone are connected to the same network. My phone is on wifi and Linux system is connected to the LAN port on the same router. The router must always be "ON" for using the tool.
  • Download WiFi Mouse App on your Android phone.  
  • Install Mouse Server on Linux machine. My machine architecture is  64 bit and i use openSUSE and hence I downloaded and installed this rpm. You can check about Linux architecture using this post. You can create a local repo and install rpms using this post.
  • Restart the Linux machine to ensure that Mouse Server has started up .
  • Open  TCP port 1978 on the Linux Firewall. Check out this post for opening firewall.
  • Now open the Wifi Mouse App on your phone. It will automatically show your computer / Linux machine if the Mouse Server is already running.

Default Screen when you open in WiFi Mouse on phone.

Denied Access Error if Firewall is not configured Correctly

(Failed to Connect:localhost)

Screenshot of WiFi Mouse After Successfully connecting to Linux Machine 

Note:- Solution tested on openSUSE Leap 15.2, GNOME SHELL VERSION 3.34.4

Monday, 20 July 2020

Fix Huge Emojis or Emoticons in Seamonkey on openSUSE Leap 15.2, GNOME Version 3.34.4

Fix Huge Emojis or Emoticons in Seamonkey on openSUSE Leap 15.2, GNOME Version 3.34.4


 Lately i have been noticing a irritating issue in Seamonkey web/internet browser. I was seeing huge emojis in all websites. This probably started around the time i upgraded to openSUSE 15.1 and issue continued even in openSUSE 15.2. Sample sites where i found the issue:-
Seamonkey with Huge emojis in  gitlab.gnome.org :(

 Seamonkey with Huge emojis in  yahoomail :(
This issue was not seen in other mozilla browser like firefox or in opera .
No huge emoji/emoticon in Firefox for the same website. The hand and Shell emojis look normal :)

 I saw that thunderbird users reporting similar issues here. I got a clue from that link that a font package by the name fonts-noto-color-emoji was causing these big emojis to show up. For the uninitiated Thunderbird, Seamonkey and Firefox share some of their codebase. So issues seen in one software may potentially appear in the other too.

 I opened YaST and found that i had similar package installed on my openSUSE Leap 15.2, GNOME Version 3.34.4
YaST showing noto-coloremoji-fonts
 I removed that font package / software and noticed that the original issue vanished and then i had font display issues. I could live with those placeholders. They look much better than those huge emoticons.
Font display issues in Seamonkey after removal of  noto-coloremoji-fonts using YaST
 To resolve the font display issue i through of installing some other emoji fount. I found emojione-color-font in YaST and installed the same which resolved the issue.
Install  emojione-color-font using YaST
 Finally everything is good in Seamonkey after replacing fonts-noto-color-emoji with emojione-color-font .
Seamonkey looking good after using emojione-color-font
 If you are using zypper you can remove noto-coloremoji-fonts and install emojione-color-font using following command.
sudo zypper rm noto-coloremoji-fonts
sudo zypper in emojione-color-font

Note:- Solution tested on openSUSE Leap 15.2, GNOME SHELL VERSION 3.34.4

Sunday, 12 May 2013

Razor-qt desktop on openSUSE 12.3

Razor-qt
Razor-qt is desktop which a KDE-ish
  • highly configurable,
  • easy-to-use,
  • light weight(low hardware requirements),
  • fast desktop environment based on Qt.
Razor-qt cosists of various components:-
  • Panel -you can add plugins, behave like GNOME 2.X applets
  • Desktop with icons support
  • Application launcher(razor-runner)
  • Settings (Configuration center)
  • Sessions
 Razor-qt works with various WMs, but Openbox seems to be the preferred window manager.
Installation:-
 I have openSUSE 12.3/ GNOME 3.6 installed, the following procedure was used to install Razor-qt.
Pre-installation:-
 First i turned-off Autologin , created "new" user and used this new user for logging into Razor-qt. For details see User Management on GNOME 3.X
Installation using YaST
Add repo
Add the following additional repo using YaST:-
http://download.opensuse.org/repositories/X11:/QtDesktop/openSUSE_12.3/
Install Packages
Install the following packages using YaST Installer
  • Base packages
    • razorqt
    • pavucontrol -simple GTK based "mixer" for PulseAudio
  • Additional packages
    • qtdesktop - Will pull in various "Must have" Qt applications :-
      • juffed - Simple tabbed text editor
      • nomacs - Lightweight image viewer
      • qlipper - Lightweight clipboard history
      • qterminal - Advanced terminal emulator
      • quiterss - QuiteRSS - RSS/Atom aggregator
      • qupzilla - Web browser based on WebKit core
      • qxkb - Qt keyboard layout switcher
      • qpdfview - Tabbed PDF Viewer
      • screengrab - Screen grabber
      • clementine - A cross-platform Music Player based on Amarok 1
      • smplayer - Complete Frontend for MPlayer
      • speedcrunch - A calculator with history display
      • vlc - multimedia player for various audio and video formats
      • qbittorrent - A Bittorrent Client built with C++ / Qt4
Installation using zypper
Add repo
open comman launcher(Alt+F2) and open terminal using command ("gnome-terminal") and run following command:-
sudo zypper ar -c -f -n 'QtDesktop_openSUSE_12.3' http://download.opensuse.org/repositories/X11:/QtDesktop/openSUSE_12.3/ QtDesktop_openSUSE_12.3
Install Packages
Run in the following command in terminal to install the desktop
sudo zypper in razorqt pavucontrol qtdesktop
Razor-qt Overview
 At first time login, Razor-qt provides a dialogue box with a list of window managers and I chose Openbox
Razor-qt choose Window manager,Openbox
The default desktop looks conservative with a touch of gloss. The analog clock adds a nice touch to the desktop.
Razor-qt default desktop
We see a traditional main menu (Alt+F1)
Razor-qt Main Menu
 Lot of plugins / applets can be added to panel by right clicking on it. We can see Application Menu, Quick Launch, Task Manager, Colour Picker, Lock Tool, CPU Usage tool, Network Usage tool, Show Desktop tool etc.. added in the screenshot below
Razor-qt Panel
 Each plugin on panel can be customised. Task Manager can be customised to make opened applications look like squares instead of rectangles.
Razor-qt Task Manager Customize
  Desktop icons / items can be added by creating launchers inside ~/Desktop folder by using commands like "gnome-desktop-item-edit 1.desktop"
 Razor-qt Create Desktop Icons
  Razor runner makes launching applications keyboard friendly (Alt+F2).
 Razor-qt Razor Runner Application Launcher
Razor Configuration Center
 The Razor Settings applet / plugin on the panel is very useful in configuring the desktop. "Razor Session Configurator" can be used to make applications like Artha(Dictionary tool) to start along with the desktop.
Razor-qt Razor Session Configurator
 To change themes we need to use both "Openbox Configuration Manager" as well as "Razor Appearance Configuration" .
Razor-qt Change Theme
 "Razor Shortcut Configuration" can be used to create keyboard shortcuts to launch applications easily using keyboard.
Razor-qt Keyboard Shortcuts
Qt Applications
 SpeedCrunch is a cool calculator which has lot of inbuilt formulae
Razor-qt Speedcrunch
 qBittorrent makes a powerful torrent downloader. qpdfview is a cool lightweight pdf viewer with "tabs" support.
qBittorrent and qpdfview
 JuffEd is a good text editor and NoMacs does a good job as image viewer
JuffEd and NoMacs
 QupZilla makes a wonderful webkit based browser and has variety of features like AdBlock, RSS reader, Cookie Manager and web inspector. It also has a good collection of inbuilt themes.
QupZilla
 SMPlayer and VLC (Audio & Video players) play almost anything you throw at them.
SMPlayer and VLC

Sunday, 28 April 2013

What is dconf editor, how is it useful ?

Dconf is
  • low-level configuration system whose main purpose is to provide a backend to GSettings on GNOME 3.X desktops.
  • dconf is a simple key-based configuration system. Keys exist in an unstructured database.
  • dconf system can be considered as a kind of replacement for gconf system which was used in GNOME 2.X series desktop.
  • dconf-editor is a Graphical Editor for Simple key-based configuration system which is dconf.
Install dconf Editor
Launch dconf Editor
  • To launch dconf Editor open command launcher (Alt+F2) and run command "dconf-editor".
    Alt + F2 ==> dconf-editor
  • Alternatively you can press left "Win" key or (Alt+F1) to open "Activities" and type "dconf" upon which you can see dconf Editor appearing grouped under "Applications".
dconf Editor Essentials
Find keys
 The various keys can be found by invoking search settings from top panel and then plugging in appropriate "search string" as shown below
dconf-editor Find Keys
 dconf Editor is a very useful configuration editing tool and the inner "workings" are as follows:-
  • All the settings are categorised broadly under Schemas.
  • All the Keys that logically belong together are grouped together under Schemas.
  • The various key's values can be changed by double clicking on them and entering new values. To save new settings we need to press return key .
  • To restore original values we can always use the "Set to default" button at the bottom of the tool.
dconf Editor Usage
The tool can be used for many purposes like:-
  • Changing preferences/settings for many native GNOME applications settings. Example:- Get Totem working again after crash by changing schema "org.gnome.totem"
  • Perform some advanced settings which is sometimes not possible to do from even the applications. It is possible to reduce inbox refresh time to 30 seconds in Evolution. In this case it is accomplished by changing schema "org.gnome.evolution.mail"
    Evolution interface allows minimum refresh rate of 1 minute
    Evolution set inbox refresh rate
    dconf Editor allows reduction of refresh rate to 30 seconds.
    dconf-editor Evolution set inbox 30 sec refresh rate
  • Change default directory where the screenshots are stored if "Print Screen" button is pressed. In this case schema that is modified is "org.gnome.gnome-screenshot"
    Print Screen default Save Folder
  • We can change mouse button modifier (Modifier to use for modified window click actions) from <SUPER> or "Win" key to <ALT>. You can use "Alt" key and click on any open window to "drag" it around. The schema to be changed in this case is "org.gnome.desktop.wm.preferences".
    dconf-editor mouse button modifier <Alt>
  • It can serve as a replacement / alternative for "gnome-tweak-tool" and "gnome-control-center". Most of the settings in Tweak tool are available / changed using dconf Editor.
  • Change mouse from left to right click by editing the schema "org.gnome.settings-daemon.peripherals.mouse" as shown below.
    dconf-editor left handed mouse button settings

Saturday, 13 April 2013

Why should we install mozplugger on openSUSE 12.3, GNOME 3.6 ?

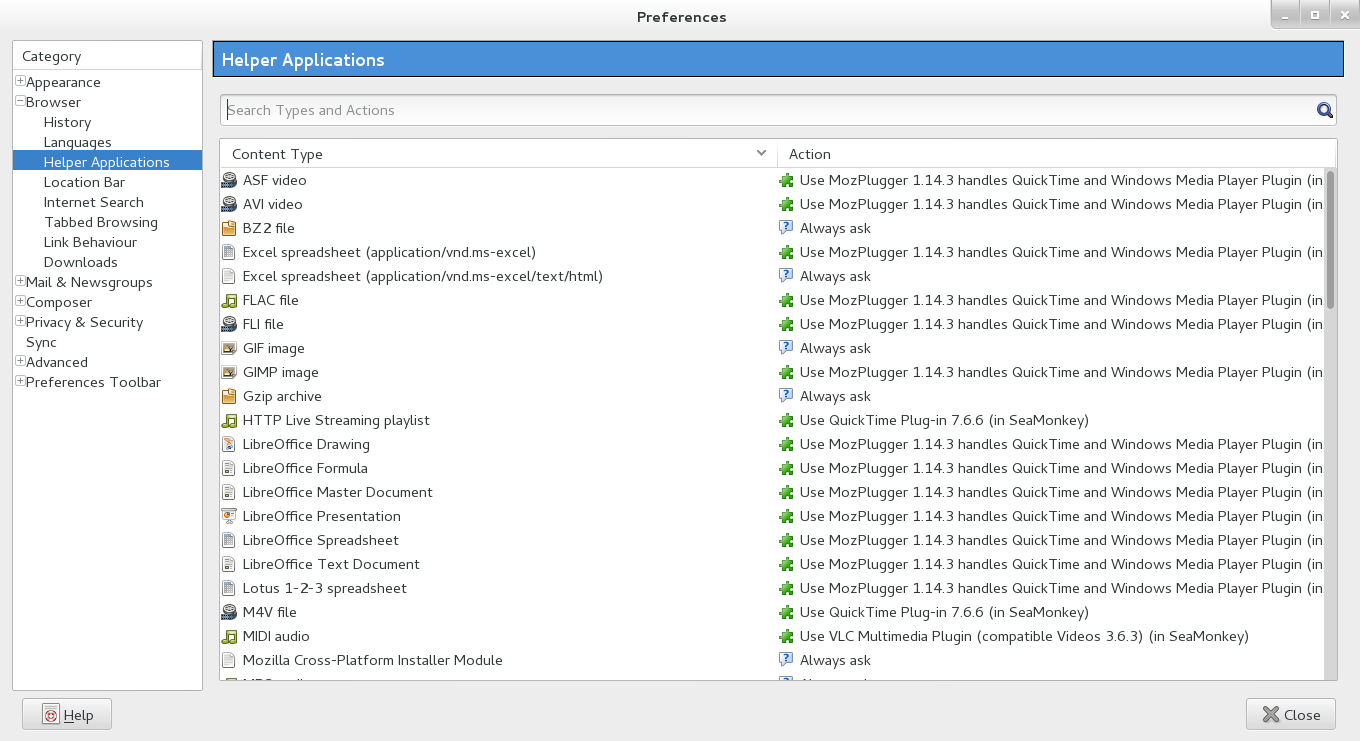
 MozPlugger is a generic Mozilla plug-in that allows the use of standard Linux programs as plug-ins for media types on the Internet. MozPlugger will help the Mozilla / Gecko based browsers to handle a variety of file formats like pdf, office formats (xls, xlsx, ppt, pptx, doc, docx), LibreOffice file formats etc. Without installing mozplugger we find that very few file types are present in "Helper Applications" window in both SeaMonkey and Firefox.
SeaMonkey with few content types in Helper Applications
SeaMonkey Before Mozplugger Installation
Firefox also shows only a few content types in Application preferences
Firefox Before Mozplugger Installation
When i try to open a sample xls file hosted online SeaMonkey tries to download and open it outside the browser.
SeaMonkey open with xls before mozplugger installation
Download and Install Mozplugger
Step 1:- First step would be to Configure Community Repositories in YaST 
Step 2 :- Before we proceed to download the rpms we need to understand what type of rpms we need. 32 bit Vs 64 bit OS architecture in Linux
Step 3 :- Since i use a 64bit OS I downloaded the following rpms
  • mozplugger-1.14.3-3.fc18.x86_64.rpm from link
  • mozilla-filesystem-1.9-8.fc18.x86_64.rpm from link
Step 4 :- I dumped these rpms into a directory and Converted the directory into a repository using YaST
Step 5 :- I open terminal (Alt+F2 ==> gnome-terminal) and install mozplugger using command "sudo zypper in mozplugger"
Post installation lot of content types are present in Helper Applications window
SeaMonkey Helper Applications After Mozplugger Installation
Post installation, I can open same xls "inside" SeaMonkey . LibreOffice opens the file in embedded mode inside the browser.
SeaMonkey LibreOffice opesn xls in embedded mode after mozplugger installation

Image resize and rotate using Nautilus on openSUSE 12.3, GNOME 3.6

 The Nautilus-Image-Converter is an extension that allows you to resize / rotate images from Nautilus. This extension is very useful when uploading images to websites (size limitations), creating thumbnails etc.
Installation & Usage
Step 1:- We need to Configure Community Repositories in YaST, GNOME 3.6, openSUSE 12.3
Step 2:- Launch command launcher(Alt+F2) and open terminal using command "gnome-terminal".
Step3:- Using zypper we can install the relevant extension using command "sudo -u root zypper in nautilus-image-converter".
 Step4:- Use the context menu (or) right click menu to "rotate" and resize images. The extension automatically appends a ".resized" and ".rotated" string to the names of newly created files, lest the original file gets overwritten.
Screenshot showing Nautilus "resize". Resize supports "resize to pixels", "scaling" and "custom size" functions.
Nautilus Resize
Screenshot showing Nautilus "rotate". Rotate supports "pre-defined rotations" and "custom angle" functions.
Nautilus Rotate

Graphical frontend for Systemd on openSUSE 12.3, GNOME 3.6

For the UN-initiated :-
  • systemd, init - systemd system and service manager
  • systemctl - Control the systemd system and service manager
Sample usage of systemd :- Restart Network Service using Systemd
 If you are not comfortable with running systemctl / systemd commands from console / terminal then you can install "systemd-ui" which acts like a Graphical front-end for systemd system and acts like a service manager.
Install and Use systemd-ui
Step 1:- We need to Configure Community Repositories in YaST, GNOME 3.6, openSUSE 12.3
Step 2:- Launch command launcher(Alt+F2) and open terminal using command "gnome-terminal".
Step3:- Now, it is possible to install systemd-ui using the command "sudo -u root zypper in systemd-ui".
Zypper Install Systemd-ui
Step 4:- Launch the systemd-ui using the command "gnomesu systemadm"
Step5:- Using this tool you can
  • Check Current status of the Service,
  • View Service dependencies,
  • Start Service,
  • Stop Service,
  • Restart Service,
  • In-activate Service etc..
Systemd System Manager

Monday, 18 March 2013

Dartmouth is out, Grab it now !

Dartmouth openSUSE 12.3
 We had sneak peeks at Dartmouth earlier here ( 1, 2, 3, 4) and it is out now and unlike Mantis did not face any hiccups in the development life cycle. I generally prefer to install any openSUSE version using Live ISOs rather than DVD as they seem to install faster than DVDs, but they do have a downside as they cannot be used for upgrading from older to newer version of the distro.This article is about preparing the ISO image, installing 12.3, things to do before installation and 30+ list of things to do after installing openSUSE 12.3 / GNOME 3.6.2.
How to prepare an ISO?
 I downloaded the openSUSE 12.3 GNOME live ISO which is available through download page. I usually download my ISOs through torrent as it is:-
  • Much faster compared to direct downloads.
  • More reliable as after downloading them i can "verify" or hash check the downloaded file to ensure the integrity of the ISO.
  • Allows me to stop and resume downloads.
 I burned / wrote it onto a flash drive using SUSE Studio Image writer. For those trying to burn 12.3 Live ISOs onto CDs there is bad news. The new Live ISOs don't fit on a CD and size of ISO is nearly a GB. For example the 64 bit version of GNOME is of size (890 MB). They can be written onto DVDs though.
Why a fresh install is better?
I usually prefer a fresh install instead of upgrade because:-
  • There is always a danger of incompatible libraries between old versions and newer versions on GNOME as well as openSUSE 
  • Sometimes there are even architectural changes between various of release like usr merge and systemd etc..
What are the things to do before installation?
Verify downloaded media
 We need to verify the downloaded ISO image using the md5sum command and compare the output from terminal to that of the md5 files obtained from download page. Running the following command should give you an output like  "29725b..." which you can check against the content inside md5 files.
md5sum openSUSE-12.3-GNOME-Live-x86_64.iso
Read Release Notes
 We obviously need to read through the release notes before starting any installation. Some important pointers are:-
  • There would be "No Network after Installation". You may need to reboot the machine once manually. Yeah this is a real downer :-(
  •  Since 12.3 uses systemd you need to use commands like "sudo systemctl restart network.service" instead of "sudo /etc/init.d/network restart". An example is given here.
  • Systemd: Cleaning Directories (/tmp and /var/tmp). By default, systemd cleans tmp directories daily as configured in /usr/lib/tmpfiles.d/tmp.conf. Users can change it by copying /usr/lib/tmpfiles.d/tmp.conf to /etc/tmpfiles.d/tmp.conf and modifying the copied file. It will override /usr/lib/tmpfiles.d/tmp.conf.
Backup data and settings
The following are the things to backup before proceeding with new installation.
  • You obviously need to backup all your data files like videos, mp3s, text files, pdfs etc:
  • You may also want to backup settings of the applications you have used before so that you need not loose any data and re-customize the applications on your new installation. To access your old application settings you should open nautilus (assuming you are using previous versions of GNOME) and then press "ctrl+h" and then navigate to your home directory. Some of the directories i would back up would be:-
    • Notes from tomboy which are available in directory ~/.local/share/tomboy.
    • Old stats folder for gkrellm available in directory  ~/.gkrellm2.
    • Old bookmarks and browser (Firefox, Seamonkey) related settings which are present in ~/.mozilla.
    • You can backup your thunderbird mails which are available from ~/.thunderbird
    • Although not recommended you can also backup installed gnome shell extensions and migrate them to new desktop. The extension files are located in  ~/.local/share/gnome-shell/extensions
    • You may migrate your old themes from  ~/.themes
    • You can migrate the custom application menus you created using alacrate from here  ~/.local/share/application.
    •  If you  use FreeRapid then you may want to backup the settings folder so that you can retain history of your downloads. The settings folders are ~/.FRD.
Note:- ~ means /home/<profileName> i.e. /home/<profileName>/.FRD is the same as ~/.FRD.
Installation:-
 As usual openSUSE installation is pretty straight forward and what i am describing here applies to installation from a Live ISO. You need to plugin the USB into your system and while booting press F10 or whatever function key which allows you to get the "boot from media" menu. Here we need to choose the USB device.
  • I would recommend booting into the LIVE session first and test a few things  by opening some applications, testing sound etc to ensure that the installation media is good.
  • Then we can reboot and choose the "installation" menu to start the installation.
  • In the first screen you can choose the right keyboard layout and Locale / Language settings.
  • Then you can choose the place you live on the world map to set the time / timezone right. You may opt to disable the setting "Set Hardware clock to UTC...". This will cause issues if you dual boot with another OS. The other OS would always show UTC / GMT time.
  • In the next screen YaST would offer you the best installation and partition setup based on your system configuration. You may choose to import your existing partition setup or even use the "Expert" option to do custom partitioning.
  • In the next screen you can create a "user" and set the password for that user. You will also notice that this password would also be your root or admin user password.
  • After you confirm the settings, the installation will begin and after a few minutes the installer will ask you to reboot and upon rebooting an automated configuration process takes over and does some magic and finally your will be logged into the DE which you have opted to install.
Things to do after installing openSUSE 12.3 / GNOME 3.6.2
Steps to open terminal:-
 In terminal you can easily run various commands to install various software. During installation you will need to provide the admin password that you have entered during installation. You can open command launcher (Alt+F2) and then use the command ("gnome-terminal") to open a GNOME terminal.
Steps to refresh desktop:-
 To refresh the GNOME desktop you press "Alt+F2" which opens the command launcher and use the command "r" and hit return or enter key. This will refresh / restart your GNOME 3.X desktop.
Notes about Zypper:-
sudo - It is a command used to elevate permission to "root" user level
zypper :- zypper is a package manager used in openSUSE . You may also read about Understanding "Package Management" in Linux
in :- this option is used to instruct zypper to install the packages following the option.
You can check Man for zypper or take a look here for more details.
01.)Configure Community repositories
 Setting up of the "Community repositories" is the first step in setting up our system. You can take a look at this article to configure the repos.
02.)Check For Updates
 To check for updates you can open the terminal and use the command "sudo zypper up" to check for available updates. You will be surprised about the number of updates that are waiting to get installed.
03.)Improve multimedia experience
 openSUSE installation doesn't provide codecs for any of the restricted multimedia formats like mp3. There is a famous "1 click Install" procedure to overcome this predicament here. The recommended one-click for gnome desktop is named "codecs-gnome.ymp". Once you click on the installer, you need to be ready with your mouse and click on "Agree / I trust" buttons that appears endlessly one after the other. Finally, we need to refresh the desktop.
04.)Install your backed up application profiles
 You can opt to move all the application profiles which you have backed up to respective folders on your new installation. Sometimes we may need to change ownership of these files and folders if you see an "X" marked on the file or folder icon in Nautilus. To do this we open a terminal and then we can apply the "change ownership" command on all folders and subfolders by running the command "sudo chown -R <profileName> /home/<profileName>/" in the terminal.
05.)Install Banshee
  The default audio jukebox on openSUSE 12.3 is Rhythmbox. But if you need Banshee then you can open the terminal and run the command. "sudo zypper in banshee  banshee-extensions-default". It integrates well with Media Player  Indicator which is a Gnome Shell Extension. The extension allows you to control playback, volume and also preview cover art of the track that is playing.
06.)Install Mp3 support
 If you don't have mp3 support even after using the above one click in step3 and you get an error that you need "Advanced Streaming Format (ASF) demuxer", then you need to install mp3 codec by running the command "sudo zypper in gstreamer-0_10-fluendo-mp3" in the terminal.
07.)Install Video player
 The default video player Totem is pretty good but not good enough. It is better to go in for a "mplayer" based media player so that most of the media formats are supported. You should consider using mplayer2 backend which claims to be better than standard mplayer backend. We can open terminal and run the following commands to install various video players.
Install gnome-mplayer
sudo zypper in gnome-mplayer mplayer2-as-mplayer (or) sudo zypper in gnome-mplayer
Install smplayer
sudo zypper in smplayer2 mplayer2 (or) sudo zypper in smplayer
Install umplayer
sudo zypper in umplayer mplayer2-as-umplayer (or) sudo zypper in umplayer
08.)Install Note Making application
 If you need to use stickies or note making application then we need to install Tomboy. To install tomboy you open gnome terminal and run the command "sudo zypper in tomboy" to install Tomboy. Once you open the application it will automatically detect the old notes from your old profile which you have migrated to "~/.local/share/tomboy".
09.)Install GKrellM
 By installing GKrellM you can get various stats like internet, CPU usage etc. To install GKrellM you can run the command "sudo zypper in gkrellm" in terminal. You can see your old internet usage stats if you had migrated your old stats to "~/.gkrellm2".
10.)Install offline dictionary
  Artha is a cool offline dictionary which has many advanced features and is very useful in day to day life. You can run the command "sudo zypper in artha" in terminal. You can access artha once it is started through the key combination "ctrl+alt+w".
11.)Install favourite web browser
 openSUSE 12.3 / GNOME 3.6 comes with Firefox as default browser. For installing any other browser you can run the following commands in terminal.
GUI based browsers
To install SeaMonkey (Web-browser, advanced e-mail, newsgroup and feed client, IRC chat, and HTML editing made simple—all your Internet needs in one application.) use "sudo zypper in seamonkey"
 To install Opera (really fast browser with inbuilt email client, torrent client and a irc chat client ) use "sudo zypper in opera-gtk"
 To install Chromium (open-source clone of infamous google chrome) use "sudo zypper in chromium"
 To install Epiphany (default browser for GNOME desktop) execute the command "sudo zypper in epiphany"
 To install midori (light weight webkit based browser) use "sudo zypper in midori"
Text based browsers
 Unlike browsers which support javascript, flash and other plugins  text browsers are as the name suggests can only render the text from any webpage. Many major sites do support text browsing. 
To install Links  use the command "sudo zypper in links"
To install Lynx  use the command "sudo zypper in lynx"
To install w3m use the command "sudo zypper in w3m"
12.)Install Bleachbit
 Bleachbit is essentially a clean up tool for your Linux desktop. According to the Bleachbit website it identifies and erases broken menu entries, cache, cookies, localizations, recent document lists, and temporary files in Firefox, OpenOffice.org, Bash, and 50 other applications. It is your Linux equivalent of ccleaner in windows. You can install Bleachbit in terminal using the command "sudo zypper in bleachbit".
13.)Install Image editor
  12.3 comes with GIMP pre-installed but, If you want a light-weight, basic image editor then you can go in for Pinta. Pinta is the Linux equivalent of Paint.NET on windows. To install Pinta you can execute the command "sudo zypper in pinta" in terminal
14.)Install Sun Java JDK / JRE / browser plugin
 openSUSE comes bundled with a community version of Java called openJDK and a browser plugin called icedtea-web. This should be good enough for most of the users but if you do need Oracle/Sun java then read on.
 Due to some licensing issues, Oracle (Sun) Java/ JRE could not be distributed through the official repositories of openSUSE, since openSUSE 12.1.
 You need JDK if you want to develop something using JAVA. If you just want to run some jars and some applets in the browser like Firefox then you need to install JRE and JAVA Plugin. Here is a official quick guide to install the newest and secure version of Java. For people who just want the software and averse to long installation procedures i would suggest installing them from user maintained repositories. openSUSE don't guarantee any stuff downloaded from user maintained repositories. I usually install Java from user maintained repositories and they work just fine. Before installing Oracle JRE you should remove openJDK by executing the following command in terminal.
sudo zypper rm -u java-1_7_0-openjdk icedtea-web
You can find "1 Click Install" links  for JRE 1.6 here. You can get JRE 1.7 here.
Similarly you can get JDK 1.6 here. You can get JDK 1.7 here
15.)Install GNOME Shell Extensions / Remove Annoying "Universal Access"
 According to GNOME site GNOME Shell extensions are small pieces of code written by third party developers that modify the way GNOME works. If you are familiar with Firefox Addons or Chrome Extensions , GNOME Shell extensions are similar to them. You can take a look at a few of the extensions in this post.
16.)Install Acrobat reader
 Evince is the default pdf document viewer for the GNOME desktop. It is already installed on openSUSE 12.2. For day to day purposes, Evince is good enough. But it is not rich in features like Acrobat reader. To install Acrobat Reader use the command "sudo zypper in acroread" in terminal.
17.)Enable desktop icons
 To enable desktop icons we need to make nautilus as desktop manager instead of gnome shell. To do this we should open the command launcher (Alt+F2) and use the command "gnome-tweak-tool" and open Advanced Settings tool. Here we can select "Desktop" in the navigation tree on the left and then turn ON nautilus as the desktop manager. You can optionally turn ON other options like "Computer Icon", "Home Icon", "Network Icon", "Trash Icon" etc...
Gnome Shell nautilus As Desktop Manager
18.)Enable location bar in Nautilus
 One can enable location bar instead of path bar in nautilus. The advantages of using location bar are that you can always see the full path of the folder you are in and also copy paste the same if required. we should open the command launcher (Alt+F2) and type in "gnome-tweak-tool" and hit return key. You can then select "Files" in the navigation tree on the left and then turn "ON" the required option as shown below.
Enable Location Bar Nautilus
19.)Enable minimize maximize and close buttons in all applications
 One can easily enable minimize maximize and close buttons in all application windows in GNOME Shell. To do this we must open the command launcher (Alt+F2). Then type in "gnome-tweak-tool" and hit return key. You can select "Shell" in the navigation tree on the left and then select the required option which is "All" in menu "Arrangement of buttons on the title bar" as shown below. One can also enable other cool options like date in calendar which gets displayed in top panel, configure shutdown options etc.
Enable Maximize Minimize buttons
20.)Customize the Dash menu
 The Dash menu is the menu bar which appear on the left hand side of the screen if you press the left windows key on your keyboard. You can easily Add and remove items, rearrange items in the DASH. A detailed post about customizing the DASH is available here
21.)Add programs to start up
 You can easily Add and Remove items to start up of your GNOME session. Open the command launcher (Alt+F2). Then type in "gnome-session-properties" and hit the return key. In this window you can click the "add" button on the right hand side of the window which will in turn open up a new window where you can type in the command that will launch the relevant applications when the system starts up. I would typically add the following applications to the startup of my GNOME based system:-
  • Network Monitoring Tool(GKrellM)
  • Offline Dictionary(Artha)
  • Note Making Application(Tomboy)
Adding items to GNOME session startup
Startup Gnome Session
22.)Change Themes
 Dark theme lovers can start rejoicing as "Adwaita" supports dark themes now. Dark theme support can be turned ON using the relevant slider as shown below in "gnome-tweak-tool".
Adwaita Dark Theme
23.)Change default applications
 If you need to change default applications on your desktop e.g.You want to make Opera default browser instead of Firefox then you should Open the command launcher (Alt+F2). Then type in "gnome-control-center" and hit the return key. This will open "Settings" where you can locate an application/applet by name "Details" under "System" category. Open "Details" and navigate to "Default Applications" on the tree like menu on the left hand side of the application. Here you can change the default applications of your system.
GNOME 3.X Default Application
24.)Force applications to appear in openwith list
 If you want some rogue applications to appear in nautilus file "open with" list (Or) when you right click on a file then you essentially need to edit the launcher in GNOME 3 applications using Alacarte(menu editor) and add a %U after the command. For detailed explanation take a look at this post.
25.)Install archive manager
 Even though openSUSE 12.3 comes with a good archive manager in the form of File Roller we usually require archive mangers that have advanced functions
  • Splitting the file into multiple parts and rejoin the split file
  • Handle multiple file formats(7zip, xz, bzip2, gzip, zip, tar)
  • Create self extracting executables
  • Encrypt archived files
  • Test archived files
  • Accessible through right click in Nautilus
  J7Z is one such cool archive manager which satisfies all the above requirements and more. It has built in themes / skins too. To install J7Z we can run the command "sudo zypper in j7z" and then press return or enter key in a terminal.
26.)Install clipboard manager
 For power users who miss the GNOME 2.X clipboard applet which was sitting prettily on the panel and wish you had similar application on your GNOME 3.X desktop then Glipper or Parcellite comes to your rescue. To install Glipper run the command "sudo zypper in glipper" in terminal. To install Parcellite use the command "sudo zypper in parcellite" in terminal. Parcellite and Glibber automatically adds itself to the start up list and will start automatically when you boot GNOME, next time.
27.)Enable icons in buttons and Menus
To do this you can take a look at this post (GNOME Shell Context Menu Appearing Plain without Icons)
28.)Make things easy using Nautilus Actions
 Actions is useful in adding custom menu items to the right click menu and execute arbitrary commands. It provides a way to automate many day to day tasks like image conversion, opening Nautilus in admin mode etc.Why should we use Nautilus Actions?
29.)Change right click options on files
 This is about setting a list of open with applications and setting default applications for any file. For more information you can take a look at Changing right click options for files on GNOME 3.X desktop.
30.)Creating custom keyboard shortcuts
 You can use the "keyboard settings" tool under Activities(Alt+F1) and create custom keyboard shortcuts to run scripts,execute jars etc.. For more details you can take a look at Custom Keyboard Shortcuts on GNOME 3.x desktop
31.)Create custom menus or application shortcuts in GNOME
 In order to create a new menu in the Accessibility dropdown or add your own application launcher to the panel you can take a look at Adding custom menus or application shortcuts to GNOME 3.X panel
32.)Force some programs to appear in openwith menu
 You can follow the method described in step 29 or check out editing of launcher using alacarte in Force programs to appear in open with list on GNOME 3.x desktop
33.)Read through GNOME Cheat Sheet
  GNOME 3.X desktop have lot of cool inbuilt features like creating screen recordings, desktop refresh, theme refresh etc.. You can learn many thing by reading GnomeShell/CheatSheet
34.)Read about various GNOME 3.6 features
 Various GNOME 3.6.X features were covered by me through
35.)DVD authoring tools
 Bombono DVD is a DVD authoring program for Linux. It is made easy to use and has nice and clean GUI (Gtk). To install Bombono you can run the command "sudo zypper in bombono" in terminal. It is very easy to create Video DVDs from individual video files using Bombono.
 36.)DVD Image Slideshows
 Imagination is a lightweight and simple DVD slide show maker for Linux. If you have a large collection of images and you want to burn them with a sound track this would be the go-to tool for you. To install Imagination you can use the command "sudo zypper in imagination" in terminal.