Saturday 15 August 2020

Use your Android phone to control your Linux machine

 Use your Android phone to control your Linux machine

 If you watch lot of videos on your big computer monitor by sitting at some distance away from screen, it becomes a pain to get up each time and change the videos. Sometimes i wished I had a remote control for my computer. I  found that i could use a tool called WiFi Mouse to operate my computer remotely from my phone. This post is about how i could successfully configure and use WiFi Mouse. I am using WiFi mouse on an Android phone, but according to WiFi Mouse website Apple products like Iphone and Ipad are also supported. Using WiFi Mouse i could use my phone as mouse as well as keyboard for my computer. The user interface of  WiFi Mouse is pretty intuitive and easy to use. The only issue i found is that it is not supporting letters in CAPS when using keyboard mode on the App.

Steps to configure Android phone as remote control / remote mouse for your Linux machine

  • Ensure that both the computer and phone are connected to the same network. My phone is on wifi and Linux system is connected to the LAN port on the same router. The router must always be "ON" for using the tool.
  • Download WiFi Mouse App on your Android phone.  
  • Install Mouse Server on Linux machine. My machine architecture is  64 bit and i use openSUSE and hence I downloaded and installed this rpm. You can check about Linux architecture using this post. You can create a local repo and install rpms using this post.
  • Restart the Linux machine to ensure that Mouse Server has started up .
  • Open  TCP port 1978 on the Linux Firewall. Check out this post for opening firewall.
  • Now open the Wifi Mouse App on your phone. It will automatically show your computer / Linux machine if the Mouse Server is already running.

Default Screen when you open in WiFi Mouse on phone.

Denied Access Error if Firewall is not configured Correctly

(Failed to Connect:localhost)
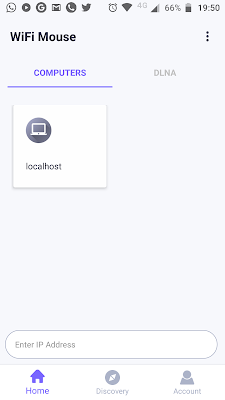
Screenshot of WiFi Mouse After Successfully connecting to Linux Machine 

Note:- Solution tested on openSUSE Leap 15.2, GNOME SHELL VERSION 3.34.4

Open TCP Port on openSUSE Firewall

Open TCP Port on openSUSE Firewall

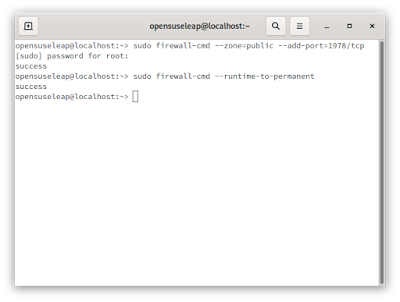
 In this post i will show how to open a firewall on openSUSE and ensure that the setting is made permanent. I will now open terminal on GNOME and open TCP port 1978

Opening Port using GNOME TERMINAL

 Command to add port to

sudo firewall-cmd --zone=public --add-port=1978/tcp

Command to keep the port open permanently
sudo firewall-cmd --runtime-to-permanent

Remove open Port
sudo firewall-cmd --zone=public --remove-port=1978/tcp

Error that you will see if we try to re-open an Open Port
opensuseleap@localhost:~> sudo firewall-cmd --zone=public --add-port=1978/tcp
[sudo] password for root:
Warning: ALREADY_ENABLED: '1978:tcp' already in 'public'
success

 GNOME terminal showing addition of port 1978 on openSUSE 15.2

Opening Port using YAST / GUI

  • Search for firewall in GNOME Shell Activities
  • Click and open Firewall tool
  • Provide password
  • In the firewall tool
    • Click on "public" Zone in the left pane
    • Then Click on "Ports" tab to open ports
    • Enter TCP Port 1978
    • Click on "Accept" button to save changes.

GNOME Shell Activities Showing YAST Firewall

 
Screenshot of YAST Firewall Tool with Labels explaining Addition of port

Refer:- Opening Ports YaST2 Firewall

Note:- Solution tested on openSUSE Leap 15.2, GNOME SHELL VERSION 3.34.4

Friday 14 August 2020

Add a Startup sound when logging in or when machine starts up - Login Sound / Melody on Linux Desktop

 Add a Startup sound when logging in or when machine starts up - Login Sound / Melody on Linux Desktop

 I was looking a way to play a sound/melody when my machine boots. I found a potential solution here. But the "Start Up" application mentioned in the article was not available on my Gnome Shell installation. It tried various options from that web-page and ran the commands available in console / terminal. Results are as follows. 

This solution did not work

opensuseleap@localhost:~> /usr/bin/canberra-gtk-play --id="desktop-login" --description="GNOME Login"
Failed to play sound: File or data not found

This solution worked

opensuseleap@localhost:~> paplay /usr/share/sounds/purple/login.wav

When i ran the above command in terminal i could hear a pleasant melody.

To Play sound when logging in

 I added the above command to my ~.profile file and voila . I can now hear pleasant sound when i start my machine. To open the .profile file you can press ALT+F2 followed by typing in the text ~.profile and then pressing Enter/Return key. Usual location of .profile file is /home/<ReplaceWithUserName>/.profile

Open .profile file using Run Command Window Alt+F2

.profile file showing the paplay command to play login sound/melody

Note:- Solution tested on openSUSE Leap 15.2, GNOME SHELL VERSION 3.34.4