Showing posts with label WEATHER. Show all posts

Sunday, 27 January 2013

Weather forecast gadget,much more about E17 on openSUSE 12.2

 I had earlier already written about  "openSUSE trying to offer E17 as mainline desktop" which covered topics like installation of E17 on openSUSE and "Changing backgrounds and themes in E17 openSUSE 12.2". Through this article I hope to cover left-over bits and pieces about E17 on openSUSE 12.2.
Install useful E17 packages
Using zypper
 After installing E17 on openSUSE as described in the articles written earlier we can install some useful packages like weather forecast module,themes, mines game, shellmentary (zenity like pop ups ) etc...
sudo zypper in shotgun elemines e-theme-a-os-detour e-theme-a-os-green e-theme-a-os-miguel-v3 e-theme-a-os-vision-v3 e-theme-darkness e-theme-efenniht e-module-forecasts shellementary
Notes:-
sudo - use command as super user
zypper- package manager
in - parameter to indicate install
Using YaST
 After invoking YaST installer you can easily select the repositories drop down and select the E17 repository and select and install the relevant modules by right clicking and install them as shown below.
YaST E17 Theme Install
Configure Weather Forecast Gadget on E17 / openSUSE 12.2
Enable Forecasts Module
 You need to first open the main menu and navigate to Settings and then Modules menu. In the "Module Settings"  you can select "Forecasts" module and press the "Load" button to activate this module.
Enable Forecasts Module
Add Forecasts Gadget to Shelf
 You can right click on the standard E17 dock or "Shelf" and then open "Contents" submenu . In the "Shelf Contents" window you can select "Forecasts" gadget and click on "Add Gadget" button to add the Gadget to the Shelf.
Add Forecasts Gadget to Shelf
Configure Forecasts Gadget
 To change "Forecasts"  settings like city ,Units(Celsius, Fahrenheit) etc you can can right click on the Gadget or Widget and then choose Settings submenu. To get the Forecasts code you need to go to www.weather.com and get the weather codes for your city.You can use this code in the "Forecasts" gadget.
Getting Weather codes from weather.com
Changing Forecasts settings
E17 developing its own set applications
  E17 developing its own set applications to become a full fledged DE and reduce reliance on applications from from other DEs.The following screenshot shown a game called elemines which is based on Enlightenment Foundation Libraries (EFL) , Terminology which is a cool terminal emulator for E17, E17's own built in file manager, Shotgun which is a XMPP (jabber) client using EFL libraries. I could easily connect with my gtalk contacts using shotgun.
Screenshot showing Elemines, Terminology, Shotgun and E17 file manager
Elemines, Terminology, Shotgun and E17 file manager
Enable Shelf Auto Hide
 Shelf which is the default dock on E17 can be set to "auto hide" state by right clicking on Shelf  and choosing "Shelf==>Settings" and then selecting the "Auto -hide" option and then  applying the settings.
Enable Shelf Auto Hide
Shellementary
 Shellementary is an EFL based GUI application similar to zenity/kdialog and can provide GUI to shell scripts. I have tried to provide an information type of pop up using shellementary from terminology using the command shellementary --info --text 'e17 Rocks!'
E17 Shellementary openSUSE 12.2
More E17 Themes
 In "Changing backgrounds and themes in E17 openSUSE 12.2" i have dealt about downloading , installing and changing themes for E17 from 3rd party sites. But now openSUSE does offer many themes in its repos. If you had installed the packages as described earlier in the article you should be able to see many themes on your E17 desktop. All E17 themes packages in openSUSE repositories are named as "e-theme-*". It is very easy to find them in YaST. I have posted some theme screenshots below.
Detour, theme for Enlightenment 17.
Green, theme for Enlightenment 17.
OS Miguel theme
OS Miguel theme
OS Vision,Beige theme for Enlightenment 17
Theme darkness for Enlightenment 17
Theme efenniht for Enlightenment 17( incorporates cool wobble effects)

Tuesday, 30 October 2012

Man is oblivious to the slugfest going on in the heavens above

 Man is oblivious to the slugfest going on in the heavens above. Here are the 3 forecasts for the ballet of the heavens courtesy our own IMD. Last image is an animation comprised of the three images.Animation is powered by ImageMagick. Command used to animate the images is as follows :-  convert -delay 20 -loop 0 24hrrain.gif 72hrrain.gif 48hrrain.gif animatespheres.gif
 
Image Source:- Regional Meteorological Centre, Chennai

Wednesday, 19 September 2012

3 Cool ways to get Weather Updates on Mantis

 There are 3 Cool ways to get weather updates on Mantis openSUSE 12.2 / GNOME 3.4.2. They are through:-
  • Gnome Shell Weather Extension
  • Weather wallpaper &
  • GKrellWeather
Gnome Shell Weather Extension
 It is a simple GNOME Shell extension which displays weather information for the required location through the top panel of your GNOME 3 desktop. The extension displays the current weather and also displays a forecast for the current day as well as the next day. The weather data is fetched from Yahoo! Weather.
Install Gnome Shell Extension Weather
  • Since this extension is not currently available in openSUSE community  repositories we need to download the rpm from pkgs.org. The rpm is available for download through this page. I downloaded the rpm "gnome-shell-extension-weather-...noarch.rpm" from pkgs.org. We need to ensure that we are downloading the binary rpm packages and not the source files. You can install the extension using zypper ( CLI, Command Line Interface ) or through YaST Software manager( GUI, Graphical User Interface ).
  • If you want to install through YaST software manager you need to "Create a repository out of your Local Directory or folder" and install the required rpm through YaST.
  • If you want to install using zypper you can open a terminal by launching command launcher (Press ALT+F2) and then typing in "gnome-terminal" and hit return or enter key. In the terminal you need to navigate to the folder where your downloaded rpm is present using command "cd<SPACE><Full directory path>". The command "sudo zypper in gnome-shell-extension-weather-0-0.3.git393203b.fc17.noarch.rpm" can be used to install the weather extension. You may be prompted to enter the admin password during installation which you need to provide.
Configure Gnome Shell Extension Weather
  • You can activate the extension using "gnome-tweak-tool"(through Alt+F2) / Advanced Settings program which is also available under GNOME activities tab.
  • After activating the extension it will appear on the top panel. Click on the extension and open "weather settings". In weather settings you can use the "+" or plus button to bring up a search window where you can type in required city ( "Ho chi Minh") and after selecting appropriate entry press "OK". After that you can configure whether the weather data should be shown in metric or your preferred units.
Activate Extension using Advanced Settings
Search For Location and Save in weather settings
Extension Showing Weather
Weather wallpaper
 This is utility to create a wallpaper based on the current weather. It is a program which connects to noaa.gov site and gets the current weather at the specified location and creates and sets the desktop wallpaper based on the data retrieved.
Install Weather Wallpaper
 The program is available in Main Repository (OSS). Ensure that you have configured all the relevant community repositories. To know more about configuring community repositories you may take a look at this post under sub heading "Add Community Repositories using YaST". After configuring community repositories you can open gnome terminal through command launcher (press Alt+F2). In command launcher use the command "gnome-terminal" and press return or enter key. The command to use in terminal is "sudo zypper in weather-wallpaper". This command will install the GNOME weather wallpaper application. You may be prompted to enter the admin password during installation which you need to provide.
Configure Weather Wallpaper
  • You can locate the "Weather Wallpaper" application under Start(left windows key) ==> Applications ==> Weather Wallpaper (Or) You can activate the application using command "weather-wallpaper" in the command launcher(Alt+F2) 
  •  You need to get the 4 letter ICAO Location Indicator from this site and plug it into the tool. Enjoy the changing wallpapers.
Navigate to the required country to display the weather stations
Locate the necessary location and get the 4 letter code
After getting the code you can configure  the tool using the tray icon
Weather Wallpaper on Cloudy day
Weather Wallpaper on Rainy day
Weather Wallpaper during night
Add Weather Wallpaper to Startup
 If you want to start "Weather Wallpaper" along with your OS then you need to add the relevant application to "gnome-session-properties".
  •  Press key combination "Alt+F2" and type in "gnome-session-properties" and hit enter key.
  •  In the session properties windows click on the add button. Give any name of your liking. In the command text box you need to type in "weather-wallpaper" in lower case as demonstrated below. Press "Save" button and from next boot the application will start automatically.
Launch gnome-session-properties through command launcher(Alt+F2)
Configure Startup parameters
GKrellWeather
 GKrellWeather is a weather plugin for GKrellM. In  order to get weather updates through this plug-in you need to install GKrellM first. You can read more about GKrellM in detail here.
Install GKrellM and GKrellWeather
  • The GKrellM program is available in Main Repository (OSS). To know how more about configuring community repositories take a look at this post . After configuring the repositories you can open gnome terminal through command launcher (press Alt+F2). In command launcher use the command "gnome-terminal" and press return or enter key. The command to use in terminal is "sudo zypper in gkrellm".
  • Download the GKrellWeather plugin from this site. The direct download link is present in this page (OR)  You can download the same from pks.org using this link
  • To Install GKrellM with weather plugin open the terminal (type in "gnome-terminal" after pressing Alt+F2 key). Navigate to the directory of the where your package or rpm is present using cd <space><dirname>. Execute the command "sudo zypper in gnome-shell-extension-weather-0-0.3.git393203b.fc17.noarch gkrellm". You may be prompted to enter the admin password during installation which you need to provide.

Configuring GKrellWeather Plug-in
  • You can find GKrellM under Applications in standard GNOME desktop after installation. Optionally you can take a look at this post to learn how make GKrellM "Remember screen location" & "Set GKrellM as a panel or dock".
  • You need to get the 4 letter ICAO Location Indicator from this site
  • Then apply this code into the apply it to the plug-in as demonstrated below.
Navigate to the required country to display the weather
Locate the necessary location and get the 4 letter code
Right click on GKrellM window and click on configure menu and activate the weather plug-in
Enter the location code and click apply
To View weather updates place your pointer onto the weather plug-in

Add GKrellM to Startup
 If you need GKrellM along with your OS then you need to add it to "gnome-session-properties".
  • Press key combination "Alt+F2" an type in "gnome-session-properties". Launch gnome-session-properties through command launcher.
  • In the session properties windows press the add button. Provide any name of your liking. In the command text box you need to type in "gkrellm" in lower case as demonstrated below. Press "Save" button and from next boot the application will start automatically. 
Launch gnome-session-properties through command launcher(Alt+F2)
Configure Startup parameters

Monday, 30 January 2012

Soup Up GNOME 3 Desktop using Opera Widgets

 This article is about customizing your GNOME 3.2.1 desktop on openSUSE 12.1 . Since GNOME 3 desktops doesn't have any desktop icons the desktop real estate is free to be taken over by widgets , screenlets ,docks etc. I propose using  Opera widgets to decorate your GNOME 3 desktop as well as make it a place where you can read news , get weather updates , track stock market updates , play games, maintain your to-do lists , listen to online radio stations, maintain virtual aquarium and do a host of other things.
GNOME 3 Desktop With Opera  Widgets
Opera
Opera is a modern browser which supports all major web standards currently in use, like CSS 2.1, XHTML 1.1, HTML 4.01, HTML5, WML 2.0, ECMAScript, DOM 2 and SVG 1.1 tiny.It's main focus is on speed of browsing . Its page load speed is pretty good even on dial up connection. It has a lot of neat features like:-
==>Supports browser Add-ons / extensions.
==>Supports desktop widgets.
==>Has an in built torrent client.
==>Has an inbuilt mail client
==>First browser to introduce speed dial first
==>First to introduce syncing for bookmarks and other settings
==>First to introduce tabs concept in browsers
==>Inbuilt RSS reader
Install Opera on openSUSE 12.1 / GNOME 3.2.1
One can use this 1-Click Install to install GTk version of opera on GNOME 3.21 / openSUSE 12.1. The installer / YaSt screens / wizard will guide you through the various steps in the installation process.You may need to type in admin password / passcode when prompted.You may also need to click "accept" / "Trust" when it prompts for accepting  the repository key
Use Opera Widgets
There is no need for installation of a separate widget manager. It comes built into the browser . Once can download the widgets here.Opera defines widgets as "small web programs running outside the browser. Widgets can be both fun and useful, like games or development tools. They float on your desktop for quick and easy access to information or services". For those who are UN-initiated ,starting from version 10.10  Opera provides the ability to run the widgets as standalone applications. After the installation, the widgets can be seen as applications in the GNOME menu as an icon . The widgets on installation create link  under "/ home / <Profile> / bin" .There is no need for the Opera browser to intervene. The widgets run as a separate process.
Each widget can be rearranged according to the need on the desktop.
Widget Launch Links in Bin Folder
Launch widgets Along with OS / Add widget to GNOME startup
To add the widget to the start up on needs to launch "gnome-session-properties" through Alt+F2 command quick launch window.Then add an entry for the required widget in "Add Startup program" pop up windows by clicking add button in "Startup Application preferences". This will essentially start the widget when the gnome session starts up.
Launch gnome-session-properties" through Alt+F2
Add new entry for widget in Gnome Session Startup Manager
Hide The widgets in GNOME window switcher
 When one presses the left windows / Super key on the keyboard (OR) on moves the mouse cursor over "Activities" label in the top panel then the windows switcher can be accessed in GNOME 3 .Through the window switcher one can switch-over from using one application to the other application. In order to hide the widgets from appearing in the window switcher one can right click on each widget and set position" to "always below"
Before hiding widgets they appear in window switcher
Set to Always Below
After Hiding widgets they don't appear in window switcher
Widgets on My Desktop
The various widgets shown here in this post are:-
==>Analog Clock
==>BBC Headlines News
==>dotoo: To-do lists.One more upgraded version of too exists here
==>Stock Monitor
==>Weather forecast.This is a cool tool and has multiple display mode like 5 days forecast , compact mode etc.The display modes can be toggled by clinking on the widget.To set the city one should click the search or magnifying glass like thing on the widget and search for the relevant city and choose the  required city in the search results. The tool also allows users to set the display  of temperature to either Celsius or Fahrenheit
Weather Widget city search

Thursday, 5 January 2012

GKrellM on GNOME 3 openSUSE 12.1

 
 GKrellM is a GTK toolkit  based software that can be used to monitor the status of CPUs, main memory, hard disks, network interfaces, local and remote mailboxes, and many other things. Plugins are available for a multitude of tasks like showing weather updates.This article is an overview of the capabilities of  GKrellM on GNOME 3.2.1 openSUSE 12.1 (ASPARAGUS)
GKrellM is so cool because:-
==>It is compatible with GNOME 3
==>It very light weight
==>It is skinnable
==>Has a number of awesome plugins
==>Easily configurable
==>It can act in panel mode(it will not show up in alt+tab list)
==>I can monitor my monthly internet usage.It can also show day and weekly usage stats too.
Installation Of GkrellM
==>It is available in Main repo(OSS)
==>Open the terminal (type in "gnome-terminal" and hit return or enter after pressing Alt+F2 key combination)
==> Execute the command :- "sudo zypper in gkrellm"
Note:- You may need to enter admin passcode when prompted and press y when it asks you whether it can install so and so software.
Add GKrellM to Startup
How to Start GKrellM along with your OS?
==>If you want to start the application along with GNOME then you need to add it to "gnome-session-properties".
==>Press key combination "Alt+F2" an type in "gnome-session-properties".

==>In the session properties windows,use add button.Give any name of your liking.In the command text-box you need to use "gkrellm" in lower case as demonstrated below. Press "Save" button and from next boot the application will start automatically

Configuring GkrellM
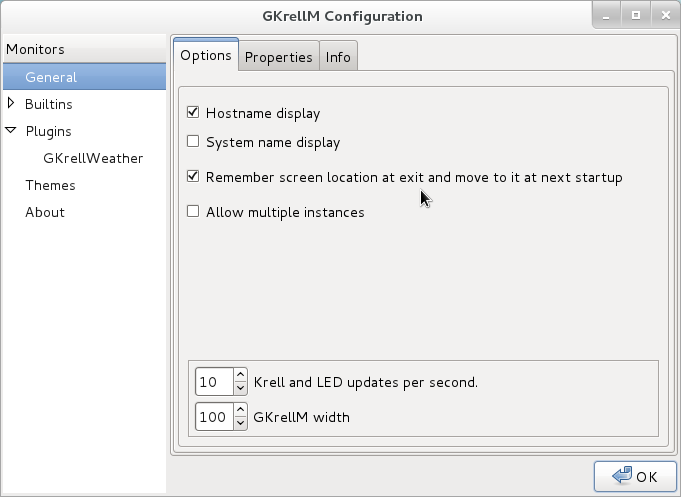
GKrellM can be easily configured.To access the configurations you can right click on the main window and access the configuration menu
Enable Bandwidth and Internet Usage Monitor
View internet data usage
We can view the internet data usage by clicking on the small button which will appear on the bandwidth monitor when the mouse cursor is moved over it
Enable Clock and Time
Remember screen location
This will cause the program to  remember the screen location so that it will show up where it is supposed to be even after restarting the system
Set As panel or dock setting
 This will cause the program to not show up in list of switchable programs when "Alt+Tab" , "Alt+`" key combinations are used.

GKrellM Weather Plugin
GKrellM has a lot of plugins whose rpms can be downloaded first,installed and then activated inside GKrellM settings and then configured to work properly. You can get weather updates on opensuse / linux / gnome using the GKrellM Weather plugin.

Download weather plugin
The program and plugins can be downloaded here:- here and here

Install GKRELLM with weather plugin
==>Open the terminal (type in "gnome-terminal" and hit return or enter after pressing Alt+F2 key combination)
==>Navigate to the directory of the where your package or rpm is present using cd <space><dirname>
==> Execute the command :-"sudo zypper in gkrellm-weather-2.0.8-1.fc16.i686.rpm gkrellm" 
Sample output for zypper installation:-
anonymous@linux-9p85:~/Software/rpms>sudo zypper in gkrellm-weather-2.0.8-1.fc16.i686 gkrellm2
root's password:
Loading repository data...
Reading installed packages...
'gkrellm2' not found in package names. Trying capabilities.
No provider of 'gkrellm2' found.
Resolving package dependencies...
The following NEW packages are going to be installed:
  gkrellm gkrellm-weather libpng12-0
3 new packages to install.
Overall download size: 497.0 KiB. After the operation, additional 1.3 MiB will
be used.
Continue? [y/n/?] (y): y
Retrieving package gkrellm-2.3.5-7.1.2.i586 (1/3), 397.0 KiB (1.1 MiB unpacked)
Retrieving: gkrellm-2.3.5-7.1.2.i586.rpm [done (63.5 KiB/s)]
Retrieving package libpng12-0-1.2.46-9.1.2.i586 (2/3), 73.0 KiB (170.0 KiB unpacked)
Retrieving: libpng12-0-1.2.46-9.1.2.i586.rpm [done (73.3 KiB/s)]
Retrieving package gkrellm-weather-2.0.8-1.fc16.i686 (3/3), 27.0 KiB (55.0 KiB unpacked)
Installing: gkrellm-2.3.5-7.1.2 [done]
Installing: libpng12-0-1.2.46-9.1.2 [done]
Retrieving package gkrellm-weather-2.0.8-1.fc16.i686 (1/3), 27.0 KiB (55.0 KiB unpacked)
Installing: gkrellm-weather-2.0.8-1.fc16 [done]
Additional rpm output:
warning: /var/cache/zypp/packages/rpms/gkrellm-weather-2.0.8-1.fc16.i686.rpm: Header V3 RSA/SHA256 Signature, key ID a82ba4b7: NOKEY

Configuring Weather Plugin
You need to get the 4 letter ICAO Location Indicator from this site
Navigate to the required country to display the weather stations
Locate the necessary location and get the 4 letter code
Right click on GKrellM window and click on configure menu and activate the weather plugin
Enter the location code and click apply
View weather updates
Note:-Similar installation and configuration can b carried out can be carried out for other plugins too.
Skins / Themes GKrellM
GKrellM has a variety of skins that can be downloaded here :- site
Typically the skin packages are available as tar packages like "MonkeyLovers.tar.gz" .You can untar or unzip them through terminal using command "tar -xvf MonkeyLovers.tar.gz" or you can use your favourite GUi based archiving tool like "peazip" or the gnome default "File Roller".

You need to move the skin folder to gkrellm theme folder.Sample path is:- "/home/<HOME>/.gkrellm2/themes/MonkeyLovers".Then you need to right click on the main window and click on "configure" menu and enable or switch to required theme.Alternatively you can click on the main window and use PageUp and PageDown keys to cycle through installed themes
 
Theme switcher
GKrellM in "MonkeyLovers" Theme


If you liked this post, you may like to check out:-


Things to do after moving to openSUSE 12.1 (Asparagus)
                       (OR)