Some Juicy Tidbits
Here are some points to note before taking a look at "M4".
- openSUSE 13.1 is expected to be released around November 2013.
- openSUSE 13.1 will be called "Bottle". Yes, it is "weird".
- openSUSE 13.1 will probably feature GNOME 3.10
- openSUSE 13.1 Live ISO features GNOME Version 3.9.1
- openSUSE 13.1 will replace GStreamer 0.10 with GStreamer 1.0. This can have huge impact on openSUSE / GNOME as multimedia playback, Nautilus preview and many applications depend on GStreamer framework.
- openSUSE 13.1 is expected to drop sysvinit completely and move to systemd completely.
- openSUSE 13.1 will feature a new reborn YaST with a Ruby back-end instead of YCP and the project is progressing well and milestone 4 YaST will be powered by Ruby.
- openSUSE 13.1 M4 Live images written onto USBs using imagewriter supports data persistence ( Hybrid ISO ) across reboots.
- You can access, read and write contents from Hard disk to Live ISO session and vice versa
Live ISO Preparation
Download Live ISO
The openSUSE 13.1 Milestone 4, GNOME live ISO (64 bit ) was downloaded from the developer page using aria2 client which makes use of Metalink technology. Metalink can deliver very fast download speeds since clients support multiple connections, to multiple mirrors, automatically. In addition,
it can do automatic error detection and correction.
Verify ISO
The md5 associated to the ISO was downloaded and the ISO was verified using md5sum command. Ensure that both the ISO and md5 files are in the same folder and run the command as shown below. If you get a "OK" after execution, it indicates that the ISO is not corrupted.
$md5sum -c openSUSE-Factory-GNOME-Live-Build0652-x86_64.iso.md5

openSUSE-Factory-GNOME-Live-Build0652-x86_64.iso: OK
Write ISO onto USB
After verifying the ISO I used SUSE Studio Image Writer to write the ISO onto a blank USB / Flash / Pen / Thumb drive. Imagewriter is available in openSUSE repos. It is also usable on Windows and other Linux distributions like Fedora, Red Hat (RHEL) and Mandriva. The Linux versions can be downloaded from this page.
GNOME Live ISO Overview/Review
The default desktop is no different from GNOME 3.0 and minimalistic but it does have a right click functionality which allows one to :-
- Change Desktop settings (gnome-control-center)
- Change wallpaper
Curiously, the much hated, "Universal Access" settings has been removed from the top panel.
openSUSE 13.1, M4 features GNOME Version 3.9.1 and openSUSE 13.1 will be called "Bottle" . Here is a screenshot of GNOME settings "Details" which can be invoked using command "gnome-control-center" and navigating to "Details".
The Details application can be used to:-
- View System info like openSUSE and GNOME versions, System architecture etc.
- Set default applications for mail, browser, calendar, video, audio and images.
- Set default actions for various removable media like CD, DVD, USB etc.
No major changes were noticed in Nautilus and the preview feature works.
Tweak tool (gnome-tweak-tool) has minimal changes when compared to GNOME 3.6. It now includes facility to customize the wallpaper settings like Stretch, Center, Scale, Span, Zoom and None.
The "Activities" application window has undergone major changes. The applications are no longer grouped under various types like Accessories, Games, Graphics, Internet etc.. There is a button/slider which can be used to switch between full list of applications and recently used applications as shown below.
Though applications are no longer classified into types, two new type of application categorization/grouping have emerged in GNOME 3.9.1 namely "Sundry" and "Utilities". Clicking on these application type/group opens a kind of pop up window revealing applications under those categories. The following screenshot shows applications under "Sundry" Category.
The Application search functionality has been improved in Activities window and the search results appear in an orderly fashion and are grouped appropriately.
GNOME Control Center Improvements
The Control Center has undergone major upgrades and the number of "configurable" items has been increased drastically. Some of them are described below.
The Activities based search can be easily customized through Search Settings to allow/disallow searching for Documents, Contacts, Files and passwords
The Privacy Settings can be used to activate automatic screen locking, setting up of cleaning Temporary files, Remove user name from Top panel / bar etc.
The "Users" setting now has a button which on clicking shows a User's Login history.
Firefox plays html5 videos very well. The video is from Anime "Shingeki no kyojin".
Enabling GNOME Shell Classic
Install GNOME Shell Classic
I use zypper(command line based package manager) to install the package named gnome-shell-classic and the package gets installed successfully as shown below.
$sudo zypper install gnome-shell-classic
Activate GNOME Shell Classic
Open Shell Activities(left win key) and locate YaST and then open /etc/sysconfig Editor. sysconfig Editor can be used to set various system level settings. In sysconfig navigate to Desktop > Window manager > DEFAULT_WM and change it's value from "gnome" to "gnome-classic" as shown below and save it. After logout and login GNOME classic will get applied/enabled.
GNOME Classic Overview
GNOME Classic restores the classic GNOME 2.X desktop on GNOME Shell. You can see the following changes:-
- Main menu and Places menu are seen in top panel.
- Icons are seen on desktop.
- Time is moved right hand side of panel.
- Bottom Panel has an application switcher to show show and switch between opened applications.
- Classic Alt + Tab behaviour is restored.
Default Screen for GNOME classic or GNOME 2.X desktop
GNOME Main menu as seen on GNOME classic
Classic Alt+Tab behaviour
Shortcomings of M4 Live ISO
- GTK YaST works but YaST installer is broken. The workaround is to use ncurses version of YaST or zypper
- The LIVE ISO is a bit laggy.
We had sneak peeks at Dartmouth earlier here ( 1, 2, 3, 4) and it is out now and unlike Mantis did not face any hiccups in the development life cycle. I generally prefer to install any openSUSE version using Live ISOs rather than DVD as they seem to install faster than DVDs, but they do have a downside as they cannot be used for upgrading from older to newer version of the distro.This article is about preparing the ISO image, installing 12.3, things to do before installation and 30+ list of things to do after installing openSUSE 12.3 / GNOME 3.6.2.
How to prepare an ISO?
I downloaded the openSUSE 12.3 GNOME live ISO which is available through download page. I usually download my ISOs through torrent as it is:-
- Much faster compared to direct downloads.
- More reliable as after downloading them i can "verify" or
hash check the downloaded file to ensure the integrity of the ISO.
- Allows me to stop and resume downloads.
I burned / wrote it onto a flash drive using SUSE Studio Image writer. For those trying to burn 12.3 Live ISOs onto CDs there is bad news. The new Live ISOs don't fit on a CD and size of ISO is nearly a GB. For example the 64 bit version of GNOME is of size (890 MB). They can be written onto DVDs though.
Why a fresh install is better?
I usually prefer a fresh install instead of upgrade because:-
- There is always a danger of incompatible libraries between old versions and newer versions on GNOME as well as openSUSE
- Sometimes there are even architectural changes between various of release like usr merge and systemd etc..
What are the things to do before installation?
Verify downloaded media
We need to verify the downloaded ISO image using the md5sum command and compare the output from terminal to that of the md5 files obtained from download page. Running the following command should give you an output like "29725b..." which you can check against the content inside md5 files.
md5sum openSUSE-12.3-GNOME-Live-x86_64.iso
Read Release Notes
We obviously need to read through the release notes before starting any installation. Some important pointers are:-
- There would be "No Network after Installation". You may need to reboot the machine once manually. Yeah this is a real downer :-(
- Since 12.3 uses systemd you need to use commands like
"sudo systemctl restart network.service" instead of "sudo /etc/init.d/network restart". An example is given here.
- Systemd: Cleaning Directories (/tmp and /var/tmp). By default, systemd cleans tmp directories daily as configured in
/usr/lib/tmpfiles.d/tmp.conf. Users can change it by copying /usr/lib/tmpfiles.d/tmp.conf to /etc/tmpfiles.d/tmp.conf and modifying the copied file. It will override /usr/lib/tmpfiles.d/tmp.conf.
Backup data and settings
The following are the things to backup before proceeding with new installation.
- You obviously need to backup all your data files like videos, mp3s, text files, pdfs etc:
- You may also want to backup settings of the applications you have used before so that you need not loose any data and re-customize the applications on your new installation. To access your old application settings you should open nautilus (assuming you are using previous versions of GNOME) and then press
"ctrl+h" and then navigate to your home directory. Some of the directories i would back up would be:-
- Notes from tomboy which are available in directory
~/.local/share/tomboy.
- Old stats folder for gkrellm available in directory
~/.gkrellm2.
- Old bookmarks and browser (Firefox, Seamonkey) related settings which are present in
~/.mozilla.
- You can backup your thunderbird mails which are available from
~/.thunderbird
- Although not recommended you can also backup installed gnome shell extensions and migrate them to new desktop. The extension files are located in
~/.local/share/gnome-shell/extensions
- You may migrate your old themes from
~/.themes
- You can migrate the custom application menus you created using alacrate from here
~/.local/share/application.
- If you use FreeRapid then you may want to backup the settings folder so that you can retain history of your downloads. The settings folders are
~/.FRD.
Note:- ~ means /home/<profileName> i.e. /home/<profileName>/.FRD is the same as ~/.FRD.
Installation:-
As usual openSUSE installation is pretty straight forward and what i am describing here applies to installation from a Live ISO. You need to plugin the USB into your system and while booting press F10 or whatever function key which allows you to get the "boot from media" menu. Here we need to choose the USB device.
- I would recommend booting into the LIVE session first and test a few things by opening some applications, testing sound etc to ensure that the installation media is good.
- Then we can reboot and choose the "installation" menu to start the installation.
- In the first screen you can choose the right keyboard layout and Locale / Language settings.
- Then you can choose the place you live on the world map to set
the time / timezone right. You may opt to disable the setting "Set Hardware
clock to UTC...". This will cause issues if you dual boot with another OS. The other OS would always show UTC / GMT time.
- In the next screen YaST would offer you the best installation and partition setup based on your system configuration. You may choose to import your existing partition setup or even use the "Expert" option to do custom partitioning.
- In the next screen you can create a "user" and set the password for that user. You will also notice that this password would also be your root or admin user password.
- After you confirm the settings, the installation will begin and after a few minutes the installer will ask you to reboot and upon rebooting an automated configuration process takes over and does some magic and finally your will be logged into the DE which you have opted to install.
Things to do after installing openSUSE 12.3 / GNOME 3.6.2
Steps to open terminal:-
In terminal you can easily run various commands to install various software. During installation you will need to provide the admin password that you have entered during installation. You can open command launcher (Alt+F2) and then use the command ("gnome-terminal") to open a GNOME terminal.
Steps to refresh desktop:-
To refresh the GNOME desktop you press "Alt+F2" which opens the command launcher and use the command "r" and hit return or enter key. This will refresh / restart your GNOME 3.X desktop.
Notes about Zypper:-
sudo - It is a command used to elevate permission to "root" user level
zypper :- zypper is a package manager used in openSUSE . You may also read about Understanding "Package Management" in Linux
in :- this option is used to instruct zypper to install the packages following the option.
You can check Man for zypper or take a look here for more details.
01.)Configure Community repositories
Setting up of the "Community repositories" is the first step in setting up our system. You can take a look at this article to configure the repos.
02.)Check For Updates
To check for updates you can open the terminal and use the command "sudo zypper up" to check for available updates. You will be surprised about the number of updates that are waiting to get installed.
03.)Improve multimedia experience
openSUSE installation doesn't provide codecs for any of the restricted multimedia formats like mp3. There is a famous "1 click Install" procedure to overcome this predicament here. The recommended one-click for gnome desktop is named "codecs-gnome.ymp". Once you click on the installer, you need to be ready with your mouse and click on "Agree / I trust" buttons that appears endlessly one after the other. Finally, we need to refresh the desktop.
04.)Install your backed up application profiles
You can opt to move all the application profiles which you have backed up to respective folders on your new installation. Sometimes we may need to change ownership of these files and folders if you see an "X" marked on the file or folder icon in Nautilus. To do this we open a terminal and then we can apply the "change ownership" command on all folders and subfolders by running the command "sudo chown -R <profileName> /home/<profileName>/" in the terminal.
05.)Install Banshee
The default audio jukebox on openSUSE 12.3 is Rhythmbox. But if you need Banshee then you can open the terminal and run the command. "sudo zypper in banshee banshee-extensions-default". It integrates well with Media Player Indicator which is a Gnome Shell Extension. The extension allows you to control playback, volume and also preview cover art of the track that is playing.
06.)Install Mp3 support
If you don't have mp3 support even after using the above one click in step3 and you get an error that you need "Advanced Streaming Format (ASF) demuxer", then you need to install mp3 codec by running the command "sudo zypper in gstreamer-0_10-fluendo-mp3" in the terminal.
07.)Install Video player
The default video player Totem is pretty good but not good enough. It is better to go in for a "mplayer" based media player so that most of the media formats are supported. You should consider using mplayer2 backend which claims to be better than standard mplayer backend. We can open terminal and run the following commands to install various video players.
Install gnome-mplayer
sudo zypper in gnome-mplayer mplayer2-as-mplayer (or) sudo zypper in gnome-mplayer
Install smplayer
sudo zypper in smplayer2 mplayer2 (or) sudo zypper in smplayer
Install umplayer
sudo zypper in umplayer mplayer2-as-umplayer (or) sudo zypper in umplayer
08.)Install Note Making application
If you need to use stickies or note making application then we need to install Tomboy. To install tomboy you open gnome terminal and run the command "sudo zypper in tomboy" to install Tomboy. Once you open the application it will automatically detect the old notes from your old profile which you have migrated to "~/.local/share/tomboy".
09.)Install GKrellM
By installing GKrellM you can get various stats like internet, CPU usage etc. To install GKrellM you can run the command "sudo zypper in gkrellm" in terminal. You can see your old internet usage stats if you had migrated your old stats to "~/.gkrellm2".
10.)Install offline dictionary
Artha is a cool offline dictionary which has many advanced features and is very useful in day to day life. You can run the command "sudo zypper in artha" in terminal. You can access artha once it is started through the key combination "ctrl+alt+w".
11.)Install favourite web browser
openSUSE 12.3 / GNOME 3.6 comes with Firefox as default browser. For installing any other browser you can run the following commands in terminal.
GUI based browsers
To install SeaMonkey (Web-browser, advanced e-mail, newsgroup and feed client, IRC chat, and HTML editing made simple—all your Internet needs in one application.) use "sudo zypper in seamonkey"
To install Opera (really fast browser with inbuilt email client, torrent client and a irc chat client ) use "sudo zypper in opera-gtk"
To install Chromium (open-source clone of infamous google chrome) use "sudo zypper in chromium"
To install Epiphany (default browser for GNOME desktop) execute the command "sudo zypper in epiphany"
To install midori (light weight webkit based browser) use "sudo zypper in midori"
Text based browsers
Unlike browsers which support javascript, flash and other plugins text browsers are as the name suggests can only render the text from any webpage. Many major sites do support text browsing.
To install Links use the command "sudo zypper in links"
To install Lynx use the command "sudo zypper in lynx"
To install w3m use the command "sudo zypper in w3m"
12.)Install Bleachbit
Bleachbit is essentially a clean up tool for your Linux desktop. According to the Bleachbit website it identifies and erases broken menu entries, cache, cookies, localizations, recent document lists, and temporary files in Firefox, OpenOffice.org, Bash, and 50 other applications. It is your Linux equivalent of ccleaner in windows. You can install Bleachbit in terminal using the command "sudo zypper in bleachbit".
13.)Install Image editor
12.3 comes with GIMP pre-installed but, If you want a light-weight, basic image editor then you can go in for Pinta. Pinta is the Linux equivalent of Paint.NET on windows. To install Pinta you can execute the command "sudo zypper in pinta" in terminal
14.)Install Sun Java JDK / JRE / browser plugin
openSUSE comes bundled with a community version of Java called openJDK and a browser plugin called icedtea-web. This should be good enough for most of the users but if you do need Oracle/Sun java then read on.
Due to some licensing issues, Oracle (Sun) Java/ JRE could not be distributed through the official repositories of openSUSE, since openSUSE 12.1.
You need JDK if you want to develop something using JAVA. If you just want to run some jars and some applets in the browser like Firefox then you need to install JRE and JAVA Plugin. Here is a official quick guide to install the newest and secure version of Java. For people who just want the software and averse to long installation procedures i would suggest installing them from user maintained repositories. openSUSE don't guarantee any stuff downloaded from user maintained repositories. I usually install Java from user maintained repositories and they work just fine. Before installing Oracle JRE you should remove openJDK by executing the following command in terminal.
sudo zypper rm -u java-1_7_0-openjdk icedtea-web
You can find "1 Click Install" links for JRE 1.6 here. You can get JRE 1.7 here.
Similarly you can get JDK 1.6 here. You can get JDK 1.7 here.
15.)Install GNOME Shell Extensions / Remove Annoying "Universal Access"
According to GNOME site GNOME Shell extensions are small pieces of code written by third party developers that modify the way GNOME works. If you are familiar with Firefox Addons or Chrome Extensions , GNOME Shell extensions are similar to them. You can take a look at a few of the extensions in this post.
16.)Install Acrobat reader
Evince is the default pdf document viewer for the GNOME desktop. It is already installed on openSUSE 12.2. For day to day purposes, Evince is good enough. But it is not rich in features like Acrobat reader. To install Acrobat Reader use the command "sudo zypper in acroread" in terminal.
17.)Enable desktop icons
To enable desktop icons we need to make nautilus as desktop manager instead of gnome shell. To do this we should open the command launcher (Alt+F2) and use the command "gnome-tweak-tool" and open Advanced Settings tool. Here we can select "Desktop" in the navigation tree on the left and then turn ON nautilus as the desktop manager. You can optionally turn ON other options like "Computer Icon", "Home Icon", "Network Icon", "Trash Icon" etc...
18.)Enable location bar in Nautilus
One can enable location bar instead of path bar in nautilus. The advantages of using location bar are that you can always see the full path of the folder you are in and also copy paste the same if required. we should open the command launcher (Alt+F2) and type in "gnome-tweak-tool" and hit return key. You can then select "Files" in the navigation tree on the left and then turn "ON" the required option as shown below.
19.)Enable minimize maximize and close buttons in all applications
One can easily enable minimize maximize and close buttons in all application windows in GNOME Shell. To do this we must open the command launcher (Alt+F2). Then type in "gnome-tweak-tool" and hit return key. You can select "Shell" in the navigation tree on the left and then select the required option which is "All" in menu "Arrangement of buttons on the title bar" as shown below. One can also enable other cool options like date in calendar which gets displayed in top panel, configure shutdown options etc.
20.)Customize the Dash menu
The Dash menu is the menu bar which appear on the left hand side of the screen if you press the left windows key on your keyboard. You can easily Add and remove items, rearrange items in the DASH. A detailed post about customizing the DASH is available here
21.)Add programs to start up
You can easily Add and Remove items to start up of your GNOME session. Open the command launcher (Alt+F2). Then type in "gnome-session-properties" and hit the return key. In this window you can click the "add" button on the right hand side of the window which will in turn open up a new window where you can type in the command that will launch the relevant applications when the system starts up. I would typically add the following applications to the startup of my GNOME based system:-
- Network Monitoring Tool(GKrellM)
- Offline Dictionary(Artha)
- Note Making Application(Tomboy)
Adding items to GNOME session startup
22.)Change Themes
Dark theme lovers can start rejoicing as "Adwaita" supports dark themes now. Dark theme support can be turned ON using the relevant slider as shown below in "gnome-tweak-tool".
23.)Change default applications
If you need to change default applications on your desktop e.g.You want to make Opera default browser instead of Firefox then you should Open the command launcher (Alt+F2). Then type in "gnome-control-center" and hit the return key. This will open "Settings" where you can locate an application/applet by name "Details" under "System" category. Open "Details" and navigate to "Default Applications" on the tree like menu on the left hand side of the application. Here you can change the default applications of your system.
24.)Force applications to appear in openwith list
If you want some rogue applications to appear in nautilus file "open with" list (Or) when you right click on a file then you essentially need to edit the launcher in GNOME 3 applications using Alacarte(menu editor) and add a %U after the command. For detailed explanation take a look at this post.
25.)Install archive manager
Even though openSUSE 12.3 comes with a good archive manager in the form of File Roller we usually require archive mangers that have advanced functions
- Splitting the file into multiple parts and rejoin the split file
- Handle multiple file formats(7zip, xz, bzip2, gzip, zip, tar)
- Create self extracting executables
- Encrypt archived files
- Test archived files
- Accessible through right click in Nautilus
J7Z is one such cool archive manager which satisfies all the above requirements and more. It has built in themes / skins too. To install J7Z we can run the command "sudo zypper in j7z" and then press return or enter key in a terminal.
26.)Install clipboard manager
For power users who miss the GNOME 2.X clipboard applet which was sitting prettily on the panel and wish you had similar application on your GNOME 3.X desktop then Glipper or Parcellite comes to your rescue. To install Glipper run the command "sudo zypper in glipper" in terminal. To install Parcellite use the command "sudo zypper in parcellite" in terminal. Parcellite and Glibber automatically adds itself to the start up list and will start automatically when you boot GNOME, next time.
27.)Enable icons in buttons and Menus
To do this you can take a look at this post (GNOME Shell Context Menu Appearing Plain without Icons)
28.)Make things easy using Nautilus Actions
Actions is useful in adding custom menu items to the right click menu and execute arbitrary commands. It provides a way to automate many day to day tasks like image conversion, opening Nautilus in admin mode etc.Why should we use Nautilus Actions?
29.)Change right click options on files
This is about setting a list of open with applications and setting default applications for any file. For more information you can take a look at Changing right click options for files on GNOME 3.X desktop.
30.)Creating custom keyboard shortcuts
You can use the "keyboard settings" tool under Activities(Alt+F1) and create custom keyboard shortcuts to run scripts,execute jars etc.. For more details you can take a look at Custom Keyboard Shortcuts on GNOME 3.x desktop
31.)Create custom menus or application shortcuts in GNOME
In order to create a new menu in the Accessibility dropdown or add your own application launcher to the panel you can take a look at Adding custom menus or application shortcuts to GNOME 3.X panel
32.)Force some programs to appear in openwith menu
You can follow the method described in step 29 or check out editing of launcher using alacarte in Force programs to appear in open with list on GNOME 3.x desktop
33.)Read through GNOME Cheat Sheet
GNOME 3.X desktop have lot of cool inbuilt features like creating screen recordings, desktop refresh, theme refresh etc.. You can learn many thing by reading GnomeShell/CheatSheet
34.)Read about various GNOME 3.6 features
Various GNOME 3.6.X features were covered by me through
35.)DVD authoring tools
Bombono DVD is a DVD authoring program for Linux. It is made easy to use and has nice and clean GUI (Gtk). To install Bombono you can run the command "sudo zypper in bombono" in terminal. It is very easy to create Video DVDs from individual video files using Bombono.
36.)DVD Image Slideshows
Imagination is a lightweight and simple DVD slide show maker for Linux. If you have a large collection of images and you want to burn them with a sound track this would be the go-to tool for you. To install Imagination you can use the command "sudo zypper in imagination" in terminal.
Why does openSUSE always ship older versions of GNOME ?
It has been three months since openSUSE 12.3 Milestone 1 GNOME 3.6 has been released and I am eagerly waiting for getting my hands on GNOME 3.6. Somehow or the other openSUSE always falls behind other distros in packaging the latest version of GNOME 3.X. I know that it is possible to install GNOME 3.6 on openSUSE 12.2, but it is not officially supported. openSUSE 12.2 was released on Sep 5th 2012 and GNOME 3.6 was released on Sep 24th 2012 and hence openSUSE 12.2 came out with GNOME 3.4 version :-(. As the old saying goes "History repeats itself" and openSUSE 12.3 is scheduled to come out on "13 Mar 2013" but GNOME 3.8 is scheduled for release on "27 March 2013" which is a couple of weeks after openSUSE comes out. Hopefully by the time 13.1 comes out both schedules will gets synced and openSUSE will ship latest version of GNOME :-)
openSUSE 12.3 RC1 GNOME 3.6 Live ISO
I have followed a procedure similar to what is described in Sneak Peek at KDE / openSUSE 12.3 RC1 Live ISO to download and boot into GNOME 3.6 Live ISO. The slight difference being that when i tried to boot GNOME Live ISO from MicroSD it refused to boot. Then I had to write the ISO onto a USB / Pen drive and boot from it.
First impressions
- The default wallpaper is cool and is titled "grow".
- The animations / desktop effects are smooth. The dimming effects are especially good.
- The desktop feels a lot snappier and faster.
Screenshots
The wallpaper is similar on both KDE as well as GNOME and the default GNOME desktop is as bland and minimalistic as ever.
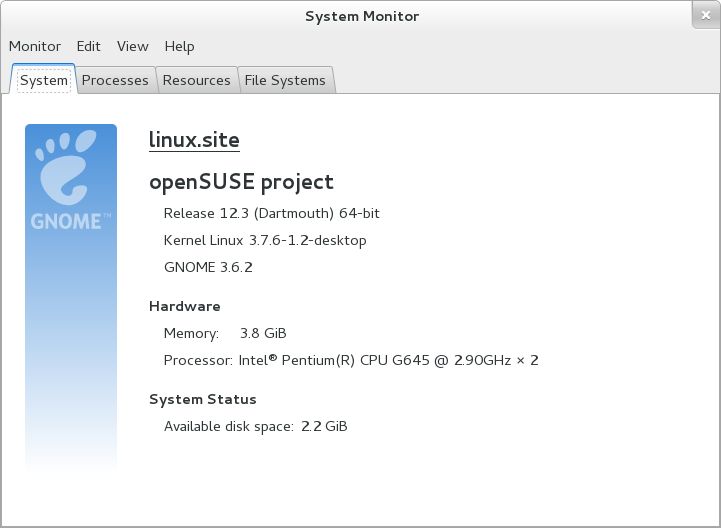
"GNOME System Monitor" can be launched from command launcher (Alt+F2) using command "gnome-system-monitor". The System monitor shows that openSUSE 12.3 / GNOME 3.6 will ship kernel version 3.7.x and GNOME version 3.6.2.
The below Screenshot shows "YaST" tool and System Settings (gnome-control-center) where most of the system related settings are configured in openSUSE.
It is pretty easy to set up "Online accounts" with Skydrive and Google Docs. First we press the left "win" key and to bring up Activities. Here we can type "online" and "Online Accounts" application will appear in Activities. We can then open the application and click on the plus (+) button and use the wizard to add new accounts .
After configuring "online accounts" we can open "Documents" application which will automatically pull the list of documents saved online as well as documents present on our harddisk. The below screenshot shows as how how we can check the pdfs we own, both online as well as offline. Documents application can be also launched through command launcher (Alt+F2) using command "gnome-documents".
In Alacarte, the "Revert" button is changed to a "Restore System Configuration" button in GNOME version 3.6. This button will restore the default set of applications in the "Applications menu" if you had turned "off" some of the applications earlier.
Ctrl+Alt+Tab key combination will bring up the accessibility switcher in Activities window and it now allows one to switch to "Message Tray" too.
Various functionalities from GNOME 2.X desktop can be reclaimed on GNOME 3.6 using GNOME shell extensions. The below screenshot shows the GNOME 2.X Application menu and Places menu restored on the top panel. We can also get Legacy Tray icons (Liferea icon) restored using "TopIcons" extension.
The extensions can be installed by toggling the "ON/OFF" slider on each extension page and then clicking the install button when the pop-up appears as shown below. The article 10 + GNOME Shell extensions that I found useful explains the working of a few extensions.
The "Shell Extension Preferences" application can be used to change the settings of individual extensions. This application can be launched through command launcher (Alt+F2) using command "gnome-shell-extension-prefs". The below screen shot shows the available settings for "NetSpeed" shell extension.
openSUSE 12.3 / GNOME 3.6 packs a two pane file manager called Midnight Commander probably to attract hard code command-line enthusiasts as it does have a legacy feel to it.
The fallback mode which imitates the classic GNOME 2.X desktop look is same as ever and one can add applets to panel by pressing on "Alt" key and then "right clicking" on the panel. The panel also features the all to familiar application window list. I could successfully add a "minimize all" applet, search applet etc... to the panel.
Also take a look at openSUSE 12.3 Milestone 1 GNOME 3.6 where I have described changes related to GNOME Tweak Tool, Nautilus, Activites window, File preview and dimming desktop effects.
I saw a spare MicroSD card lying around when I had a brain wave. I loaded the MicroSD onto a USB Card reader and proceeded to download KDE Live ISO (openSUSE 12.3 RC1) from openSUSE development site using Transmission. After downloading it I burnt the image onto the Micro SD card using SUSE Studio ImageWriter. This article is being written from the Live KDE ISO to test the stability of the system.
Few thoughts about KDE RC1 Live ISO
- Good looking default theme and wallpaper. The desktop seems to be kind of "Tronish". The new wallpaper can be downloaded from this link and is titled "grow". The wallpaper is an winning entry from a contest organised through Flickr. You can view all the submissions for the contest here.
- Great progress has been made in the "looks" department from the last time i too a look at it. openSUSE 12.3 Milestone 1 KDE 4.9.2
- The desktop effects are smooth and fluid and it is a lot less glassy compared to earlier openSUSE/KDE avatars.
- Even though it is a RC1 release, ISO image is of top grade quality. There were no hiccups when booting using the ISO.
- Browsing does work on the Live ISO which is a big plus. I could play only WebM encoded files like this one "Adobe Flash Versus GNOME Totem Vegas webm" in Firefox as native "h.264" support doesn't seem to be available. Many videos in youtube complain that flash is not installed, but they start playing once I closed the error window which seemed kind of funny.
- In Dolphin (File manger) everything is invoked through "single click" which can be a pain sometimes.
Screenshots
Default desktop has a openSUSE greeter and provides links to key webpages associated with the project .
On clicking the "KInfocenter" icon in the desktop we get to see that openSUSE 12.3 will most probably be shipping kernel 3.7.x and KDE version 4.10. KInfocenter is a nice tool to have and does provide a lot of nice info about Hardware configuration of the underlying system.
Firefox playing a WebM encoded video in youtube.
A lot of plasma widgets come pre-installed. You can see Weather, Calendar, RSS feed ticker, Hardware information and Disk Space widget in the below screenshot.
To open the widget browser we need to Right click on panel ==> Navigate to Panel options ==> Add Widgets ==> Get New Widgets ==> Download New Plasma Widgets. This tool will allow us to add more widgets to the desktop. At long last I am in widget heaven :-)
For those who prefer a more contemporary desktop there is "Desktop Icons Activity". The Activity manager can be accessed by clicking the icon next to the kickoff menu (Alt+F1).
The following screenshot shows two main configuration tools available on openSUSE namely "YaST" and "KDE Settings"
Konqueror passes youtube's html5 test but Firfox doesn't.
When I wanted to read a pdf i found that there is no pdf reader on Live ISO? In these days when even cheap mobiles have all kinds of document readers, I feel that Live ISOs ought to have some kind of readers on them.
Apper notification indicate that I need to update some packages indicating that openSUSE 12.3 is still under heavy development :-) When I click on the notification, it shows the packages that I need to update.
Found KWrite to be a exceptionally easy to use. I liked as to how "Find & Replace" function has been implemented. It highlights all replacements and the number of replacements made. Kwrite has a vi editor mode (Win key+Ctrl+v) which allows "vi" enthusiasts to edit text using commands (dd does delete entire line in this mode).
Final Thoughts
- Lot of widgets, desktop effects, great theme and other eye-candy are available.
- The new KDE does makes all the right noises and sounds.
- But the Live ISO cannot be used on a day to day basis as it doesn't pack any document reader, dictionary and other niche tools.
- SUSE Studio ImageWriter cannot create persistent USBs which is a real bummer.
HAIKU is an opensource OS that is targeted at the personal computing market. It is developed by the Haiku Project and takes its inspiration from BeOS. It's kernel is based on NewOS. Haiku recently announced release of Haiku Release 1 Alpha 4. Haiku OS is named after classical Japanese poetry form which is known elegance and simplicity. I am pretty excited about Haiku because
- Haiku looks cool and has a mature and sleek user interface.
- It offers a non Linux based opensource OS which is hard to come by.
- It supports Bash scripting.
Getting Haiku
I downloaded the Anyboot image torrent file from this page and used my trusted transmission torrent client on GNOME 3.X desktop to download the image. Anyboot images are the preferred distribution format. I prefer torrents for ISO downloads as it provides download resumption and hash checking of downloaded files. Many of the times torrent based downloads are faster than regular downloads as the download speed is not dependant on Server Bandwidth.
Verifying Haiku image
After completion of the download i extracted the archive contents into a folder in Nautilus and then navigated to the folder where the image is present . Then i right clicked inside the folder and chose "Open in Terminal" menu and opened a terminal window. Then i ran the command "md5sum haiku-r1alpha4-anyboot.image". The output of this command is a hash code and this should be same as the one mentioned in this page. I copied the hash from terminal and then compared it to the one at Haiku's website. Now that the integrity of the image has been confirmed it is time to produce a bootable USb out of Haiku Image.
Booting from USB Image
I plugged the USB device onto my machine and then ran the command "umount sdb1" in the terminal that was opened earlier where sdb1 is the device name of my flash drive. This step will ensure that i have unmounted the device. Then i ran the command "sudo dd if=haiku-r1alpha4-anyboot.image of=/dev/sdb bs=1M". For more info you may refer to this page. If you are wondering as to why i used sdb instead of sdb1 then the explanation is here. Then i tweaked my BIOS to make the USB my first boot device and hit F10 to save the setting and exit BIOS.
Haiku Overview
The first thing i noticed after booting into Haiku was that the OS did not look like a alpha version. The following screenshot shows the default Haiku desktop with
- Desktop icons at the top left and the default wallpaper with the Haiku banner. The position of the banner is customisable.
- Workspaces desktop applet occupies the bottom left . It allows one to switch between workspaces.
- Deskbar sits on the top right hand side. It behaves in a fashion similar to a Windows 7 / XP taskbar or a GNOME panel.
- The Launch Box on the right hand side of the screenshot is similar to a dock in Mac OS. It can be used as a application launcher for regularly used applications.
The following "About" screen shows various system related information like version of OS, Processor information, Memory information, Kernel version and system Up time.
Fix sound issue
Everything worked fine except the sound. It seems that for many users the sound works out of box but my system was an exception. When mp3 files were played I could see waveforms appearing on the player but couldn't find sound output on the speaker. I found the solution to the problem in Haiku forums . With little help from the irc channel i could install "opensound" driver and remove the hda driver. Here are the steps i followed:-
- Open terminal by right clicking on desktop and then choosing "Addons" and then the "open terminal" option.
- Then install opensound driver by running the command "installoptionalpackage -a opensound" without quotes in the terminal.
- Run the command "query hda" without quotes to find the locations where "hda" is present. Then I navigated to all those folders and then typed the command "open <folderName>" to open the folder in a file viewer application called tracker. Then I right clicked and used "MoveTo" option to move the driver to the desktop. One can also use the mv command "mv /system/add-ons/kernel/drivers/bin/hda /system/add-ons/kernel/drivers/bin/hda.disabled" to accomplish this task.
- Restart OS by right clicking on Deskbar and choosing "Shutdown" ==> "Restart System".
- On restarting the OS sound worked.
Change Alt and Ctrl keymaps
By default the functions of Alt and Ctrl keys on the keyboard are reversed. For example the application switcher would be invoked using "Ctrl+Tab" instead of "Alt+Tab". If you need the use the regular Alt format then you need to right click on Deskbar and then chose the option "Preferences" and then the sub option "Keymap". In Keymap you need to click the button labelled "Switch shortcut keys to windows/Linux format" to change the relevant setting.
Multimedia Challenge
I had earlier written a post about the various media players on Linux and I wanted to test the multimedia support offered by Haiku. Haiku offers amazing level of support for various audio and video formats out of box. The media players in Haiku could play almost all forms of media that were thrown at them. The video file extension Haiku could play were flv, webem, 3gp, mkv, 3g2, avi, m4v, ogg, mov, m2v, mp4, avi. It couldn't play asf, rm and rmkv formats. I got the sample video files for from here(skydrive) and here(apple) for testing the players. The audio file samples wav, mp3, midi from this site also worked.
Folder Structure
The folder structure is a lot similar to that found in Unix or Linux with a home folder which has the user related files and system folder which had OS relate files. The application which is used for file and folder management is called Tracker
By changing the settings the tracker looks much better and provides more navigation aids like arrows for moving forward and backward between folder locations and also provides an arrow icon for moving up in folder hierarchy. We can also see a location bar in Tracker now.
Maximize, Tile, Restore & Close Windows
- With reference to the above screenshot in order to maximize a window one must click on the double rectangle icon at the top bar of any window.
- To restore the window one use the same double rectangle icon.
- When double clicked on the title of any window the windows will get tiled and appear below the Deskbar at the top right hand side of the desktop.
- To close any window one must click on the square icon on the left hand side of yellow bar.
Desktop Preferences Menu
The various desktop preferences like Window appearance ( Appearance ), Sound card settings ( Media ), Mouse Settings, Keyboard Settings, Network Settings, Monitor resolution(Screen) can be changed by right clickling on the Deskbar and then choosing the "Preferences" menu. Then the the relevant tool or applet has to be chosen. The following screenshot shows the preferences menu on the right hand side of the screen.
Applications Menu
The various applications installed on Haiku can be accessed through the Applications menu which can be availed by right clicking on the Deskbar as shown below. Various applications come pre--installed on Haiku and some are described below.
Browser
The default web browser on Haiku is called WebPositive. It is based on Webkit engine. It is a minimalistic, light weight browser. It supports bookmarks, tabbed browsing, search from url bar and proxy. The following screenshot shows skydrive website opened inside WebPositive. The screenshot also shows the browsers' inbuilt download manager window with a file download in progress. It is not html5 ready as of now according to www.html5test.com.
PDf Viewer
The PDF viewer in Haiku is called BePF and it supports bookmarks and sports a sidebar through which one can navigate between pages. It supports basic annotation.
IRC Client
Haiku comes with a IRC (Internet Relay Chat) client called Vision which can be used to connect to various IRC channels located on various servers. On clicking the connect button Vision directly connects to the official "#haiku" channel on server "irc.freenode.net". I really loved this setting.
Editor
Pe is a powerful editor which comes bundled with Haiku. It can can be used to edit bash scripts and can even run basic bash scripts so that you can test the scripts on the go. The following screenshot shows Pe executing the command "alert hi" where "alert" is the command which opens a alert box in Haiku and "hi" is the message or string that should get displayed in the body of the alert box.
Pe also packs advanced features like a compare tool which can show differences between contents of two files. This is very useful feature and will be particularly helpful if on needs to compare two versions of the same source code file.
Conclusion
With its power packed features and nice interface Haiku will definitely gain more popularity as time goes. One more plus is that there is rich documentation, guides and tutorials available on Haiku website. I would definitely recommend one and all to try out Haiku and contribute to this novel project. It remains to be seen how Haiku is going to incorporate a good office suit and come out with a fully functional OS.
Few Links