Why should we use Nautilus Actions?
Nautilus is the default file manager on GNOME desktop. Nautilus-Actions is an extension for Nautilus file manager which allows one to launch arbitrary applications on files. "Actions" brings in the coolness that is missing in Nautilus. Simply put, it allows you to automate some of the daily activities on your desktop like:-
- Changing Ownership of files.
- Converting images from png to jpg.
- Creating desktop shorcuts.
- Enqueue audio, video files into media players.
- Invoking "Fortune".
- Open file as Admin mode.
- On demand Virus scanning of files.
- Running a Jar. etc...
All of the above list of activities can be implemented without referring any bulky manual. Using Nautilus-Actions, we can pack lot of custom functions into the right click (or) context menu.
Install Nautilus Actions on openSUSE 12.2, GNOME 3.4.2
Step1:-
First we need to configure community repos in YaST. The procedure would be similar to what is described here.
Step 2:-
After configuring YaST we can install Nautilus-Actions using either YaST or Zypper.
Installation using Zypper
sudo zypper in nautilus-actions
Notes:- sudo switches permissions to super user; zypper is the package manager in openSUSE; in instructs zypper to install packages
Installation using YaST
It is pretty easy to install packages using YaST. All one needs to do is open YaST installer and locate relevant packages (nautilus-actions) and install them. Here is a video (YaST Installer Video Demo) demonstrating installation of packages using YaST.
Launch Nautilus-Actions Configuration Tool
After installation you can easily locate Nautilus-Actions in GNOME Shell Activities(Alt+F1)by searching for "Actions" as shown below.
Alternatively you can launch it using the command "nautilus-actions-config-tool" from Quick launcher (or) Command launcher (Alt+F2).
Using Nautilus-Actions Configuration Tool
Using the configuration tool is very easy. You can easily figure out various things by reading various Tooltips that are available in the tool. For example, one can find the functionality of each tab by hovering the mouse on top of them as shown below.
Creating "Change File Owner" Menu
Let us start off by creating a simple menu that allows us to create a context menu to change ownership of selected files to that of logged-in user. We use the "chown" command to accomplish this.Click on the create "New Action" icon or press "Ctrl+N" to create a menu item. Then you can provide an appropriate name for the menu entry.
Then we open the "Command" tab and configure the relevant commands to change the ownership of selected files. In "Path" textbox you can provide the path to the executable or you can just type in the command alone. In the "Parameters" textbox you can type in the parameters like "user" to whom the file should belong to and %F which represents coma separated list of file names. By clicking the "Legend" button you can get the various parameter options that are available for use.
If you would like to see output of command in an alert box, then you can configure the same in "Execution" tab and by selecting "Display output" option.
Checking whether "Change Owner" works
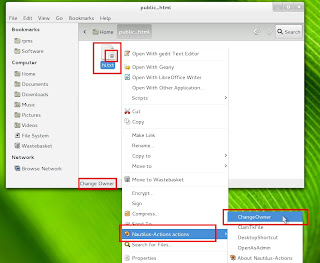
I have created a sample text file and made "root" user as it's owner. Now we see a "X" icon on the file indicating that the file is not "owned" by the logged-in user. We now use our newly created context menu and check whether we can change the owner of the file.
After supplying root password we find the command execution in an alert.
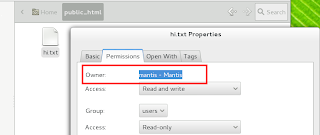
When we right click on file now and check the file properties, we find that the logged in user or "mantis" is the owner of the file. The context menu works :-)
On Demand Virus Scanning
ClamTk(Anti-Virus Scanner) can be installed using "1 Click Install" links from this page. After installing clam you can create a custom "Clam Scan menu" to scan selected files.
Image Conversion using right Click Menu
Images can be converted from one format to another using a command line tool called "ImageMagick". It can be installed using "1 Click Install" links from here. After installation we can create a custom menu to convert images from one format to another. Assuming that we need to convert "png" files to "jpg" file, we need to implement the command "mogrify -format jpg <source>.png". It can be done as shown below.
To ensure that the image conversion context menu appears only on "png" files and not on any other file format like "jpg" we need to add "MimeType" data in Nautilus-Actions. To do this, we right click and find Mimetype data in properties of files for which the conversion menu should appear as shown below.
Then we add the MimeType in the relevant tab as shown below
Convert Png To Jpeg menu appears only in "png" type files.
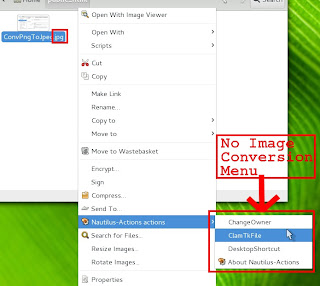
Convert Png To Jpeg doesn't appear on "jpeg" type files.
Enqueue Music Files in Banshee
Banshee is a media player which has cool music library management capabilities. It can be installed using "1 Click Install" links from this page. After installing banshee we should find the proper command line command for enqueuing media files to it. The command need to do this happens to be "banshee --play-enqueued %F". We need to use this information to create the custom nautilus action as shown below.
To Ensure that the Enqueue context menu appears only on mp3 files we need to use the same technique as described above to add relevant MimeTypes in Nautilus-Actions.
Read Fortune in Pop up
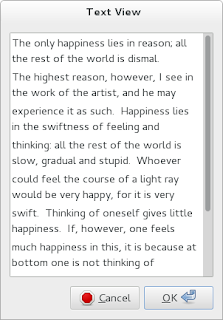
To have some fun, you can try setting up "fortune" in context menu and read it. To do this we can use "zenity" library which can provide alert windows for bash scripts. The command that can be used is " /bin/sh -c 'fortune|zenity --text-info' ". This command can be entered as follows and a custom right click menu can be created as shown below.
The fortune output will be shown in zenity like this
Run Jars using Right Click
The command to run jars is "java -jar <jarname>.jar". You can can configure this command and run jars using Nautilus-Actions as shown below.
Open folder as Super User
You can open any folder in Super User or Root User by creating a context menu as shown below.
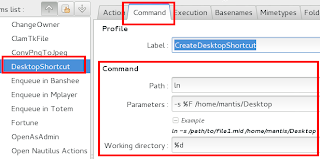
Create Desktop Shortcuts
In Linux, in order to create desktop shortcut or "link" you can use the command "ln -s /<path-to-file>/<filename> ~/Desktop". The same command be incorporated into Nautilus context menu as shown below.









You skip out how to actually add the action into the contect menu :/
ReplyDeleteI thought the fourth image was self explanatory but obviously it is not helping :)
ReplyDeleteYou can click on each image to zoom in on the image