The Nautilus-Image-Converter is an extension that allows you to resize / rotate images from Nautilus. This extension is very useful when uploading images to websites (size limitations), creating thumbnails etc.
Installation & Usage
Step 1:- We need to Configure Community Repositories in YaST, GNOME 3.6, openSUSE 12.3
Step 2:- Launch command launcher(Alt+F2) and open terminal using command "gnome-terminal".
Step3:- Using zypper we can install the relevant extension using command "sudo -u root zypper in nautilus-image-converter".
Step4:- Use the context menu (or) right click menu to "rotate" and resize images. The extension automatically appends a ".resized" and ".rotated" string to the names of newly created files, lest the original file gets overwritten.
Screenshot showing Nautilus "resize". Resize supports "resize to pixels", "scaling" and "custom size" functions.
Screenshot showing Nautilus "rotate". Rotate supports "pre-defined rotations" and "custom angle" functions.
To download pictures that you have marked favourite from the popular Photo sharing site Flickr you can use an application called "FlickrFaves". It is a Java based application which means that you need to have openJDK or Sun/Oracle JRE installed on your system.
Getting Started
Downloading and Installing FlickrFaves:-
There is no need to install anything except that you need to setup up Java/JRE on you system. All you need to do is download the jar which is marked / labelled as "executable "and "launch the jar" to use it.
Use FlickrFaves
Step1:-
Open a quick command launcher (Alt+F2) and open the terminal using command "gnome-terminal".
Step 2:-
Launch jar using the following command from terminal
java -jar /home/<ProfileName>/Downloads/FlickrFaves-2.0.4.jar
Step3:-
On pressing "Authorize" button it will open the default web browser and take you to a page where you need to "Login" and "Authorize" the application to enable FlickrFaves to use Flickr.
After successful Authorisation you will see a success page
Step 4:-
Comeback to FlickrFaves application and click on "Complete Authorization".
Step 5:-
Configure your download folder and other settings like "number of files to download" and start downloading your stuff.
After downloading your pictures it will show a download successful message like this
Add FlickrFaves to GNOME Activities
Step 1:-
Open command launcher(Alt+F2) and use the command "alacarte" to open GNOME 3.X menu editor
Step 2:-
Add the relevant command(java -jar <Path>FlickrFaves-2.0.4.jar) and create a menu item as show below
You can now locate FlickrFaves in Activities
Nautilus has undergone massive changes in recent versions and it is going to be a challenge figuring out a few things. The following long winded article would be useful in figuring out various "Hidden" functionalities of Nautilus. But before doing anything, do Configure Community Repositories openSUSE 12.3
Where are Preferences / settings in Nautilus?
After opening Nautilus you need to click on the Nautilus icon on top panel to pull down the various settings / preferences.
Do you need nautilus to confirm with you before executing each script and provide an option to run in a terminal?
If yes then you can enable using following menu in preferences
How can i sort icons ?
By clicking on the drop down button next to the "Wheel" like button on the menu bar, you can access functions like :-
- Zoom in / out which allows us to increase and decrease icon sizes.
- Reload which allows us to refresh Nautilus.
(keyboard : F5).
- Allows Sorting and reverse sort of icons by:-
- Name
- Size
- Type
- Modification Date
- Hide / Show Hidden files & folders (Names starts with a dot (.) )
How can i Bookmark various folders ?
Bookmarking folders in Nautilus makes them appear in the "pane" on the left hand side of Nautilus. You can use the wheel / Gears like button on top right hand side of Nautilus to :-
- Bookmark Folders
(keyboard : Ctrl+B) so that they appear on "left pane".
- Open New Tab in Nautilus
(keyboard : Ctrl+T)
- Create New Folder in present working directory.
- Selecting all matching items
(keyboard : Ctrl+S). You can select all png files in a folder using this functionality.
Where are "New File" and "Refresh" Context / Right click menus ?
They have ahem! been "removed". We can easily restore these functions by using "Nautilus Actions". I would take a look at this post (Nautilus Actions?) before coming back here to read further.
Use "touch" command to create a "New File"
Install "xdotool" (sudo zypper in xdotool) to simulate key presses. Now, all we need to do is simulate F5 key press to add refresh functionality to context menu.
Restored "NewFile" and "Refresh" Menu items
How can I preview files ?
Preview functionality in Nautilus allows you "preview" contents of all files without actually opening them. You can even play video and audio tracks using this functionality. It can be accessed by ensuring that you have the following packages installed:-
- Install "sushi" (Quick Previewer for Nautilus)
sudo zypper in sushi
- Install "unoconv" (Allows us to preview doc,ppt,xls,docx,odt,odf etc)
sudo zypper in unoconv
- Install "nautilus-evince"(Allows previewing pdfs)
sudo zypper in nautilus-evince
- Install Gstearmer libs (Allows previewing Audio and Video files)
sudo zypper in gstreamer* (Will pull in lot of packages :) ).
After installing above stuff you may restart system and to preview files you can press "spacebar". You can "preview" virtually any file now :). You can see preview samples here:- Audio,video and doc preview features in Nautilus
Also chekout :- Image resize,create thumbnail and image rotate using Nautilus on openSUSE 12.3, GNOME 3.6
Nautilus is the default file manager on GNOME desktop. Nautilus-Actions is an extension for Nautilus file manager which allows one to launch arbitrary applications on files. "Actions" brings in the coolness that is missing in Nautilus. Simply put, it allows you to automate some of the daily activities on your desktop like:-
- Changing Ownership of files.
- Converting images from png to jpg.
- Creating desktop shorcuts.
- Enqueue audio, video files into media players.
- Invoking "Fortune".
- Open file as Admin mode.
- On demand Virus scanning of files.
- Running a Jar. etc...
All of the above list of activities can be implemented without referring any bulky manual. Using Nautilus-Actions, we can pack lot of custom functions into the right click (or) context menu.
Install Nautilus Actions on openSUSE 12.2, GNOME 3.4.2
Step1:-
First we need to configure community repos in YaST. The procedure would be similar to what is described here.
Step 2:-
After configuring YaST we can install Nautilus-Actions using either YaST or Zypper.
Installation using Zypper
sudo zypper in nautilus-actions
Notes:- sudo switches permissions to super user; zypper is the package manager in openSUSE; in instructs zypper to install packages
Installation using YaST
It is pretty easy to install packages using YaST. All one needs to do is open YaST installer and locate relevant packages (nautilus-actions) and install them. Here is a video (YaST Installer Video Demo) demonstrating installation of packages using YaST.
Launch Nautilus-Actions Configuration Tool
After installation you can easily locate Nautilus-Actions in GNOME Shell Activities(Alt+F1)by searching for "Actions" as shown below.
Alternatively you can launch it using the command "nautilus-actions-config-tool" from Quick launcher (or) Command launcher (Alt+F2).
Using Nautilus-Actions Configuration Tool
Using the configuration tool is very easy. You can easily figure out various things by reading various Tooltips that are available in the tool. For example, one can find the functionality of each tab by hovering the mouse on top of them as shown below.
Creating "Change File Owner" Menu
Let us start off by creating a simple menu that allows us to create a context menu to change ownership of selected files to that of logged-in user. We use the "chown" command to accomplish this.Click on the create "New Action" icon or press "Ctrl+N" to create a menu item. Then you can provide an appropriate name for the menu entry.
Then we open the "Command" tab and configure the relevant commands to change the ownership of selected files. In "Path" textbox you can provide the path to the executable or you can just type in the command alone. In the "Parameters" textbox you can type in the parameters like "user" to whom the file should belong to and %F which represents coma separated list of file names. By clicking the "Legend" button you can get the various parameter options that are available for use.
If you would like to see output of command in an alert box, then you can configure the same in "Execution" tab and by selecting "Display output" option.
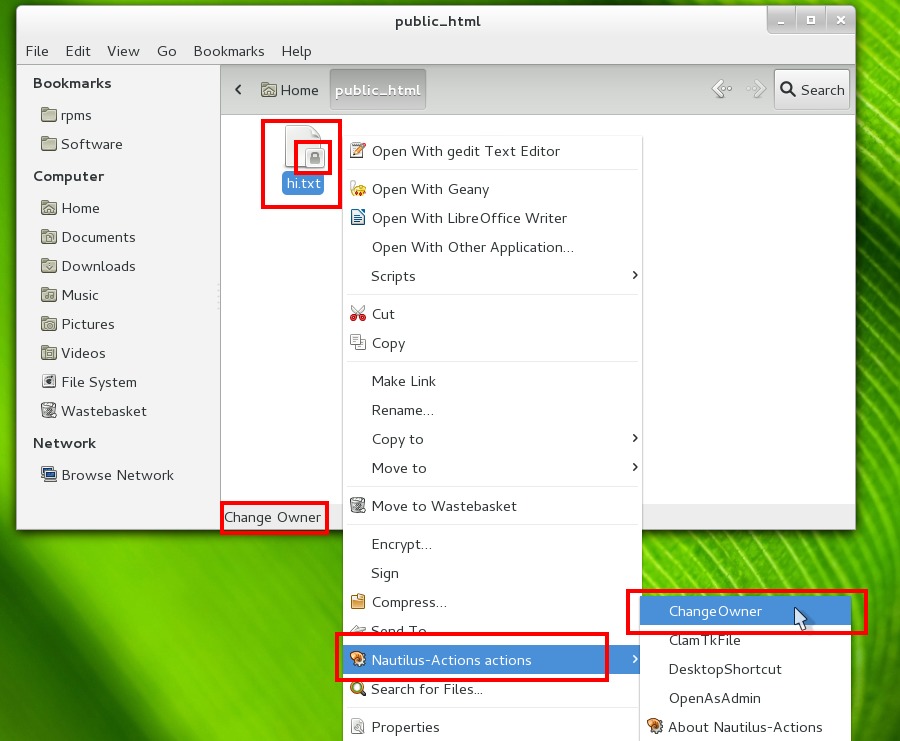
Checking whether "Change Owner" works
I have created a sample text file and made "root" user as it's owner. Now we see a "X" icon on the file indicating that the file is not "owned" by the logged-in user. We now use our newly created context menu and check whether we can change the owner of the file.
After supplying root password we find the command execution in an alert.
When we right click on file now and check the file properties, we find that the logged in user or "mantis" is the owner of the file. The context menu works :-)
On Demand Virus Scanning
ClamTk(Anti-Virus Scanner) can be installed using "1 Click Install" links from this page. After installing clam you can create a custom "Clam Scan menu" to scan selected files.
Image Conversion using right Click Menu
Images can be converted from one format to another using a command line tool called "ImageMagick". It can be installed using "1 Click Install" links from here. After installation we can create a custom menu to convert images from one format to another. Assuming that we need to convert "png" files to "jpg" file, we need to implement the command "mogrify -format jpg <source>.png". It can be done as shown below.
To ensure that the image conversion context menu appears only on "png" files and not on any other file format like "jpg" we need to add "MimeType" data in Nautilus-Actions. To do this, we right click and find Mimetype data in properties of files for which the conversion menu should appear as shown below.
Then we add the MimeType in the relevant tab as shown below
Convert Png To Jpeg menu appears only in "png" type files.
Convert Png To Jpeg doesn't appear on "jpeg" type files.
Enqueue Music Files in Banshee
Banshee is a media player which has cool music library management capabilities. It can be installed using "1 Click Install" links from this page. After installing banshee we should find the proper command line command for enqueuing media files to it. The command need to do this happens to be "banshee --play-enqueued %F". We need to use this information to create the custom nautilus action as shown below.
To Ensure that the Enqueue context menu appears only on mp3 files we need to use the same technique as described above to add relevant MimeTypes in Nautilus-Actions.
Read Fortune in Pop up
To have some fun, you can try setting up "fortune" in context menu and read it. To do this we can use "zenity" library which can provide alert windows for bash scripts. The command that can be used is " /bin/sh -c 'fortune|zenity --text-info' ". This command can be entered as follows and a custom right click menu can be created as shown below.
The fortune output will be shown in zenity like this
Run Jars using Right Click
The command to run jars is "java -jar <jarname>.jar". You can can configure this command and run jars using Nautilus-Actions as shown below.
Open folder as Super User
You can open any folder in Super User or Root User by creating a context menu as shown below.
Create Desktop Shortcuts
In Linux, in order to create desktop shortcut or "link" you can use the command "ln -s /<path-to-file>/<filename> ~/Desktop". The same command be incorporated into Nautilus context menu as shown below.
I had earlier written about forcing programs to appear in open with list. There is one more method of :-
- Adding file associations / context menu / right click entries.
- Setting order of programs for opening in context menu.
- Setting default program for a file type.
on GNOME 3.4.2 / openSUSE 12.2, all in a single shot.
I am taking a Flash video as a sample and i find the file associations as shown below and I set about modifying it.
Step 1
Find the file mimeapps.list on your machine. It will be under the folder path as shown below.
~/.local/share/applications/mimeapps.list
Step 2
Check the file type or mime type of the file by right clicking and checking properties. Since I am taking a Flash video as a sample, I find that mime type is (video/x-flv).
Step 3
Open it in your favourite text editor. I am using gedit to edit the file. Open command launcher (Or) quick launch window (Alt+F2) and type in following commands followed by return or enter key to edit the file.
gnome-text-editor /home/<profileFolder>/.local/share/applications/mimeapps.list
(Or)
gedit /home/<profileFolder>/.local/share/applications/mimeapps.list
Step 4
After opening the file we will find some existing entries in the file. Don't remove any existing entries. Just append any new entries at the end. After deciding on the default application for a file we make an entry under "Default Applications". Then we put this default application first under "Added Associations" and then add subsequent entries as shown below. Save and exit the file.
[Added Associations]

video/x-flv=gnome-mplayer.desktop;banshee.desktop;totem.desktop;
(Or)
[Default Applications]

video/x-flv=gnome-mplayer.desktop
When we check the context menu of the Flash video again we will see the changes reflected.
In order to capture screenshots of multiple webpages using openSUSE 12.2, GNOME 3.4.2 we need to use a screenshot tool can "gnome-web-photo". GNOME Web Photographer is a tool that can be used to generate full-size image files and thumbnails from HTML files and web pages. Optionally, we can use zenity (GNOME Command Line Dialogue Utility) to inform the user about the completion of the process through an alert window. Both these packages should be installed by default on openSUSE 12.2, GNOME 3.4.2.
The usage of both the commands are as follows:-
Usage: gnome-web-photo [--mode=photo|thumbnail|print] [...]

Usage:  zenity [OPTION…]
- First we open nautilus and go to ~/bin folder , right click and choose "Create New Document" and then click on the submenu "Empty Document". We choose the newly created file and hit "F2" and rename the file to something like "LetItRip.sh".
- Then we right click on "LetItRip.sh" and choose file "Properties" . In the properties window we open the "Permissions" tab. Here we will find a checkbox labelled "Execute". We select this checkbox and and close the properties window.
- We can then add the following lines of code to take the screenshots of relevant websites and put them in "public_html" folder.
/bin/sh -c 'gnome-web-photo  --mode=photo --file     http://www.dogpile.com ~/public_html/dogpile.png';

/bin/sh -c 'gnome-web-photo  --mode=photo --file     http://www.google.com    ~/public_html/google.png';

/bin/sh -c 'gnome-web-photo  --mode=photo --file     http://www.bbc.com    ~/public_html/bbc.png';

/bin/sh -c 'gnome-web-photo  --mode=thumbnail --file     http://www.dogpile.com ~/public_html/thumb_dogpile.png';

zenity --info --text "Capture Complete";
Notes :-
- sh shell, the standard command language interpreter;
- -c option reads commands from command_string operand;
- --mode option tells us whether photo or thumbnail will be generated;
- --file option specifies the URL that needs to scraped;
- zenity is command used to create alert windows;
- --info option tells zenity to display a "info" type alert;
- --text is used to specify the text that zenity should display in the alert window;
Create executable file and plugin the code as shown below
Double click on executable and click on "Run" button. After creation of the screenshots you should see an alert like this.
public_html folder with screenshots created from websites
After installing openSUSE 12.2 / GNOME 3.4.2 on my new machine i found that all the context menus or right click menus were looking plain and bland. Something was missing in the menus . After a while i figured that icons were missing in the menus.
SeaMonkey context menu without icons
Nautilus(Browser) context menu without icons
To fix this all i had to do is open quick launch window (Alt+F2) and use the command "gnome-tweak-tool" to open "Advanced Settings". Advanced Settings can also be accessed through Left Win key ==> Applications==> Advanced Settings. Then i had to navigate to "Theme" settings and enable icons in Context menus using the sliders "Menus Have Icons" and "Buttons Have Icons"
After enabling the settings in tweak tool i had to retsart Shell (Alt+F2 ==> r) and browser and now the icons appeared in context menus.
SeaMonkey with icons in context menu
Nautilus Context Menu with icons