Showing posts with label WIDGET. Show all posts

Wednesday, 20 March 2013

Reverting Disqus to older version again ?

 Disqus as a comment platform is very good and i am very thankful to them. But they has recently started "turning ON" Advertisements on my blog without my express consent. They did it once in the past and I had documented as to how I reverted back here (Reverting from DISQUS 2012 to older version) . They have done it again . I received a mail in my inbox about providing me with more revenue etc.. and I started seeing advertisements on my blog.
Mail from Disqus about the new disqus and advertisements appearing on my webpages :(
Disqus Email
Then i had to go back to Disqus website. Navigate to Settings and under Settings navigate to "Discovery" tab .Then i had to change the "Discovery" settings from increased "Revenue" to "Just comments" and everything is back to normal :)
Disqus Turn Off Discovery Use Just Comments

Sunday, 27 January 2013

Weather forecast gadget,much more about E17 on openSUSE 12.2

 I had earlier already written about  "openSUSE trying to offer E17 as mainline desktop" which covered topics like installation of E17 on openSUSE and "Changing backgrounds and themes in E17 openSUSE 12.2". Through this article I hope to cover left-over bits and pieces about E17 on openSUSE 12.2.
Install useful E17 packages
Using zypper
 After installing E17 on openSUSE as described in the articles written earlier we can install some useful packages like weather forecast module,themes, mines game, shellmentary (zenity like pop ups ) etc...
sudo zypper in shotgun elemines e-theme-a-os-detour e-theme-a-os-green e-theme-a-os-miguel-v3 e-theme-a-os-vision-v3 e-theme-darkness e-theme-efenniht e-module-forecasts shellementary
Notes:-
sudo - use command as super user
zypper- package manager
in - parameter to indicate install
Using YaST
 After invoking YaST installer you can easily select the repositories drop down and select the E17 repository and select and install the relevant modules by right clicking and install them as shown below.
YaST E17 Theme Install
Configure Weather Forecast Gadget on E17 / openSUSE 12.2
Enable Forecasts Module
 You need to first open the main menu and navigate to Settings and then Modules menu. In the "Module Settings"  you can select "Forecasts" module and press the "Load" button to activate this module.
Enable Forecasts Module
Add Forecasts Gadget to Shelf
 You can right click on the standard E17 dock or "Shelf" and then open "Contents" submenu . In the "Shelf Contents" window you can select "Forecasts" gadget and click on "Add Gadget" button to add the Gadget to the Shelf.
Add Forecasts Gadget to Shelf
Configure Forecasts Gadget
 To change "Forecasts"  settings like city ,Units(Celsius, Fahrenheit) etc you can can right click on the Gadget or Widget and then choose Settings submenu. To get the Forecasts code you need to go to www.weather.com and get the weather codes for your city.You can use this code in the "Forecasts" gadget.
Getting Weather codes from weather.com
Changing Forecasts settings
E17 developing its own set applications
  E17 developing its own set applications to become a full fledged DE and reduce reliance on applications from from other DEs.The following screenshot shown a game called elemines which is based on Enlightenment Foundation Libraries (EFL) , Terminology which is a cool terminal emulator for E17, E17's own built in file manager, Shotgun which is a XMPP (jabber) client using EFL libraries. I could easily connect with my gtalk contacts using shotgun.
Screenshot showing Elemines, Terminology, Shotgun and E17 file manager
Elemines, Terminology, Shotgun and E17 file manager
Enable Shelf Auto Hide
 Shelf which is the default dock on E17 can be set to "auto hide" state by right clicking on Shelf  and choosing "Shelf==>Settings" and then selecting the "Auto -hide" option and then  applying the settings.
Enable Shelf Auto Hide
Shellementary
 Shellementary is an EFL based GUI application similar to zenity/kdialog and can provide GUI to shell scripts. I have tried to provide an information type of pop up using shellementary from terminology using the command shellementary --info --text 'e17 Rocks!'
E17 Shellementary openSUSE 12.2
More E17 Themes
 In "Changing backgrounds and themes in E17 openSUSE 12.2" i have dealt about downloading , installing and changing themes for E17 from 3rd party sites. But now openSUSE does offer many themes in its repos. If you had installed the packages as described earlier in the article you should be able to see many themes on your E17 desktop. All E17 themes packages in openSUSE repositories are named as "e-theme-*". It is very easy to find them in YaST. I have posted some theme screenshots below.
Detour, theme for Enlightenment 17.
Green, theme for Enlightenment 17.
OS Miguel theme
OS Miguel theme
OS Vision,Beige theme for Enlightenment 17
Theme darkness for Enlightenment 17
Theme efenniht for Enlightenment 17( incorporates cool wobble effects)

Monday, 14 January 2013

Formatting Contents inside code tags in blogger

HTML CODE
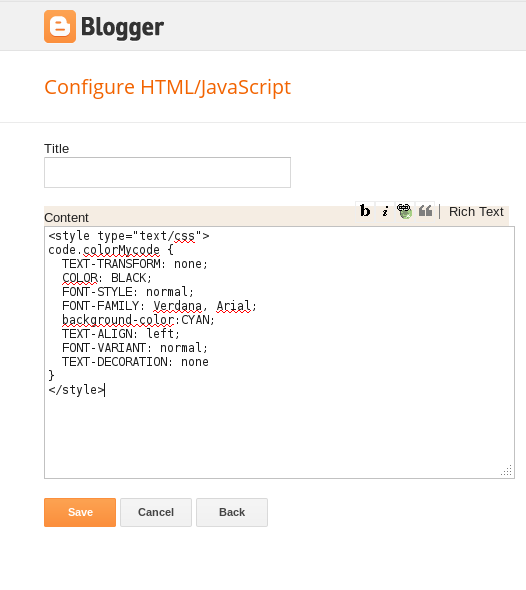
 This post explains a simple way to format the contents in code tags in blogger. This enables distinguishing content between "source code" and  rest of the post .i.e It helps in highlighting the source code in the post. We need to use some CSS to accomplish this.
  We need to first login into "blogger.com" and then navigate to "Layout" page and then create a new "HTML/JavaScript" gadget and add the below contents inside it and save it.
    <style type="text/css">
    code.colorMycode {
    padding:0.5em;
    color:white;
    background-color:gray;
    clear:left;}
    </style>
Notes:- code represent code tag , "colorMycode" is the class you need to use the <code> tag
Screenshot of gadget addition should look like this
Blogger Add HTML JavaScript Widget
 When composing a post and you want to add source code you then need to open the HTML mode as shown below and plugin the <code> tags otherwise they would be rendered as it is. i.e. <code> tags will not work in compose mode.
Screenshot showing post being made in HTML mode in blogger
Blogger Post Editor HTML Mode
 When adding the code in the post you need to ensure that you add a class attribute within the <code> tag as shown below. You should use the same "class" name which is "colorMycode" as defined in the gadget above. Type the below code in HTML mode of the post editor.
<code class="colorMycode">This is sample code</code>
 To test whether the source code highlighting works you may click on preview button in the editor and check the content of code tag as shown below.
Working Preview Code Highlighting Blogger
Citation :- Creating a homepage without tables

Thursday, 27 December 2012

GKrellM gets stuck near Activities hotspot sometimes

 I have been using GKrellM for some time now, first on openSUSE 12.1 / GNOME 3.2.1 and now on openSUSE 12.2 / GNOME 3.4.2 and i like it very much. But sometimes it gets onto my nerves. I set it up so that it opens on startup and have enabled "remember startup position" but  some times it opens up below Activities hotspot and i cannot drag it to any other position on my screen. I had to right click on it to change to non dock mode and then exit it. Then after starting it would allow me drag it required screen location and then i need to enable dock option and restart it.
GKrellM gets stuck near Activities hotspot sometimes
 Then i looked up the Manual(man) for GKrellM by opening command launcher (Alt+F2) and then use the command "gnome-help man:gkrellm" . In the manual i  found that i can use the "-g" option to enforce startup location for GKrellM like this "gkrellm -g +1221+300" . Since my screen is set to 1360x768 resolution this would make GKrellM appear in right hand side of my screen, right where i wanted. 
GKrellM Man
 All i had to do now is change the start up properties as shown below. I hope this will fix the issue.
GKrellM gnome session properties

Monday, 22 October 2012

How to generate "Link to this page" HTML code ?

 It is very easy to generate HTML links for any webpage based on the page url and page title. The following is a generic piece of code snippet when included in any page of your website will produce a link generator widget. It will automatically create  HTML code which will enable others to copy the code and refer to your site easily. It can be included anywhere in the webpage . You can find this widget displayed in the top right hand side of this blog.
 The code snippet will get the title of the page and the url of the page and store them in separate variables. Then the code create a HTML link code dynamically using two variables namely page url and title . After that it will write the generated HTML link code into a textarea.

Adding to Blogger

  • Login into www.blogger.com
  • Clicking  on the link with your blog name will take you to blogger dashboard
  • In Dashboard click on the layout menu on the left hand side as displayed below
 
  • Then click on "Add a Gadget" link and then in the pop up select HTML/JavaScript gadget as shown below.Then all you need is to use the code snippet and your link creator gadget is ready.

Code Snippet

<style>
textarea#styledText {
    border: 3px solid #cccccc;
    padding: 5px;
    font-family: Tahoma, sans-serif;
}
input.styleButton
{
   font-size:12px;
   font-family:Verdana,sans-serif;
   font-weight:bold;
   color:#775555;
   width:107px;
   height:19px;
   border-style:none;
}
</style>
<script type="text/javascript">
var pageTitle=document.title;
var pageUrl=document.location.href;
urlTextValue="<a href=\""+pageUrl+"\">"+pageTitle+"</a>";
document.write("<textarea name=\"styled-textarea\" id=\"styledText\"onfocus=\"setbgcl('#e5fff3');\" onblur=\"setbgcl('white')\">"+urlTextValue+"</textarea>");
function setbgcl(color)
{
document.getElementById("styledText").style.background=color;
}
function SelecTextInTextArea()
{
document.getElementById("styledText").select();
}
</script>
<blockquote><input type="button" value="Select Text" onclick="SelecTextInTextArea()" class="styleButton" title="Select Text"/></blockquote>
Note:- Style elements adapted from here

Sunday, 14 October 2012

Translate tool for websites using Google and Bing

  This translate tool will essentially give you quite a few html links which when clicked upon will automatically submit the webpage page url to translate.google.com and microsofttranslator.com where you can view the translated version of the same page. The tool depends on the availability of both the services though :-). You need to set the source webpage language in the scripts correctly to ensure that to tool works properly.
 Once the source webpage language is set. The scripts have JavaScript arraylist(s) which contain language key-value pairs where the value is displayed in the webpage and the key gets submitted as the part of the submission URL to the translation websites. The for loop in the script essentially creates the translation links dynamically by iterating through the language key value pairs appending them to the translator urls.
 The Version of the scripts from this blog which opens the pages in new window or tab and has style sheet applied to the links are further down

Google Translate(Simple)

<script type="text/javascript">
//store page url
var pageUrl=document.location.href;
//Store href beginning string
var hrefBeg='<a href=\'';
//Store href ending string
var hrefEnd='\'>';
//store anchor tag closure
var hrefClosure='</a>';
//set your webpage language here.It should be one from the below arraylists.It //cannot be "mandarin".Use  zh-CN
var myLang='en';
//Google translator url.Source page url is set as English
var transHelpPage='http://translate.google.com/translate?sl='+myLang+'&tl=';
//store the url param to indicate page url
var urlBeg='&u=';
//Store space between languages
var spacer='&nbsp;';
//Two dimensional JavaScript array to Store language label and label code
var arr = [['af','Afrikaans'],['sq','Albanian'],['ar','Arabic'],['hy','Armenian'],['az','Azerbaijani'],['eu','Basque'],['be','Belarusian'],['bn','Bengali'],['bg','Bulgarian'],['ca','Catalan'],['zh-CN','Chinese'],['hr','Croatian'],['cs','Czech'],['da','Danish'],['nl','Dutch'],['en','English'],['eo','Esperanto'],['et','Estonian'],['tl','Filipino'],['fi','Finnish'],['fr','French'],['gl','Galician'],['ka','Georgian'],['de','German'],['el','Greek'],['gu','Gujarati'],['ht','HaitianCreole'],['iw','Hebrew'],['hi','Hindi'],['hu','Hungarian'],['is','Icelandic'],['id','Indonesian'],['ga','Irish'],['it','Italian'],['ja','Japanese'],['kn','Kannada'],['ko','Korean'],['lo','Lao'],['la','Latin'],['lv','Latvian'],['lt','Lithuanian'],['mk','Macedonian'],['ms','Malay'],['mt','Maltese'],['no','Norwegian'],['fa','Persian'],['pl','Polish'],['pt','Portuguese'],['ro','Romanian'],['ru','Russian'],['sr','Serbian'],['sk','Slovak'],['sl','Slovenian'],['es','Spanish'],['sw','Swahili'],['sv','Swedish'],['ta','Tamil'],['te','Telugu'],['th','Thai'],['tr','Turkish'],['uk','Ukrainian'],['ur','Urdu'],['vi','Vietnamese'],['cy','Welsh'],['yi','Yiddish']];
//For loop to iterate over the two dimensional javascript array
for (var i=0;i<arr.length; i++) {
document.write(spacer+hrefBeg+transHelpPage+arr[i][0]+urlBeg+pageUrl+hrefEnd+arr[i][1]+hrefClosure+spacer);
  }
</script>

Microsoft Translate(Simple)

<script type="text/javascript">
//store page url
var pageUrl=document.location.href;
//Store href beginning string
var hrefBeg='<a href=\'';
//Store href ending string
var hrefEnd='\'>';
//store anchor tag closure
var hrefClosure='</a>';
//set your webpage lanuage here.It should be one from the below arraylists.It //cannot be "mandarin".Use either zh-CHS or zh-CHT
var myLang='en';
//Bing translator url.Source page url is set as english
var transHelpPage='http://www.microsofttranslator.com/bv.aspx?from='+myLang+'&to=';
//store the url param to indicate page url
var urlBeg='&a=';
//Store space between languages
var spacer='&nbsp;';
//Two sets of single dimensional javascript arrays to Store language label and label code
var LangPair_ToDDL_keys=["ar","bg","ca","zh-CHS","zh-CHT","cs","da","nl","en","et","fi","fr","de","el","ht","he","hi","mww","hu","id","it","ja","ko","lv","lt","no","fa","pl","pt","ro","ru","sk","sl","es","sv","th","tr","uk","vi"];
var LangPair_ToDDL_values=["Arabic","Bulgarian","Catalan","Chinese Simplified","ChineseTraditional","Czech","Danish","Dutch","English","Estonian","Finnish","French","German","Greek","HaitianCreole","Hebrew","Hindi","HmongDaw","Hungarian","Indonesian","Italian","Japanese","Korean","Latvian","Lithuanian","Norwegian","Persian","Polish","Portuguese","Romanian","Russian","Slovak","Slovenian","Spanish","Swedish","Thai","Turkish","Ukrainian","Vietnamese"];
//For loop to iterate over the two dimensional javascript array
for (var i=0;i<LangPair_ToDDL_keys.length; i++) {
document.write(spacer+hrefBeg+transHelpPage+LangPair_ToDDL_keys[i]+urlBeg+pageUrl+hrefEnd+LangPair_ToDDL_values[i]+hrefClosure+spacer);
  }
</script>

 Google Translator with stylesheet and open in new window / tab customisation

<style type="text/css">
a.pastoral:link {
COLOR: #0000FF;
}
a.pastoral:visited {
COLOR: #800080;
}
a.pastoral:hover {
COLOR: #FF0000;
}
a.pastoral:active {
COLOR: #00FF00;
}
</style>
<script type="text/javascript">
//store page url
var pageUrl=document.location.href;
//Store href beginning string
var hrefBeg='<a href=\'';
//Store href ending string
var hrefEnd='>';
//Store rel param string
var hrefHoldRel='\'rel=\'external\'';
//Store the style param
var styleHolder= 'class=\'pastoral\'';
//store anchor tag closure
var hrefClosure='</a>';
//set your webpage language here.It should be one from the below arraylists.It //cannot be "mandarin"
var myLang='en';
//Google translator url.Source page url is set as English
var transHelpPage='http://translate.google.com/translate?sl='+myLang+'&tl=';
//store the url param to indicate page url
var urlBeg='&u=';
//Store space between languages
var spacer='&nbsp;';
//Two dimensional javascript array to Store language label and label code
var arr = [['af','Afrikaans'],['sq','Albanian'],['ar','Arabic'],['hy','Armenian'],['az','Azerbaijani'],['eu','Basque'],['be','Belarusian'],['bn','Bengali'],['bg','Bulgarian'],['ca','Catalan'],['zh-CN','Chinese'],['hr','Croatian'],['cs','Czech'],['da','Danish'],['nl','Dutch'],['en','English'],['eo','Esperanto'],['et','Estonian'],['tl','Filipino'],['fi','Finnish'],['fr','French'],['gl','Galician'],['ka','Georgian'],['de','German'],['el','Greek'],['gu','Gujarati'],['ht','HaitianCreole'],['iw','Hebrew'],['hi','Hindi'],['hu','Hungarian'],['is','Icelandic'],['id','Indonesian'],['ga','Irish'],['it','Italian'],['ja','Japanese'],['kn','Kannada'],['ko','Korean'],['lo','Lao'],['la','Latin'],['lv','Latvian'],['lt','Lithuanian'],['mk','Macedonian'],['ms','Malay'],['mt','Maltese'],['no','Norwegian'],['fa','Persian'],['pl','Polish'],['pt','Portuguese'],['ro','Romanian'],['ru','Russian'],['sr','Serbian'],['sk','Slovak'],['sl','Slovenian'],['es','Spanish'],['sw','Swahili'],['sv','Swedish'],['ta','Tamil'],['te','Telugu'],['th','Thai'],['tr','Turkish'],['uk','Ukrainian'],['ur','Urdu'],['vi','Vietnamese'],['cy','Welsh'],['yi','Yiddish']];
//For loop to iterate over the two dimensional javascript array
for (var i=0;i<arr.length; i++) {
document.write(spacer+hrefBeg+transHelpPage+arr[i][0]+urlBeg+pageUrl+hrefHoldRel+styleHolder+hrefEnd+arr[i][1]+hrefClosure+spacer);
  }
//This function can be used to add a target="_blank" attribute to all anchor tags //with a rel="external" attribute
function externalLinks() { if (!document.getElementsByTagName) return; var anchors = document.getElementsByTagName("a"); for (var i=0; i<anchors.length; i++) { var anchor = anchors[i]; if (anchor.getAttribute("href") && anchor.getAttribute("rel") == "external") anchor.target = "_blank"; } } window.onload = externalLinks;
</script>

 Bing / Microsoft Translator with stylesheet and open in new window / tab customisation

<style type="text/css">
a.microBing:link {
COLOR: #0000FF;
}
a.microBing:visited {
COLOR: #800080;
}
a.microBing:hover {
COLOR: #FF0000;
}
a.microBing:active {
COLOR: #00FF00;
}
</style>
<script type="text/javascript">
//store page url
var pageUrl=document.location.href;
//Store href beginning string
var hrefBeg='<a href=\'';
//Store href ending string
var hrefEnd='>';
//Store rel param string
var hrefHoldRel='\'rel=\'external\'';
//Store the style param
var styleHolder= 'class=\'microBing\'';
//store anchor tag closure
var hrefClosure='</a>';
//set your webpage lanuage here.It should be one from the below arraylists.It //cannot be "mandarin".Use either zh-CHS or zh-CHT
var myLang='en';
//Bing translator url.Source page url is set as English
var transHelpPage='http://www.microsofttranslator.com/bv.aspx?from='+myLang+'&to=';
//store the url param to indicate page url
var urlBeg='&a=';
//Store space between languages
var spacer='&nbsp;';
//Two sets of single dimensional javascript arrays to Store language label and label code
var LangPair_ToDDL_keys=["ar","bg","ca","zh-CHS","zh-CHT","cs","da","nl","en","et","fi","fr","de","el","ht","he","hi","mww","hu","id","it","ja","ko","lv","lt","no","fa","pl","pt","ro","ru","sk","sl","es","sv","th","tr","uk","vi"];
var LangPair_ToDDL_values=["Arabic","Bulgarian","Catalan","ChineseSimplified","ChineseTraditional","Czech","Danish","Dutch","English","Estonian","Finnish","French","German","Greek","HaitianCreole","Hebrew","Hindi","HmongDaw","Hungarian","Indonesian","Italian","Japanese","Korean","Latvian","Lithuanian","Norwegian","Persian","Polish","Portuguese","Romanian","Russian","Slovak","Slovenian","Spanish","Swedish","Thai","Turkish","Ukrainian","Vietnamese"];
//For loop to iterate over the two javascript arrays
for (var i=0;i<LangPair_ToDDL_keys.length; i++) {
document.write(spacer+hrefBeg+transHelpPage+LangPair_ToDDL_keys[i]+urlBeg+pageUrl+hrefHoldRel+styleHolder+hrefEnd+LangPair_ToDDL_values[i]+hrefClosure+spacer);
  }
//This function can be used to add a target="_blank" attribute to all anchor tags //with a rel="external" attribute
function externalLinks() { if (!document.getElementsByTagName) return; var anchors = document.getElementsByTagName("a"); for (var i=0; i<anchors.length; i++) { var anchor = anchors[i]; if (anchor.getAttribute("href") && anchor.getAttribute("rel") == "external") anchor.target = "_blank"; } } window.onload = externalLinks;
</script>
Note:-open links in new window/tab is from this site

Tuesday, 21 August 2012

Reverting from DISQUS 2012 to older version

 DISQUS 2012 can really damage your blogger stats.You can find below a way to revert back to older system. I am using DISQUS in my blog for quite a few months now. I like DISQUS commenting platform a lot for it offers many features like the "Like" page button, nested commenting, trackball URL, reactions etc. which are not present in the default  commenting system in blogger. A few days ago I jumped the gun and switched from older version of DISQUS to DISQUS 2012 when  saw  the link Activate Disqus 2012 for your site » in DISQUS's website. I did not think before acting  and without properly studying the consequences of going in for the new system had taken a bite at the carrot that dangled before my eyes. From that point onwards all hell broke loose. I could not  keep track of any stats in the blogger platform.
Below is the screenshot showing how badly the DISQUS 2012 comment system has damaged the Referring URLs stats.
 Although the above un intelligent stats rendered  my blogger stats next to useless, the DISQUS 2012 system spared me further agony  by not affecting my stats pages at statcounter. Since majority of the referral URLs appear to be redirects they have a potential to lower your sites reputation. I also learned from DISQUS's website that DISQUS 2012 now uses iframe. I am not an web wizard but I did notice that frames are bad for any website's health.
 Now I have turned off the new DISQUS 2012 system though it looked much cooler than older system. I don't know at this point of time whether my blogger stats will be back to normal from now onwards. Thankfully reverting to old system is quite simple. According to DISQUS's website "You can disable Disqus 2012 off at any time at the top of your admin's Settings > General page".
 All I needed to do was login into my account, navigate to this admin page after which I located the settings tab on top right hand side of the webpage.
 Then I had to un-check the Disqus 2012 Checkbox under "Basic Settings" label available in "General" tab as shown below. One needs to ensure that the "Save Changes" button at the bottom of the page is pressed after un-checking the check box in order to confirm the changes.
 I am hoping that my blogger stats will be back to normal. All that is left to do is to wait and watch and hope for the best. I keeping my fingers crossed too ...just in case :-)
Update(03Sep2012):- The problem of redirection ULRs in blogger stats has gone away after I reverted back to Older version of DISQUS

Friday, 25 November 2011

Create Label or Tag Cloud In a New Page In Blogger

How To Create a dynamic Label or Tag Cloud In a New Page In Blogger?

 In  some of our blogs there would be too many labels that it would be difficult to show all of them in main page of the blog.To solve this issue we can add the label cloud in a new page in our blog.This post aims to serve as a tutorial for doing this.

The following screenshot shows the appearance of the  Labels page or tag cloud page for your blog:-

Step1:-
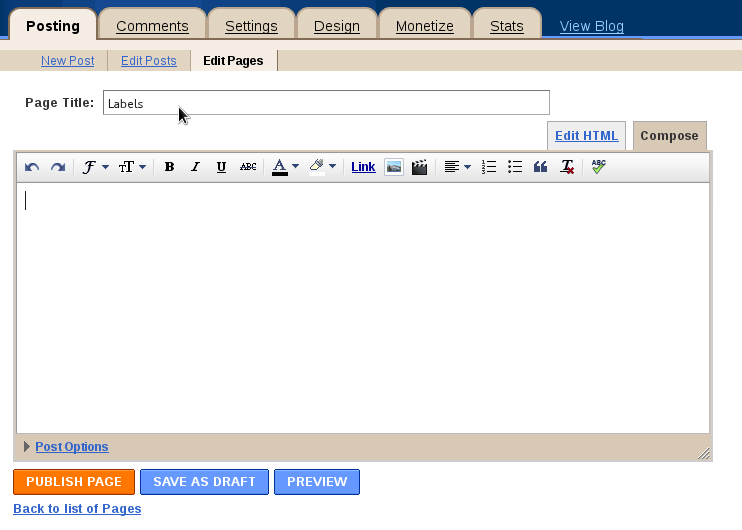
Step one is to create a new page and name it "labels" .For accomplishing that this you need to
==>Go into "Design Mode in blogger", henceforth will be referred to as "Design Mode" in rest of the post
==>Click on the "Posting" tab.
==>Under this "Posting" tab click on the "Edit Pages" tab.
==>Click on the "New page" button
==>Give a title for he page like "Labels"
==>and then click on "Publish Page" button


Step2:-
   Ensure that in the "design view" of blogger ,otherwise click on the "Pages" gadget and rearrange so that "Pages" gadget appears below the header gadget.Ensure that "Save" the design after editing.
Step3:-
Add the labels gadget. To do that you need to:-
==>Click on "Add a Gadget" link and add a new gadget "Labels" which is available under "Basics" menu.
==>Drag the "Labels" Rearrange as required so that it appears just above "Blog Posts" gadget and below "Pages" gadget

Step 4:-
Edit the code so that the label code appears only in the "Labels page and not the main page of the blog"
==>Click on "Edit HTML" link in "Design Mode"
==>Click on check box "Expand Widget Templates"
==>Search and Locate  your label widget.It should look something like this
<b:widget id='Label1' locked='false' title='Labels' type='Label'>
==>Add the following "if condition" nestle it within   your gadget/widget tags so that the xml structure is well formed and then ensure that the ending if tag is added in the right place as shown below.You can then "Save Template"
 If your xml is not well formed then the page will display an error. My advise is to exit the "Design Mode" and repeat Step 4 otherwise it will mess up your blog.
<b:widget id='Label1' locked='false' title='Labels' type='Label'>
<b:includable id='main'>
<b:if cond='data:blog.url == &quot;URLOFYOURLABLEPAGE&quot;'>
...
...
</b:if>
</b:includable>
</b:widget>
Finally you will have a beautiful tag cloud which you can use to browse your blog. Try out the label tab at the top of this blog to get a feel of it.

Saturday, 1 November 2008

Added Dictionary

Everybody needs to know meanings for words.Also felt that it is a useful tool.Hence added it

Saturday, 22 March 2008

URL Shortening

Hi friends,just added a service called Tiny Url to my blog.
Many of you would of faced the problem of copying and pasting links which are too long.
The problem can be solved by just pasting the long url in the toolbox attached to this blog and generate tiny urls.

For example i created one for my blog "http://vazhavandan.blogspot.com/" which was
http://tinyurl.com/26ml5n

You can know about url shortening here :-Url Shortening

Thursday, 14 February 2008

Attached country codes tool to footer

I found this very useful site which gives information on how people from one country can place a call to numbers other than their own.I have added the site tool to the footer. Just click the footer and it will take you to a page which has two selection boxes where you have to choose the country from where you are dialing and the country to which you want to make a call.Then the webpage shows you as to how to dial the number.I hope people would find it useful.

Monday, 19 November 2007

Added Meebo Connectivity

Hi all, anyone can use the meebo widget on this page to communicate with me when i am online on meebo. You can also leave messages offline messages to me.Just type in your nick in the appropriate box and type away messages you want to send me

Wednesday, 5 September 2007

Dogpile Search Added

Well people , I have added dogpile search box to this blog . It is my favourite search engine because one i like its blue theme and also the dog motif on the home page . Also it is a meta search engine(Queries other search engines and displays results from those).I like the "search history" feature where one can see all the searches one has done previously.I find this feature useful at times . Now people visiting blog can check dogpile out from the dogpile search I added to this page .