Showing posts with label TOTEM. Show all posts

Wednesday, 30 January 2013

Manokwari Desktop on openSUSE 12.2

 Manokwari is a desktop shell for GNOME 3 and it features a combined Gtk+ and HTML5 frontend. It is an evolution from a shell called blankon-panel. Manokwari is cool because :-
  • Instead of being a GNOME 2.X fork, it is a GNOME 3.X fork which means that it can support modern libraries.
  • It is lighting fast and amazingly stable and has a exotic feel to it.
  • The gnome-tweak-tool or "Advanced Settings" tool can be used to customise the desktop.
  • The default theme(Krawu) and icons(Komodo) look good.
  • It features a fully loaded "Applications menu" or "Main Menu". The main menu is scrollable and hence easy to use.
  • The main menu has a "Places" menu too where all the bookmarked folders from Nautilus appear.
  • For those who don't like the Activities hotspot in GNOME shell, the absence of the same would be a welcome relief.
  • It is the default desktop in a Linux distro called BlankOn.
Install Manokwari on openSUSE 12.2
 Manokwari desktop has been installed by me on openSUSE 12.2 on a experimental basis and this desktop is in no way supported by openSUSE. Due caution needs to be exercised by any user who tries to emulate the installation procedure described below.
Pre-requisites
  • Identify the architecture of OS we use and the type of rpm that will fit our desktop. More details about this can be found in 32 bit Vs 64 bit OS architecture in Linux.
  • We will probably need an working GNOME 3.4.2 desktop. More details can be obtained from this link.
  • Configure a Local rpm repository using YaST installer.
  • Create a new "Test user" and  Turn Off auto login. This new "Test user" profile will be used as a test bed for using Manokwari. More details about user management can be found here.
Download rpms
 Those interested in compiling and installing Manokwari from source, the link to checkout would be  BlankOn / Manokwari. The links for downloading the rpms would be as follows:-
After verifying the type of OS we use, we can proceed with downloading the relevant rpms and creating Local rpm repository as described above and place all our rpms there. Since i use a 64 bit system the rpms I required  were as follows:-
  • blankon-session-0.0.10-1.fc18.noarch.rpm
  • gnome-menus2-2.30.5-1.fc18.x86_64.rpm
  • gtk-murrine-engine-0.98.2-2.fc18.x86_64.rpm
  • gtk-unico-engine-1.0.2-2.20120808bzr139.fc18.x86_64.rpm
  • komodo-icon-theme-0.2.21-1.fc18.noarch.rpm
  • krawu-theme-0.2.16-1.fc18.noarch.rpm
  • manokwari-0.2.1.10-1.fc18.x86_64.rpm
  • redhat-menus-12.0.2-5.fc18.noarch.rpm
Install rpms
Install using zypper (CLI)
 Assuming that you have created a Local directory repository using YaST you can proceed to install the desktop using the zypper package manager. First we open command launcher(Alt+F2) and then use the command "gnome-terminal" to open a terminal session. Then we need to use the "zypper in" command and install the packages.
$sudo zypper in -f -r rpms blankon-session gnome-menus2 gtk-murrine-engine gtk-unico-engine komodo-icon-theme krawu-theme manokwari redhat-menus
Notes:-
  • sudo - Run command as super user
  • zypper - Package manager in openSUSE
  • in - Instructs zypper to install
  • -f - This force reinstalls packages(optional)
  • -r - Asks zypper to install the packages from repo named "rpms".(Local repo name created through YaST)
Install using YaST (GUI)
 To locate YaST installer on GNOME 3.X desktop, you can use the left "win" key or "Alt+F1" key combination to open "Activities" window. In this window you can start typing a search query like "install" when YaST installer will show up grouped under "Applications" as shown below.
GNOME 3.4.2 YaST Installer
 After YaST is opened you can use the drop down on the left to change the display mode to "Repositories". Then you can select the relevant repo "rpms". Finally we can select all the requires packages and hit "Apply" button to finish the installation.
YaST openSUSE 12.2 Manokwari Install rpm
Login into Manokwari and configuring things
  After creating a "Test" user I logout from GNOME shell and login into "Test" and select the session as "BlankOn" as shown below
openSUSE 12.2 Manokwari GDM BlankOn
 The default desktop looks like the below screenshot and is not very appealing. There are no desktop icons. The icons and main menu in the top panel are almost invisible.
openSUSE 12.2 Manokwari Default desktop
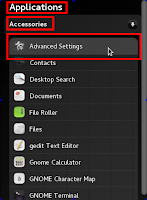
 I proceed to customise the desktop using "gnome-tweak-tool" or "Advanced Settings" tool. I can find this tool in the main menu under "Accessories".
openSUSE 12.2 Manokwari Main Menu
I change the icons theme to "komodo", window and GTK+ themes to "Krawu". I also enable 'icons' in menus and buttons.
openSUSE 12.2 Manokwari Gnome Tweak Tool Theme
Then it is time to bring the desktop icons back by setting Nautilus as desktop manager. By doing this right click on desktop also gets enabled :-).
openSUSE 12.2 Manokwari Gnome Tweak Tool Restore Desktop Icons Nautilus
 Then i can open "Settings" or "gnome-control-center" using the Main menu and change the wallpaper
openSUSE 12.2 Manokwari Menu Gnome Control Center Settings
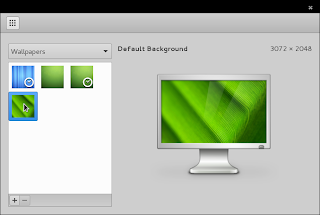
Changing wallpaper in gnome-control-center
openSUSE 12.2 Manokwari Gnome Control Center Wallpaper
After changing Icons, themes and wallpaper, the desktop feels better and more usable.
openSUSE 12.2 Manokwari Desktop with icons
How to use Manokwari ?
Main Menu
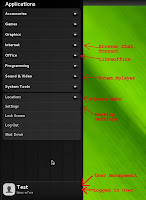
The Manokwari main menu is well designed, scrollable and is the place where you can access all your installed applications.
openSUSE 12.2 Manokwari Main Menu
Task bar
The taskbar / top panel which sits at the top of the DE consists the following controls:-
  • Main menu launcher at the extreme left. It is represented by BlankOn icon (O|)
  • Icons showing currently "running" applications show up to the right of Menu launcher.  On "mouse over" of any one of the icons the description is shown. You can switch between applications using these icons.
  • At the right end is is the workspace switcher. It also has a "show desktop" or "minimize all windows" button.
  • To it's left sits the "system tray" with calendar, volume changer and other tray icons.
openSUSE 12.2 Manokwari Top Panel
 Screenshot showing Totem playing Top tracks from Jamendo and Geany compiling a simple java program
openSUSE 12.2 Manokwari Geany Java Totem Jamendo
Conclusion
 For those who don't like GNOME Shell, Cinnamon and Manokwari offer viable desktop alternatives with all familiar GTK+ bells and chimes. Sometimes when you log-in into the desktop, we will find that the desktop icons are not click-able. This anomaly almost drove me crazy and was about to remove the DE when I found the solution. When i was messing around with dconf-editor i saw a setting called Switch system controls ("switch-panels") under the schema "org.gnome.desktop.wm.keybindings". The default settings to use this function is "<Control><Alt>Tab" . This keybinding allowed me to switch to "Desktop" mode which allowed me to use the desktop icons again. Vote may opt to for inclusion of Manokwari in openSUSE here.

Monday, 14 January 2013

Adobe Flash Versus GNOME Totem Vegas on openSUSE 12.2 GNOME 3.4.2

Totem Vegas Flash Plugin
 Totem, the good old Multimedia player from GNOME stable has become the new superstar in Linux world after it has come out with its own flash compatible plug-in that allows Linux users to play flash videos from major video streaming sites like youtube and metacafe. Vegas servers as a good alternative to Adobe Flash for playing flash videos in the aforementioned sites.
 The new Totem plug-in is called (vegas) browser plugin. Totem is multimedia player for the GNOME desktop based on GStreamer framework. The "totem-browser-plugin-vegas" allows one to play  Flash videos with virtually any browser like Firefox, Seamonkey, Opera etc. The advent of Vegas is good news especially since Adobe has stopped providing Flash Player for Linux.
Vegas Pluses
  • Can be installed along side Adobe Flash.
  • Works on variety of browsers.
  • Supports fullscreen and non fullscreen modes.
  • Can be easily disabled and enabled as described below.
Install Vegas
Various things to do before installing Vegas on openSUSE 12.2 are:-
  • Configure "Community repositories" using YaST similar to what is described in this post.
  • Finish the Multimedia related steps described in this post.
Install Vegas using YaST
 To locate YaST installer on GNOME 3.X desktop you can use the left "win" key or "Alt+F1" key combination to open "Activities" window. In this window you can start typing a search query like "install" when YaST installer will show up grouped under "Applications" as shown below.
GNOME 3.4.2 YaST Installer
 After opening YaST installer you can type in the search query in YaST as shown below.  After locating Vegas you can select the required software using the relevant checkbox . To complete installation you can press the "Apply" button.
GNOME 3.4.2 YaST Installer Totem Vegas
Install Vegas using zypper.
 First we need to open command launcher using key combination "Alt+F2" . Then invoke the terminal using the command "gnome-terminal". After terminal opens, we can use the "zypper" command to install the relevant packages as shown below.
$sudo -u root zypper in totem*vegas*
Loading repository data...
Reading installed packages...
Resolving package dependencies...
The following NEW package is going to be installed:
  totem-browser-plugin-vegas
1 new package to install.
Overall download size: 56.0 KiB. After the operation, additional 71.5 KiB will
be used.
Continue? [y/n/?] (y): y
Retrieving package totem-browser-plugin-vegas-3.4.3-1.1.1.x86_64
                                           (1/1),  56.0 KiB ( 71.5 KiB unpacked)
Retrieving: totem-browser-plugin-vegas-3.4.3-1.1.1.x86_64.rpm[done (58.5 KiB/s)]
Installing: totem-browser-plugin-vegas-3.4.3-1.1.1 .......................[done]
Notes:- "sudo" is command to execute a command as another user , "-u" option specifies the user which is "root" in this case, "zypper" is the command for managing packages, "in" option stands for installation, zypper allows wildcards like "*" while specifying package names.
Configure Vegas as Flash player
 To configure Vegas as the default plugin to handle flash content on your browser of choice, you may need to disable the Adobe flash plugin. You can easily do this using "Add-ons Manager" in Firefox and SeaMonkey as shown below.
Configure Vegas Flash Plugin Addon Manager SeaMonkey Firefox
 Similarly in Opera you need to open the "opera:plugins" page through the location or address bar and disable the relevant plugin.
Configure Vegas Flash Plugin Opera opera:plugins
Screenshot of Youtube video in Opera played using Vegas
Youtube video in Opera played using Vegas
Screenshot of Metacafe video in SeaMonkey played using Vegas
Metacafe video SeaMonkey Vegas
Short Video Clip comparing the working of Vegas and Adobe Flash
 This is a short screencast comparing video playing capability of Adobe Flash plug-in (Opera) and Totem plug-in Vegas (SeaMonkey). Screen capture done on GNOME 3.4.2 desktop using built in Screencasting tool. Control+Shift+Alt+R keybinding starts and stops the recording. The screencast was generated in "*.webm" format and is readily compatible with youtube. The video first shows SeaMonkey playing Metacafe and Youtube videos in fullscreen and normal mode using Vegas plugin . Then we switch over to Opera which plays same videos using flash plugin. The Screencast proves beyond a doubt that Vegas has good video playing capability and can switch quite smoothly between normal and full screen modes :-)

Sunday, 20 November 2011

After a long wait finally onto a proper Gnome 3.X desktop openSUSE 12.1 GNOME 3.2.1

 After a long wait , i am finally onto a proper Gnome 3.X desktop which is openSUSE 12.1, GNOME 3.2.1. Man !!!!!! ,it took like ever before the 12.1 release came through. I was so exited when GOME 3.X came out through in openSUSE 11.4  . It really built up the hype for the 12.1 release which is supposed to be a full fledged GNOME 3.X desktop environment.

Gnome System Monitor showing  juicy items like openSUSE release version 12.1,Kernel version 3.1.x,GNOME version 3.2.1


Desktop with one amazing background{that too out of box}
 Application menu or Applications menu
Totem with a Nice and sleek Skin


Very Cool looking iphonesque onscreen keyboard


Cutest YaST yet,cool integration of YaST with GNOME 3.X interface


 I was itching for the first weekend to arrive after the 12.1 release,I was really raring to have a crack at the new OS . Unlike previous upgrades and installations of openSUSE this time I tried doing things a bit different.The first time I installed openSUSE which happens to be version 11.0 I installed it from a boxed DVD from which I obtained along with a computer magazine.
For the  transition from 11.0 to 11.2 I downloaded a DVD ISO and burned it and upgraded the OS.Then from 11.2==>11.3 and then from 11.3==>11.4
and from 11.4 , GNOME 2.x ==> 11.4 , GNOME 3.0.X I used YaST and zypper based upgrade.This time i tried  something different i.e. installed from a live image written on-to a flash drive.

The +ses of 12.1/GNOME 3.2 over 11.4/GNOME 3.0

==>Nasty bug in Nautilus 3.0 which did not allow users to copy paste files from one directory to another using commands ctrl+c and ctrl+v has been fixed in Nautilus 3.2
Nautilus 3.0 bug

==>Much better looking Totem media player

==>GNOME 3.2 has not even crashed once though GNOME 3.0 in early days crashed a lot of times

==>openSUSE 11.2/GNOME 3.2 has "gnome-tweak-tool" {lets you customise gnome 3.x} and "gnome-shell-extension-alt-status-menu" {which provides you a proper shutdown or Power off menu for GNOME 3.X desktops} are installed by default which is big relief as these two tool are more like "the most important tools" on GNOME 3.X desktops

==>As usual the interface is smooth and free flowing and beautiful like a river .The OS feels like a giant iphone ,special mention is required for the iphonesque ultra cool on-screen keyboard.

==>The icing on the cake is the installation was very fast unlike anything that I had experienced before.Probably the credit goes to the flash drive based installation instead of using an optical drive based installation.


==>Shutdown time/latency is vastly improved

The only minus I noticed so far is that sun/oracle jre is not included in the 12.1 repos / repositories .One can only install openJDK implementation from 12.1 repos.

Wednesday, 26 October 2011

How to get Totem 3.0.1(openSUSE 11.4,GNOME 3.0) working again after crash?

How to get Totem 3.0.1 ( openSUSE 11.4 , GNOME 3.0 ) working again after crash due to plugin?

{Crash caused due to misbehaving plug-ins like bemused}

The other day  I was fooling about with Totem's plug-ins .Suddenly Totem crashed and when I tried to start it Totem refused to start.Since it has a better and cleaner interface on GNOME 3.0, instead of switching to myriad other players I set upon fixing it.I found two solutions.

Solution one:-
==>This is an easy one.Remove Totem Plug-ins.Since it is the plug-ins that is causing the problem, the obvious solution is to UN-install the trouble maker.
==>Go to Install/Remove Software (YaST)and UN-install "totem-plugins"

==>Launch Totem and it will open up well


==>The cliché is that you will not be able to use any plug-ins

Solution Two:-
==>For unfortunate souls who crave to use  Totem plug-ins which "actually work" the following is the solution.This one is fairly straight forward too.It involves disabling all the plug-ins that get loaded when Totem starts up
==>First one must Install Dconf-Editor{Dconf is in short is a settings editor for GNOME 3.0[GSettings]} if not available.To accomplish that all one has to do is to use the software search tool in openSUSE website and finish installing the software/package by pressing a series of "Next" and "I Agree" buttons as and when they pop-up
For installation on openSUSE 11.4,GNOME 3.0 one can use the following URL and then click on one-click link as shown below openSUSE Software Search


==>After installation of Dconf-Editor one can start it by pressing the key combination "Alt+F2" and bring up the program launch window/Run Window/ command prompt or what ever name the tool.Then one must key in the magic words "open SESAME/CHASAM/Abracadabra" into the program launch window.Nope these don't work :-) .Use"dconf-editor" instead.

==>When "Dconf-Editor" opens up then one needs to navigate the tree on the left pane of the tool to a setting called org==>gnome==>totem.After reaching Totem node in the tool when one glances into the pane on the right hand side of the the tool.one can see all the plug-ins(Active plug-ins list) loaded by Totem when it starts up.One can either double click on the list and edit it or hit "Set To Default" button on the right hand side bottom of the tool.After you have done editing the list close the tool.

Before Totem Plug-in list Reset

After Totem Plug-in list Reset


==>Launch Totem and it will open up well.If it does not start up edit the plug-in list again in the Dconf-Editor

Sunday, 25 July 2010

Totem crash resolved!!!!!!!!!!!!!!!!!!

Whenever i used to play audio files like mp3 on Totem it used to crash.
Totem used to work fine on openSUSE 11.0/gnome
The problem started when i switched to Gnome/openSUSE 11.2
I reinstalled entire codec packs for Gnome/openSUSE 11.2,ugly,bad what not!!!
Then finally I switched off the visualization by name "GOOM" and everything works fine now.
I should have realized this long ago as i found that Totem did not crash when playing video files like "avi"

Related Post:-
How to get Totem 3.0.1 ( openSUSE 11.4 , GNOME 3.0 ) working again after crash due to plugin? 

Edited:- 05DEC2011

Saturday, 20 September 2008

Testing A New Media Player

Nowadays we find a lot of media players and codec+mediaplayer combinations that promise that they play all types of video/audio files.But in the end they just aren't upto the mark.

Here is a quick collection of various file formats that you can download and use to check whether a player indeed is able to play all file formats.

http://cid-e9fb700d18b176ad.skydrive.live.com/self.aspx/Public/Test/AVI|_DivX.avi
http://cid-e9fb700d18b176ad.skydrive.live.com/self.aspx/Public/Test/BlackJackOP.flv
http://cid-e9fb700d18b176ad.skydrive.live.com/self.aspx/Public/Test/niceday.asf
http://cid-e9fb700d18b176ad.skydrive.live.com/self.aspx/Public/Test/niceday.rm
http://cid-e9fb700d18b176ad.skydrive.live.com/self.aspx/Public/Test/sample.mkv
http://cid-e9fb700d18b176ad.skydrive.live.com/self.aspx/Public/Test/sample|_iTunes.mov
http://cid-e9fb700d18b176ad.skydrive.live.com/self.aspx/Public/Test/sample-pitbull.s03e07.pl.webrip.xvid-h3nk.avi
http://cid-e9fb700d18b176ad.skydrive.live.com/self.aspx/Public/Test/Samurai%20X.mpg
http://cid-e9fb700d18b176ad.skydrive.live.com/self.aspx/Public/Test/szybcy%20sie%20sample.rmvb
http://cid-e9fb700d18b176ad.skydrive.live.com/self.aspx/Public/Test/WindowsMedia.wmv