Showing posts with label BROWSER. Show all posts

Saturday, 1 June 2013

Pleasant Open document format surprise

 The other day, when i asked for some details about outlets from my telephone / cellphone provider by email they replied back to me and sent an attachment (spreadsheet) in ods format which was a pleasant surprise.
 In the "past" I have only seen proprietary formats like .xls, .doc, .ppt in my emails as attachments. I used to tear my hair out when I saw haphazard tables and overflowing text whenever I opened "word" documents in LibreOffice and OpenOffice. The less said about opening Excel with "macros" in LibreOffice / OpenOffice the better. Guess, those days of excruciating pain are finally over and we can all move towards a bright future where data is shared in Open document formats.
 Three cheers ! for the silent revolution brought about by LibreOffice / OpenOffice / OASIS and co.

Sunday, 24 March 2013

Change address bar's background and text colour in SeaMonkey

 I noticed that whenever i accessed  https / encrypted pages, the Address / URL bar appeared dark in SeaMonkey (kind of Firefox cousin). This issue cropped up after I migrated from GNOME 3.4 to GNOME 3.6.
Dark Address bar in SeaMonkey in GNOME 3.6 at DuckDuckGo.com
 This issue does not occur in some themes. The "default" theme is probably adjusting it's settings to achieve better integration with rest of the desktop which is good, but in this case it proving to be counter productive.
Address bar looks normal in Non https URL
Address bar looks normal in Non https url
Normal looking address bar, "Nautipolis theme" at DuckDuckGo.com
 With inputs from "Mozillazine" forums, i figured that i had to do the following to address the issue with the address bar:-
  1. Create a folder called "chrome" under my SeaMonkey profile ("~/.mozilla/seamonkey/<profileName>/") folder
  2. Create a "userChrome.css" file inside it.
  3. Make some entries in this file to customize my address bar.
 I chose to use some yellowish colour as background and black as the text colour. I found the site (colorhexa.com) extremely useful in figuring out the hexadecimal codes I needed. The following is the code i had to use to change the settings the way i wanted it.
#urlbar[level] .autocomplete-textbox-container >* {background-color:#FFFFB7 !important; color: #000000 !important; }
Screenshot of css code in userChrome.css
css code in userChrome.css
 Better looking address bar after changing the settings
SeaMonkey Address / URL bar Yellow background Black text  in https
 To change non address bar settings for non https URLs the following code might be used in the userChrome.css file
#urlbar { background-color: #00FF00 !important; color: #000FFF !important; }
 Customized Address bar look for normal http pages
Customized Address bar look for normal http pages

Wednesday, 20 March 2013

Reverting Disqus to older version again ?

 Disqus as a comment platform is very good and i am very thankful to them. But they has recently started "turning ON" Advertisements on my blog without my express consent. They did it once in the past and I had documented as to how I reverted back here (Reverting from DISQUS 2012 to older version) . They have done it again . I received a mail in my inbox about providing me with more revenue etc.. and I started seeing advertisements on my blog.
Mail from Disqus about the new disqus and advertisements appearing on my webpages :(
Disqus Email
Then i had to go back to Disqus website. Navigate to Settings and under Settings navigate to "Discovery" tab .Then i had to change the "Discovery" settings from increased "Revenue" to "Just comments" and everything is back to normal :)
Disqus Turn Off Discovery Use Just Comments

Sunday, 10 March 2013

GConf daemon issue in GNOME 3.4.2, openSUSE 12.2

 Recently I noticed that some GTK based applications in GNOME 3.4.2, openSUSE 12.2 were misbehaving or throwing a tantrum and are refusing to start or crashing when they start. The applications which had these issues were:-
  • Tomboy
  • Browsers (SeaMonkey and Firefox)
  • Gnome Terminal but not xterm.
 The issue occurrence was random and the only pattern i noticed was that when issue showed up in one application others would also have these weird issues. The only way to rectify these issues was to restart the machine when these anomalies disappeared. Firefox and SeaMonkey gave an error in pop up when starting up "Configuration server couldn't be contacted: D-BUS error: The GConf daemon is currently shutting down."
Screenshot of error in Firefox
Firefox SeaMonkey Configuration server couldn't be contacted: D-BUS error: The GConf daemon is currently shutting down.
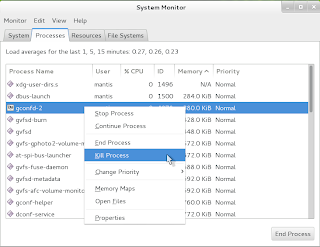
 I found a solution / workaround for these issues in Fedora forums . All i had to do is "kill" the GConf daemon which is the root cause of the issue. It seems that the daemon would automatically start up whenever any application which needs it is started, hence there is no need to manually start this daemon again. I opened "System Monitor" through application launcher (Alt+F2) using the command "gnome-system-monitor".
Alt+F2 Application Launcher gnome-system-monitor
Then i opened "Processes" tab and right clicked on GConf daemon and killed it.
GNOME System Monitor "Processes" tab Kill GConf daemon
 After doing that all applications mentioned above worked fine. I also noticed that I could kill the daemon from application launcher (Alt+F2) too using the command "killall gconfd-2"
Application Launcher (Alt+F2)  killall gconfd-2

Wednesday, 20 February 2013

Simple Bookmarklet to get webpage link and title

 If are posting an article and if you want to "link" any any webpage or website from your blog or website then you need manually create a html anchor tag and you will need plugin:-
  • Webpage url
  • Webpage title
 To simplify things I have written some bookmarklets which you can easily create in your browsers bookmarks toolbar. You can plugin the below codes in location / url textbox when creating a bookmark or favourites. In Firefox, SeaMonkey and Opera "ctrl+D" is the shortcut to create bookmarks. After creating the bookmarklet all you need to do is navigate to the relevant webpage and then click on the bookmarlet to get the anchor tag in a popup / alert window.
  • Get Link with title for webpage.
    javascript:window.alert("<a%20href=\""+document.location.href+"\">"+document.title+"</a>");
  • Get Link with title and a nofollow tag for a webpage. javascript:window.alert("<a%20rel=\"nofollow\"%20href=\""+document.location.href+"\">"+document.title+"</a>"); 
  • Get Link with title no follow and open in new tab or window for a webpage.
    javascript:window.alert("<a%20rel=\"nofollow\"%20target=\"_blank\"%20href=\""+document.location.href+"\">"+document.title+"</a>");  

 The below screenshot shows as to how to create the bookmarklet in SeaMonkey / Firefox after pressing Ctrl+D .
SeaMonkey create bookmarklet bookmarks toolbar
After creation of bookmarlet click on it to get webpage link
Click bookmarklet get webpage link

Monday, 14 January 2013

Adobe Flash Versus GNOME Totem Vegas on openSUSE 12.2 GNOME 3.4.2

Totem Vegas Flash Plugin
 Totem, the good old Multimedia player from GNOME stable has become the new superstar in Linux world after it has come out with its own flash compatible plug-in that allows Linux users to play flash videos from major video streaming sites like youtube and metacafe. Vegas servers as a good alternative to Adobe Flash for playing flash videos in the aforementioned sites.
 The new Totem plug-in is called (vegas) browser plugin. Totem is multimedia player for the GNOME desktop based on GStreamer framework. The "totem-browser-plugin-vegas" allows one to play  Flash videos with virtually any browser like Firefox, Seamonkey, Opera etc. The advent of Vegas is good news especially since Adobe has stopped providing Flash Player for Linux.
Vegas Pluses
  • Can be installed along side Adobe Flash.
  • Works on variety of browsers.
  • Supports fullscreen and non fullscreen modes.
  • Can be easily disabled and enabled as described below.
Install Vegas
Various things to do before installing Vegas on openSUSE 12.2 are:-
  • Configure "Community repositories" using YaST similar to what is described in this post.
  • Finish the Multimedia related steps described in this post.
Install Vegas using YaST
 To locate YaST installer on GNOME 3.X desktop you can use the left "win" key or "Alt+F1" key combination to open "Activities" window. In this window you can start typing a search query like "install" when YaST installer will show up grouped under "Applications" as shown below.
GNOME 3.4.2 YaST Installer
 After opening YaST installer you can type in the search query in YaST as shown below.  After locating Vegas you can select the required software using the relevant checkbox . To complete installation you can press the "Apply" button.
GNOME 3.4.2 YaST Installer Totem Vegas
Install Vegas using zypper.
 First we need to open command launcher using key combination "Alt+F2" . Then invoke the terminal using the command "gnome-terminal". After terminal opens, we can use the "zypper" command to install the relevant packages as shown below.
$sudo -u root zypper in totem*vegas*
Loading repository data...
Reading installed packages...
Resolving package dependencies...
The following NEW package is going to be installed:
  totem-browser-plugin-vegas
1 new package to install.
Overall download size: 56.0 KiB. After the operation, additional 71.5 KiB will
be used.
Continue? [y/n/?] (y): y
Retrieving package totem-browser-plugin-vegas-3.4.3-1.1.1.x86_64
                                           (1/1),  56.0 KiB ( 71.5 KiB unpacked)
Retrieving: totem-browser-plugin-vegas-3.4.3-1.1.1.x86_64.rpm[done (58.5 KiB/s)]
Installing: totem-browser-plugin-vegas-3.4.3-1.1.1 .......................[done]
Notes:- "sudo" is command to execute a command as another user , "-u" option specifies the user which is "root" in this case, "zypper" is the command for managing packages, "in" option stands for installation, zypper allows wildcards like "*" while specifying package names.
Configure Vegas as Flash player
 To configure Vegas as the default plugin to handle flash content on your browser of choice, you may need to disable the Adobe flash plugin. You can easily do this using "Add-ons Manager" in Firefox and SeaMonkey as shown below.
Configure Vegas Flash Plugin Addon Manager SeaMonkey Firefox
 Similarly in Opera you need to open the "opera:plugins" page through the location or address bar and disable the relevant plugin.
Configure Vegas Flash Plugin Opera opera:plugins
Screenshot of Youtube video in Opera played using Vegas
Youtube video in Opera played using Vegas
Screenshot of Metacafe video in SeaMonkey played using Vegas
Metacafe video SeaMonkey Vegas
Short Video Clip comparing the working of Vegas and Adobe Flash
 This is a short screencast comparing video playing capability of Adobe Flash plug-in (Opera) and Totem plug-in Vegas (SeaMonkey). Screen capture done on GNOME 3.4.2 desktop using built in Screencasting tool. Control+Shift+Alt+R keybinding starts and stops the recording. The screencast was generated in "*.webm" format and is readily compatible with youtube. The video first shows SeaMonkey playing Metacafe and Youtube videos in fullscreen and normal mode using Vegas plugin . Then we switch over to Opera which plays same videos using flash plugin. The Screencast proves beyond a doubt that Vegas has good video playing capability and can switch quite smoothly between normal and full screen modes :-)

Tuesday, 21 August 2012

Reverting from DISQUS 2012 to older version

 DISQUS 2012 can really damage your blogger stats.You can find below a way to revert back to older system. I am using DISQUS in my blog for quite a few months now. I like DISQUS commenting platform a lot for it offers many features like the "Like" page button, nested commenting, trackball URL, reactions etc. which are not present in the default  commenting system in blogger. A few days ago I jumped the gun and switched from older version of DISQUS to DISQUS 2012 when  saw  the link Activate Disqus 2012 for your site » in DISQUS's website. I did not think before acting  and without properly studying the consequences of going in for the new system had taken a bite at the carrot that dangled before my eyes. From that point onwards all hell broke loose. I could not  keep track of any stats in the blogger platform.
Below is the screenshot showing how badly the DISQUS 2012 comment system has damaged the Referring URLs stats.
 Although the above un intelligent stats rendered  my blogger stats next to useless, the DISQUS 2012 system spared me further agony  by not affecting my stats pages at statcounter. Since majority of the referral URLs appear to be redirects they have a potential to lower your sites reputation. I also learned from DISQUS's website that DISQUS 2012 now uses iframe. I am not an web wizard but I did notice that frames are bad for any website's health.
 Now I have turned off the new DISQUS 2012 system though it looked much cooler than older system. I don't know at this point of time whether my blogger stats will be back to normal from now onwards. Thankfully reverting to old system is quite simple. According to DISQUS's website "You can disable Disqus 2012 off at any time at the top of your admin's Settings > General page".
 All I needed to do was login into my account, navigate to this admin page after which I located the settings tab on top right hand side of the webpage.
 Then I had to un-check the Disqus 2012 Checkbox under "Basic Settings" label available in "General" tab as shown below. One needs to ensure that the "Save Changes" button at the bottom of the page is pressed after un-checking the check box in order to confirm the changes.
 I am hoping that my blogger stats will be back to normal. All that is left to do is to wait and watch and hope for the best. I keeping my fingers crossed too ...just in case :-)
Update(03Sep2012):- The problem of redirection ULRs in blogger stats has gone away after I reverted back to Older version of DISQUS

Monday, 2 April 2012

Securing GNOME 3.2.1 openSUSE 12.1

 In order to secure my GNOME 3 desktop I use a combination of following tools . This ensures that there is multilevel protection on my system. Prevention is always better than cure :-) . All the software described below are being used on openSUSE 12.1 / GNOME 3.2.1.
==>Clam Antivirus & Fireclam Addon(gecko based browser like Firefox and SeaMonkey)
==>AppArmor
==>Rootkit Hunter & chkrootkit
Clam Antivirus
Salient Features of Clam Antivirus are:-
==>ClamAV is an open source (GPL) Antivirus engine
==>It can detect Trojans, viruses, malware and other malicious threats.
==>It is the de facto standard for mail gateway scanning.
==>It provides a high performance mutli-threaded scanning daemon, command line utilities for on demand file scanning
==>The core ClamAV library provides numerous file format detection mechanisms, file unpacking support, archive support, and multiple signature languages for detecting threats.
==>Tool for automatic signature updates.There is a scheduler for scheduling scans as well as option to schedule update the definitions.
==>The software can update virus signatures,GUI and Antivirus engine independently.
Installation:-
Clam Antivirus can be installed using the famous 1- Click Install on . Alternatively it can installed from this search page.
Usage:-
It can be found under Activities ( Windows Key ) ==> Applications ==> System Tools ==> ClamTk.
After hitting windows key one can type in "clamtk"  and GNOME 3 desktop will intuitively show clamtk GUI
It can also be launched using command "clamtk" through quick launch window (Alt + F2 )
Main Window After installation
The signatures can be updated using update window.The update menu can be located under help menu
The following screenshot is how the application looks after updation
Fireclam Addon
One can force automatically scan all the downloaded files using Fireclam Addon which can be installed onto a gecko based browser. After installation the addon will automatically invoke clamscan to scan the files being downloaded the  whenever files are downloaded through the browser
SeaMonkey showing Fireclam installed
Clamscan shown running in "gnome-system-monitor" when files are being downloaded
AppArmor 
==>AppArmor proactively protects the OS and Apps from threats by enforcing good behavior and preventing even unknown application flaws from being exploited.
==> AppArmor security policies completely define what system resources individual applications can access, and with what privileges. A number of default policies are included with AppArmor.
Installation:-
Here is the 1- Click install for installing AppArmor . Alternatively it can installed from this search page. After installing AppArmor one should restart the system to activate the software.
Usage:- 
To check the status of the profiles that have been installed you can run the command "aa-status" from "gnome-terminal".
Sample output for aa-status(shows whether profiles are AppArmor successfully installed or not)
linux-9p85:~> sudo /usr/sbin/aa-status
root's password:
apparmor module is loaded.
27 profiles are loaded.
27 profiles are in enforce mode.
   /bin/ping
...
   /usr/sbin/smbldap-useradd///etc/init.d/nscd
   /usr/{sbin/traceroute,bin/traceroute.db}
0 profiles are in complain mode.
3 processes have profiles defined.
3 processes are in enforce mode.
...
Create New Profiles:-
A good article demonstrating setting up of new / additional  AppArmor profiles here using YaST .One can also take a look at the  detailed article about it here in ubuntu forums.
rkhunter & chkrootkit
==>Rootkit Hunter and chkrootkit are very useful command line / CLI based tools which can be invoked through "gnome-terminal" and can detect a variety of malware.
==>Rootkit Hunter scans files and systems for known and unknown rootkits, backdoors, and sniffers.
==>chkrootkit is a set of tools that detect rootkit (a program that hides the presence of attackers) symptoms on a system
Installation:- 
Here is the 1- Click install for installing rkhunter . Alternatively it can installed from this search page.
Here is the 1- Click install for installing chkrootkit . Alternatively it can installed from this search page.
Usage:-
rkhunter update
rkhunter can be updated using command "sudo rkhunter --update"
Sample rkhunter update process output:-
linux-9p85:~> sudo rkhunter --update
root's password:
[ Rootkit Hunter version 1.3.8 ]
Checking rkhunter data files...
  Checking file mirrors.dat                                  [ No update ]
  Checking file programs_bad.dat                             [ Updated ]
...
rkhunter scan
rkhunter can be used to check for rootkit using the command"sudo rkhunter -c"
Sample output for rkhunter usage:-
linux-9p85:~> sudo rkhunter -c
[ Rootkit Hunter version 1.3.8 ]
Checking system commands...
Checking for rootkits...
  Performing check of known rootkit files and directories
    55808 Trojan - Variant A                                 [ Not found ]
    ADM Worm                                                 [ Not found ]
    AjaKit Rootkit                                           [ Not found ]
...
chkrootkit scan
Sample output for chkrootkit usage:- 
linux-9p85:~> sudo /sbin/chkrootkit
ROOTDIR is `/'
Checking `amd'... not found
Checking `basename'... not infected
Checking `biff'... not found
Checking `chfn'... not infected
.....

Friday, 23 March 2012

10 + GNOME Shell extensions that I found useful

According to GNOME site GNOME Shell extensions are small pieces of code written by third party developers that modify the way GNOME works. If you are familiar with Chrome Extensions or Firefox Addons,GNOME Shell extensions are similar to them.
 The below  GNOME Shell extensions are some of the must  haves on any GNOME 3.X desktop. If found that the below extensions are novel and at the same thime extremely useful . All the extensions mentioned are tested on GNOME 3.2.1 / openSUSE 12.1 / SeaMonkey .The extensions site has been a huge hit with the GNOME users.
Pre-Requisites
==>Ensure that Community repositories are installed and also the following packages are installed
        ==>gnome-shell-browser-plugin - The GNOME Shell Browser Plugin
                provides integration with gnome-shell and the corresponding
                extensions repository
        ==>gnome-shell-extensions - GNOME Shell Extensions is a collection
                 of extensions providing additional and optional functionality to
                GNOME Shell.
       ==>gnome-shell-extensions-common - This package provides files
               common to several GNOME Shell Extensions
       ==>gnome-tweak-tool - GNOME Tweak Tool is an application for
               changing the advanced settings of GNOME 3.
 ==>One needs a gecko compatible browser like (SeaMonkey or Firefox) to install the extensions from the GNOME Shell extensions.
Manage Extensions
When one installs the extensions from gnome site they get installed in "~.local/share/gnome-shell/extensions" directory path  by default.
  The source code installed here can be in fact customised  which is pretty awesome. I did try and customise one of the extensions,the process which I have described below.
You can manage(Delete / Turn On(Activate)/TurnOff (Deactivate)) the Shell extension using Installed Extensions page.
 Alternatively ,You can manage the installed extension using Advanced Settings tool (or) gnome-tweak-tool
10 + / Ten plus Extensions that rock
==>Alternative Status Menu
This cool extension brings the Power Off menu to the User Menu .This eliminates the nee to keep pressing Alt button to access the power off button when one wants to shutdown their machine.Before activation of this extension you cannot see shutdown or power off menu.
 After activation of the extension you can see the shutdown menu
==>Remove Accessibility
Helps to remove the generally unused accessibility menu from the top bar or panel in Shell desktop unless otherwise you need to access the onscreen keyboard regularly.Before installing this extension you can see the accessibility tool.
You don't see it after activation of this extension
==>Media Player Indicator
This extension allows one control ( playback ,volume ) the multimedia players like banshee.You can navigate your playlist without switching to the player
==>NetSpeed
Shows the speed at with internet is working when you are browsing the net.
==>Coverflow Alt Tab
Move over Alt Tab switcher Coverflow Alt Tab is here.Brings back memories of gnome 2 desktop effects.Move-over Alt Tab,Coverflow is here.Coverflow unlike Alt Tab based switcher shows multiple windows of same application without collapsing them.When using Alt Tab based switcher you nee to use Alt+` along with Alt+Tab to switch between two windows of the same application
Alt+Tab Switcher
Coverflow Switcher
==>ToDo List
You can maintain a simple to do list.You can jot down things you need to do without any hassle.
==>Shutdown Timer
This extension is an ideal tool if you want to schedule your Power Offs on you machine.If you have a download running and you want to lave your system unattended and you want the machine to shutdown after download then this is the ideal tool for you
==>Recent Items
This extension can display the latest accessed files on your desktop.You can clear the recent list of documents and files too.
==>NothingToDo
If you don't use the calendar tool on evolution to keep the appoints then the calendar in the top bar doesn't require such a large window to show all the appointments.This extension would help in making the calendar cuter.
Calendar Before installation
Calendar After installation
==>Search Firefox Bookmarks
This is an extension which helps one search for the bookmarks through the GNOME Shell Activities window.This extension was originally meant to e used for Firefox.But  don't use Firefox and hence wanted to tweak it to work with SeaMonkey.You can install SeaMonkey for openSUSE 12.1 using this link
I got the Firefox bookmark search extension to work with SeaMonkey by editing the "extension.js" file present inside folder path "~.local/share/gnome-shell/extensions/searchfirefoxbookmarks@ciancio.net/". I replaced all occurrences of the string firefox with SeaMonkey in that file using gedit an viola,it became SeaMonkey search extension.
==>Inhibit Applet
This can prevent you monitor from switching off / prevents monitor from going into power saving mode when you are watching movies on your favourite video player.
==>Overlay Icons
It is an ultra cool extension that shows the application icons over the windows in the Activities window switcher(After installation press Windows key).