Big Bash of Light weight Desktop Managers is about pitting against each other the various DMs offered by openSUSE 12.2 . It involves taking each of the each of the desktops for a spin and checking out whether they are good enough for daily use. The desktop managers described here are managed by the community and not officially supported. The end of the article features a table which compares and rates these desktops.
Special Note:-
It would be a good idea to create a new user profile and turn off auto login feature to avoid getting stuck with a broken system. To know more about user management from a GNOME 3.X perspective you may take a look at this post.
Since I had already written about Cinnamon i am not covering it again. The following are the desktop managers we are going to take a look at in the rest of the article
I badly wanted to review Razor Qt / Razor Desktop too. But it currently suffers from "Razor Death". Once we login the screen goes blank and I became it's latest victim :) .
Installation
- Assuming that you have GNOME 3.4.2 / openSUSE 12.2 installed, we need to ensure that we have installed the community repositories similar to what has been described here.
- Open the gnome terminal and add the relevant desktop repositories. The -f option will make the repos' auto-refresh enabled.
sudo zypper ar -f http://download.opensuse.org/repositories/X11:/windowmanagers/openSUSE_12.2/X11:windowmanagers.repo
- Reresh the repository metadata
sudo zypper ref -f
- Install the relevant packages/rpms
sudo zypper in iceWMCP icewm-gnome icewm-themes iceWMCP enlightenment epplet-base fluxbox fvwm2 pekwm pekwm-theme-adriano awesome
Awesome
It is a window manager for X. It is very fast, extensible. It is primarily targeted at power users and developers. It has minimal graphical user interface and is not the for people who need a GUI (Graphical User interface) to configure or do things. Awesome needs users to be comfortable editing config files and at ease with command line settings to perform basic things like changing wallpaper. If changing the desktop background involves editing a configuration file sounds like a bad idea then avoid Awesome.
Change background
You need to download a ".png" image of your choice as ".jpg" are not accepted by the themes framework and then edit the below line in the file "/usr/share/awesome/themes/default/theme.lua" provided you are using the default theme.
-- You can use your own command to set your wallpaper
--theme.wallpaper_cmd = { "awsetbg /usr/share/awesome/themes/default/background.png" }
theme.wallpaper_cmd = { "awsetbg /home/test/Downloads/Fable3-wallpaper_1280x1024.png" }
Open an application
Press key combination "Win key+r" which opens a tiny command launcher on the top panel where you can type in a command of your choice to launch any application. If you need to browse and need Opera you can type in opera in the command launcher and press the return or enter key.
Screen Layouts
Awesome provides a cool layout switcher at the right end of the panel which can be used to switch between 12 different screen layouts. The default is the floating layout. Using key combination "Win+Space" we can switch between various layouts.
Switch Screen Resolution
Awesome requires its users to know what XRandR is and how can one set the screen / display resolution using command line interface. You open a terminal by terminal in command launcher(win+r) or (win+Enter key) and then type in "xrandr -q" to get the screen resolution list.Then you can type in something like "xrandr --size 1280x1024". Ensure that the 'x' is a small one.
Close Applications
Applications can be closed using "win+shift+c" key combination.
Switch between workspaces
You can switch between workspaces using key combination "win+1, win+2, ..." or use the GUI tool on the panel numbered 1 to 9.
Application Switcher
Instead of using Alt+Tab for application switcher you need to use "win+Tab"
Screenshot of Awesome desktop showing time at the top right end of the screen, customised desktop wallpaper, a rudimentary panel at the top which also contains a workspace switcher and very simple menu at the top left hand side.
Screenshot showing Nautilus (File & folder organizer), Gedit (Text Editor), Terminal and SeaMonkey (Browser)
Enlightenment(e16)
Enlightenment also known simply as E, is a stacking window manager for the X Window System which can be used alone or in conjunction with a desktop environment such as GNOME or KDE. Only thing I found annoying is that the focus shifts to a window based on the location of mouse pointer on the screen. E16 has a very different user interface and main desktop consists of:-
- Two Pagers(Workspace Switchers)
- System Tray
- Icon Box(Dock or Panel like stuff) for switching between open applications
- E-Applets which provide additional functionality like E-NetFlame(Network app),E-CPUFlame(CPU load app), E-Exec(Application launcher)
The following snapshot shows the Enlightenment desktop with "iconbox" at the bottom of the page , systray at the right hand side bottom, Two pagers at the bottom left hand side, two E-Applets at the top left hand side.
The next snapshot shows the Enlightenment desktop with Alt+Tab switcher at the centre of the screen. It is a switcher with a difference as the applications are stacked vertically.
Instead of placing the application menu on the panel the desktop E has opted to display the application menu on the left click of the mouse.
Not many desktops provide maintenance menu to purge cache and stuff and i am impressed that E16 provides a way to purge desktop latency.
There is a very good E16 settings tool which provides various tabs to manage sessions, theme, desktop background and a host of other settings.
Fluxbox
Fluxbox is a lightweight window manager for the X Windows. It offers a bare bones desktop similar to Awesome and requires a high degree of customisation using command line and editing myriad config files.
The default desktop with command launcher(Alt+F2) is displayed below
Fluxbox showing Gedit and nautilus
Fluxbox screen with context menu(right click) showing sub menu to change themes
Fluxbox theme ZimekGreen in action. The snapshot also shows the way to customise panel/toolbar which consists of a widget showing list of open application list, workspace switcher , time widget and system tray.
Since Fluxbox doesn't give you a fully loaded application menu the desktop users can download the menu creator software from here and create their own menus as displayed below. After you download the menu creation software you can extract the archive file and then launch the tool by using the command "python fluxMenu.py" from terminal.
After creating your own customised application menu you can get a menu similar to the one below . When creating new menus you may want some icons. You will find that application icons are of format "png" or "xpm" and are available under folder path "/usr/share/pixmaps"or "/usr/share/icons/...".I have created four custom menu items for applications Shutter(Screenshot Tool) , SeaMonkey( Browser ), Artha( Thesaurus ) and Pinta( drawing/editing program ) using the menu creator software as shown in the screenshot.
FVWM
FVWM is a window manager for X Windows. FVWM is intended to have a small memory footprint but a rich feature set, to be extremely customizable and extendible. This window manager tends to iconify windows and place them at the top left hand side of the desktop when minimised which i found to be novel and at the same time amusing.
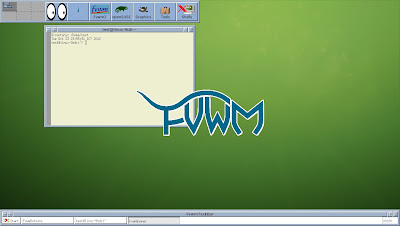
Default start up screen of FVWM with banner displayed prominently. You can see the task bar at the bottom of the page.
FVWM provides a very cool feature for power users. It provides menu item which launches xterm in super user mode which is very helpful if we are going to change any settings.
FVWM screenshot showing Libreoffice Calc, Pinta and xterm windows
FVWM iconifies applications when they are minimised
FVWM has a very simple and dull looking application switcher (Alt+Tab). I guess it reflects the age of the product.
There is cute application launcher called Talk!
IceWM
IceWM is a ice cool window manager for the X Windows System .It has lot of quirky themes. IceWM features multiple workspaces, opaque move and re-size, taskbar, window list, mailbox status, and a digital clock. It is fast but at the same time has a lot of features. It has a good desktop configuration utility in the form of iceWMCP (IceWM Control Panel) which can be accessed through the main menu.
The fact that the main menu of IceWM responds to windows key on keyboard is a welcome relief compared to other desktops which have not bothered to implement this simple feature. The panel is loaded with buttons like "show desktop" button, "window list" button which adds up to provide a good user experience. Pressing "Win+Space" opens up a command launcher on the panel which is pretty cool.
This is a screenshot of the default IceWM desktop with toolbar / taskbar at the bottom of the screen.The toolbar has a network monitor as well CPU load monitor at the right end near the digital clock. If we want more detailed stats we can click on the monitors and they will open full fledged monitors.
The application list is exhaustive and can be accessed either through right click of mouse of through icemenu(win key) at the bottom of the screen.
The below screenshot shows Nautilus(File manager), SeaMonkey (Browser) and DrJava (light weight IDE for Java)
IceWM with xterm and YaST installer in action
You can launch the "IceWM Control Panel" using the command "iceWMCP" from xterm. The control panel allows users to do various activities like change themes, change desktop backgrounds etc.
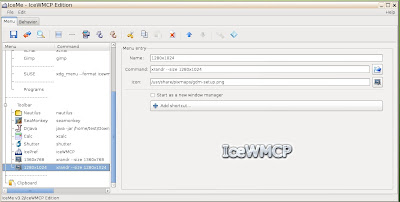
The IceWM Menus or IceMe provides a cool way to add more application launch buttons to the panel/toolbar.

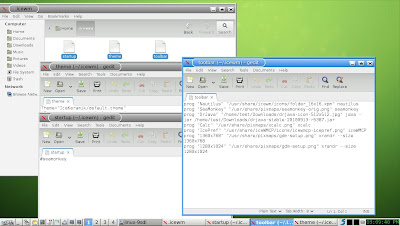
To customize IceWM we can create the following files in the folder "~./.icewm"
- toolbar - If you make entries in this it will create application launchers in toolbar. The entries in my file as below. The format is prog<space>"<tooltip>" "<iconpath>"<space><excutable name>
prog "Nautilus" "/usr/share/icewm/icons/folder_16x16.xpm" nautilus
prog "SeaMonkey" "/usr/share/pixmaps/seamonkey-orig.png" seamonkey
prog "DrJava" "/home/test/Downloads/drjava-icon-512x512.jpg" java -jar /home/test/Downloads/drjava-stable-20100913-r5387.jar
prog "Calc" "/usr/share/pixmaps/xcalc.png" xcalc
prog "Shutter" "/usr/share/pixmaps/shutter.png" shutter
prog "IcePref" "/usr/share/iceWMCP/icons/icewmcp-icepref.png" iceWMCP
prog "1360x768" "/usr/share/pixmaps/gdm-setup.png" xrandr --size 1360x768
prog "1280x1024" "/usr/share/pixmaps/gdm-setup.png" xrandr --size 1280x1024
- startup - This file needs to be made executable and any executable / program entries made in this file are executed at start of IceWM session.
- theme - The theme settings are stored here. The settings look are something like this
Theme="icedesert/default.theme"

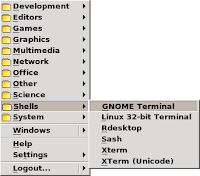
You can use MenuMaker to recreate the the IceWM menu using the command "mmaker icewm" which creates menus based on categories like "Education", "Development" etc. You can refresh menus using command "mmaker icewm -f". You can get the MnuMaker executable by extracting the archive downloaded from the link. The following screenshot shows the menu created by MenuMaker.

Though outdated this page should serve as a good starting point for your IceWM customisation needs.
PekWM
pekwm is a window manager which was based on the aewm++ window manager. It has a expanded feature-set, including window grouping , autoproperties and much more. It is very Lightweight and unobtrusive. It feels like an much improved version of TWM. I would call it TWM++. The following screenshot shows tiled windows of running applications on PekWM.
The default theme has a Orange tint to it. Here is screenshot of Gedit, Nautilus and Terminal applications and PekWM after applying "Vista Black" theme.
All PekWM applications sport 4 buttons on the top bar which are "Tiling button" on the top left and then the usual minimize, maximize and close buttons are bunched together at the top right.But in some themes(Vista Black) all the four buttons appear together .
The application menu can be launched using the key combination "Mod4+R" or "Winkey+R". It can also be opened by right clicking on the desktop.
When applications are minimized they get hidden unlike what you see on other desktop managers. Once minimised they can be opened using the "Focus Client" which can be accessed through the application menu.
The command launcher is mapped to "Mod4+D" or "Winkey+D" and very useful to launch applications.
You can use MenuMaker
to recreate the the PekWM menu using the command "./mmaker -f pekwm" which
creates menus based on categories like "Education", "Development" etc.You can get the
executable by extracting the archive from this link.
Sample PekWM config file can be obtained from here. It can be downloaded and copy pasted into the path ~/.pekwm/ or /home/<profileName>/.pekwm. This folder has various files which can be used to configure things like programs which should startup with PekWM and so on. To figure out the usage of all the configuration files you can take a look at this webpage. Here is also a official page for your configuration needs.
Comparison & Rating
Window
Manager |
Ease
Of Use |
Cmd
Launch |
Theme
Support |
Sys
Tray |
Dock
Panel |
Steep
Learn
Curve |
App
Menu |
Personal
Rating |
| Awesome |
No |
Win+x |
Yes |
Yes |
Yes |
Yes |
No |
2/5 |
| E16 |
Yes |
E-Exec
(Applet) |
Yes |
Yes |
Yes |
No |
Yes |
4/5 |
| Fluxbox |
No |
Alt+F2 |
Yes |
No |
Yes |
Yes |
Yes |
3/5 |
| FVWM |
Yes |
Talk |
Yes |
No |
Yes |
Yes |
Yes |
3/5 |
| IceWM |
Yes |
Win+Spc |
Yes |
Yes |
Yes |
No |
Yes |
5/5 |
| PekWM |
No |
Win+D |
Yes |
No |
No |
Yes |
Yes |
3/5 |
Man is oblivious to the slugfest going on in the heavens above. Here are the 3 forecasts for the ballet of the heavens courtesy our own IMD. Last image is an animation comprised of the three images.Animation is powered by ImageMagick. Command used to animate the images is as follows :- convert -delay 20 -loop 0 24hrrain.gif 72hrrain.gif 48hrrain.gif animatespheres.gif
Image Source:- Regional Meteorological Centre, Chennai
If you are one of thos guys who doesn't like the above form or if you are looking for a TataIndicom Wimax connection login app or script then your search ends here. The application described here is a self executing jar which when launched reads a configuration file in the same directory as the jar and then connects to the internet. When clicked again it will logout and end the session.
The program is simple and uses HttpClient and HttpPost classes from Apache "HttpComponents" framework and creates a HTTP session and submits the user name and password obtained from the configuration file to login. The classes were developed in DrJava and the final jar was created using Eclipse. The executable jar can be downloaded along with a sample config file. If you are interested in getting the source code you can download the ".java" files too :-). The jar has been tested on "Windows 7" and openSUSE 12.2 / GNOME 3.4 and it works in both environments.
Running the jar
- Install a JAVA JRE or JDK of version 1.6 or higher. If you are using openSUSE 12.2 then you can take a look at this page. If you are using windows you can get it from here ( JRE,JDK ).
- Download "ConnectionAlertWindows.jar" and "myconfig.txt" from the folder shared below.
- Place the myconfig.txt in the same folder as the jar and then edit the config file and enter the correct LoginUrl , LogoutUrl , user name and password. In general you need to correct the text between these symbols "<" , ">" and also remove those symbols. In case of urls it is the short form of the city you live in like "hyd" in case of Hyderabad and "ban" in case of Bangalore, "ahm" in case of Ahmedabad , "bom" in case of Bombay etc:
- If you are on GNOME 3.4 you can us this hack to run the jar. If you are on windows then you
- If there is config related issue you will see the pop up.
- If the program is able to exit the Login part then you will see the following pop up.
- If you are already logged in and you launch the jar again then the program goes to the Logout part then it gives the following pop up.
Creating jar from Source
- httpclient-4.2.2.jar, httpcore-4.2.2.jar and commons-logging-1.1.1.jar from "HttpComponents Client" project are required and can be downloaded from here.
- ReadValues.java, TataLogin.java and TataLogout.java are the source files which can be downloaded from the folder shared below.
- Eclipse classic (link) or Eclipse IDE for J2EE development(link)
- It is also good to install a JAVA JRE or JDK. If you are using openSUSE 12.2 then for installing the same you can take a look at this page. If you are using windows you can get it from here(JRE,JDK)
This is the folder from where you can get the executable jar, source code and sample config file.
Sample code for HttpClient code referenced from here
I had earlier written about a generic way of Running executable jar files on GNOME. I found a much cooler way of executing jar files. It involves adding a menu entry(.desktop file) in GNOME 3.X desktop and then forcing this menu entry to appear in open with list using a "%U" at the end. This will make the jar execution command appear on the context menu or right click menu of the jar. Ensure that you have a JRE or JDK on your system. For installing JRE on your openSUSE 12.2 you can take a look at this post.
Launch Alacarte through quick launch window(use command "alacarte" after pressing Alt+F2) and add menu entry "java -jar %U" as shown below. A new entry can be created by clicking the "New Item" button. In the pop up window you can give any name like "Jar" against Name entry and provide comments like "Cool way to run jar". The %U ensures that the launcher will appear on "open with" list.
After making the menu entry right click on any jar and choose the "Open With Other Application" menu.
Then choose the menu entry named "Jar" in the dialogue box as shown below.
Now the "Jar" entry will get permanently added to your context menu and will always be handy when you need to run a Jar
To set the application's default action on double click you need to right click and choose "Properties". You need to choose "Open With" tab and then choose the relevant application launcher and the "Set as default" button.
It is very easy to generate HTML links for any webpage based on the page url and page title. The following is a generic piece of code snippet when included in any page of your website will produce a link generator widget. It will automatically create HTML code which will enable others to copy the code and refer to your site easily. It can be included anywhere in the webpage . You can find this widget displayed in the top right hand side of this blog.
The code snippet will get the title of the page and the url of the page and store them in separate variables. Then the code create a HTML link code dynamically using two variables namely page url and title . After that it will write the generated HTML link code into a textarea.
Adding to Blogger
- Login into www.blogger.com
- Clicking on the link with your blog name will take you to blogger dashboard
- In Dashboard click on the layout menu on the left hand side as displayed below
- Then click on "Add a Gadget" link and then in the pop up select HTML/JavaScript gadget as shown below.Then all you need is to use the code snippet and your link creator gadget is ready.
Code Snippet
<style>
textarea#styledText {
    border: 3px solid #cccccc;
    padding: 5px;
    font-family: Tahoma, sans-serif;
}
input.styleButton
{
   font-size:12px;
   font-family:Verdana,sans-serif;
   font-weight:bold;
   color:#775555;
   width:107px;
   height:19px;
   border-style:none;
}
</style>
<script type="text/javascript">
var pageTitle=document.title;
var pageUrl=document.location.href;
urlTextValue="<a href=\""+pageUrl+"\">"+pageTitle+"</a>";
document.write("<textarea name=\"styled-textarea\" id=\"styledText\"onfocus=\"setbgcl('#e5fff3');\" onblur=\"setbgcl('white')\">"+urlTextValue+"</textarea>");
function setbgcl(color)
{
document.getElementById("styledText").style.background=color;
}
function SelecTextInTextArea()
{
document.getElementById("styledText").select();
}
</script>
<blockquote><input type="button" value="Select Text" onclick="SelecTextInTextArea()" class="styleButton" title="Select Text"/></blockquote>
Note:- Style elements adapted from here


