Why does openSUSE always ship older versions of GNOME ?
It has been three months since openSUSE 12.3 Milestone 1 GNOME 3.6 has been released and I am eagerly waiting for getting my hands on GNOME 3.6. Somehow or the other openSUSE always falls behind other distros in packaging the latest version of GNOME 3.X. I know that it is possible to install GNOME 3.6 on openSUSE 12.2, but it is not officially supported. openSUSE 12.2 was released on Sep 5th 2012 and GNOME 3.6 was released on Sep 24th 2012 and hence openSUSE 12.2 came out with GNOME 3.4 version :-(. As the old saying goes "History repeats itself" and openSUSE 12.3 is scheduled to come out on "13 Mar 2013" but GNOME 3.8 is scheduled for release on "27 March 2013" which is a couple of weeks after openSUSE comes out. Hopefully by the time 13.1 comes out both schedules will gets synced and openSUSE will ship latest version of GNOME :-)
openSUSE 12.3 RC1 GNOME 3.6 Live ISO
I have followed a procedure similar to what is described in Sneak Peek at KDE / openSUSE 12.3 RC1 Live ISO to download and boot into GNOME 3.6 Live ISO. The slight difference being that when i tried to boot GNOME Live ISO from MicroSD it refused to boot. Then I had to write the ISO onto a USB / Pen drive and boot from it.
First impressions
- The default wallpaper is cool and is titled "grow".
- The animations / desktop effects are smooth. The dimming effects are especially good.
- The desktop feels a lot snappier and faster.
Screenshots
The wallpaper is similar on both KDE as well as GNOME and the default GNOME desktop is as bland and minimalistic as ever.
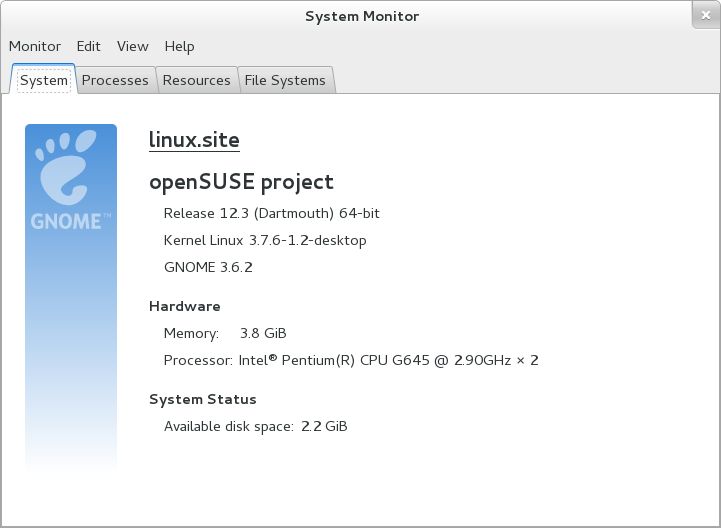
"GNOME System Monitor" can be launched from command launcher (Alt+F2) using command "gnome-system-monitor". The System monitor shows that openSUSE 12.3 / GNOME 3.6 will ship kernel version 3.7.x and GNOME version 3.6.2.
The below Screenshot shows "YaST" tool and System Settings (gnome-control-center) where most of the system related settings are configured in openSUSE.
It is pretty easy to set up "Online accounts" with Skydrive and Google Docs. First we press the left "win" key and to bring up Activities. Here we can type "online" and "Online Accounts" application will appear in Activities. We can then open the application and click on the plus (+) button and use the wizard to add new accounts .
After configuring "online accounts" we can open "Documents" application which will automatically pull the list of documents saved online as well as documents present on our harddisk. The below screenshot shows as how how we can check the pdfs we own, both online as well as offline. Documents application can be also launched through command launcher (Alt+F2) using command "gnome-documents".
In Alacarte, the "Revert" button is changed to a "Restore System Configuration" button in GNOME version 3.6. This button will restore the default set of applications in the "Applications menu" if you had turned "off" some of the applications earlier.
Ctrl+Alt+Tab key combination will bring up the accessibility switcher in Activities window and it now allows one to switch to "Message Tray" too.
Various functionalities from GNOME 2.X desktop can be reclaimed on GNOME 3.6 using GNOME shell extensions. The below screenshot shows the GNOME 2.X Application menu and Places menu restored on the top panel. We can also get Legacy Tray icons (Liferea icon) restored using "TopIcons" extension.
The extensions can be installed by toggling the "ON/OFF" slider on each extension page and then clicking the install button when the pop-up appears as shown below. The article 10 + GNOME Shell extensions that I found useful explains the working of a few extensions.
The "Shell Extension Preferences" application can be used to change the settings of individual extensions. This application can be launched through command launcher (Alt+F2) using command "gnome-shell-extension-prefs". The below screen shot shows the available settings for "NetSpeed" shell extension.
openSUSE 12.3 / GNOME 3.6 packs a two pane file manager called Midnight Commander probably to attract hard code command-line enthusiasts as it does have a legacy feel to it.
The fallback mode which imitates the classic GNOME 2.X desktop look is same as ever and one can add applets to panel by pressing on "Alt" key and then "right clicking" on the panel. The panel also features the all to familiar application window list. I could successfully add a "minimize all" applet, search applet etc... to the panel.
Also take a look at openSUSE 12.3 Milestone 1 GNOME 3.6 where I have described changes related to GNOME Tweak Tool, Nautilus, Activites window, File preview and dimming desktop effects.
I saw a spare MicroSD card lying around when I had a brain wave. I loaded the MicroSD onto a USB Card reader and proceeded to download KDE Live ISO (openSUSE 12.3 RC1) from openSUSE development site using Transmission. After downloading it I burnt the image onto the Micro SD card using SUSE Studio ImageWriter. This article is being written from the Live KDE ISO to test the stability of the system.
Few thoughts about KDE RC1 Live ISO
- Good looking default theme and wallpaper. The desktop seems to be kind of "Tronish". The new wallpaper can be downloaded from this link and is titled "grow". The wallpaper is an winning entry from a contest organised through Flickr. You can view all the submissions for the contest here.
- Great progress has been made in the "looks" department from the last time i too a look at it. openSUSE 12.3 Milestone 1 KDE 4.9.2
- The desktop effects are smooth and fluid and it is a lot less glassy compared to earlier openSUSE/KDE avatars.
- Even though it is a RC1 release, ISO image is of top grade quality. There were no hiccups when booting using the ISO.
- Browsing does work on the Live ISO which is a big plus. I could play only WebM encoded files like this one "Adobe Flash Versus GNOME Totem Vegas webm" in Firefox as native "h.264" support doesn't seem to be available. Many videos in youtube complain that flash is not installed, but they start playing once I closed the error window which seemed kind of funny.
- In Dolphin (File manger) everything is invoked through "single click" which can be a pain sometimes.
Screenshots
Default desktop has a openSUSE greeter and provides links to key webpages associated with the project .
On clicking the "KInfocenter" icon in the desktop we get to see that openSUSE 12.3 will most probably be shipping kernel 3.7.x and KDE version 4.10. KInfocenter is a nice tool to have and does provide a lot of nice info about Hardware configuration of the underlying system.
Firefox playing a WebM encoded video in youtube.
A lot of plasma widgets come pre-installed. You can see Weather, Calendar, RSS feed ticker, Hardware information and Disk Space widget in the below screenshot.
To open the widget browser we need to Right click on panel ==> Navigate to Panel options ==> Add Widgets ==> Get New Widgets ==> Download New Plasma Widgets. This tool will allow us to add more widgets to the desktop. At long last I am in widget heaven :-)
For those who prefer a more contemporary desktop there is "Desktop Icons Activity". The Activity manager can be accessed by clicking the icon next to the kickoff menu (Alt+F1).
The following screenshot shows two main configuration tools available on openSUSE namely "YaST" and "KDE Settings"
Konqueror passes youtube's html5 test but Firfox doesn't.
When I wanted to read a pdf i found that there is no pdf reader on Live ISO? In these days when even cheap mobiles have all kinds of document readers, I feel that Live ISOs ought to have some kind of readers on them.
Apper notification indicate that I need to update some packages indicating that openSUSE 12.3 is still under heavy development :-) When I click on the notification, it shows the packages that I need to update.
Found KWrite to be a exceptionally easy to use. I liked as to how "Find & Replace" function has been implemented. It highlights all replacements and the number of replacements made. Kwrite has a vi editor mode (Win key+Ctrl+v) which allows "vi" enthusiasts to edit text using commands (dd does delete entire line in this mode).
Final Thoughts
- Lot of widgets, desktop effects, great theme and other eye-candy are available.
- The new KDE does makes all the right noises and sounds.
- But the Live ISO cannot be used on a day to day basis as it doesn't pack any document reader, dictionary and other niche tools.
- SUSE Studio ImageWriter cannot create persistent USBs which is a real bummer.
Tor (The onion router) is a anonymizing overlay network for TCP. Simply put, Tor allows one to browse anonymously over the internet.
Tor provides:-
- Virtual tunnels that should theoretically improve privacy and security when browsing over the Internet.
- Low latency anonymous communication system.
- Proxying services to various applications on your machine using SOCKS protocol.
- Necessary abstraction framework that would make it harder for websites to figure out and find the actual geographical location of your machine.
Tor is not:-
- Proxy server.
- Totally foolproof way of staying anonymous online.
How can you help Tor project ?
You can help or contribute back to the project by making the Tor network large enough so that it can handle all the users who want privacy and security on the Internet. Configure your Tor to relay traffic for others.
Install Tor on openSUSE 12.2 GNOME 3.4.2
Step1:-
You may need to "configure community repositories" and include packman repos using YaST.
Step 2:-
We need to install packages called tor (main application) as well as torsocks (enables applications to use "Tor") to use the application efficiently.
Install using CLI
Open application launcher (Alt+F2) and open terminal ("gnome-terminal"). After completion of step 1 all we need to do is install the relevant packages using zypper as shown below.
$sudo zypper in tor torsocks
Notes:-
sudo - runs command as super user,
zypper - package manager on openSUSE,
in - instructs zypper to install the packages
Install using GUI
To locate YaST installer on GNOME 3.X
desktop, you can use the left "win" key or "Alt+F1" key combination to
open "Activities" window. In this window you can start typing a search
query like "install" when YaST installer will show up grouped under
"Applications" as shown below.
After opening YaST you can select the relevant packages and click on "Apply" button to finish the installation.
Starting Tor
Start Tor as daemon:-
If you want to start Tor as a daemon / service (running in background) then you can follow the following steps:-
Open YaST
To locate YaST administrative tools on GNOME 3.X
desktop, you can use the left "win" key or "Alt+F1" key combination to
open "Activities" window. In this window you can start typing a search
query like "yast" when YaST settings application will show up grouped under
"Applications" as shown below.
Open RunLevel Edior
In YaST "Administrator Settings" window you can search for "RunLevel" editor and open the same. This is a System services tool which can be used to set Tor as a daemon.
Setup Tor Daemon
After opening System Services you need to switch to "Expert Mode" by selecting the radio button at the top of the tool. Then we need to locate the "tor" service and set it up to start at appropriate RunLevel, using the check boxes at the bottom of the tool and click "Ok" button. This will ensure that the next time system starts / boots up, "Tor" would already be running.
Starting Tor from Shell Activities
If you don't want "Tor" to start along with the system and want to start it as and when its is required, then you can easily add it to "Activities" menu or launcher.
First we open command launcher (Alt+F2) and launch "alacarte" menu editor.
In Alacarte we can add a relevant menu item as shown below. To check status of Tor when it starts up, it is better to set the application "type" as "Application in Terminal".
To locate "tor" on GNOME 3.X
desktop, you can use the left "win" key or "Alt+F1" key combination to
open "Activities" window. In this window you can start typing a search
query like "tor" when "Tor" will show up grouped under
"Applications" as shown below.
Setting up browser to use Tor
Use Torify command
After starting Tor as a daemon or through GNOME Shell Activities, we can use the commands "torify" to enable almost any application to use Tor proxying service and connect to the internet. The command to open w3m text browser using Tor is as follows:-
$torify w3m http://ip.nefsc.noaa.gov/
Screenshot showing w3m opening a webpage on the left and Tor running on the right inside GNOME terminal.
Configure Socks proxy in various browsers
By default Tor is accessible through port "9050" and network address "127.0.0.1". It is easy to Setup Tor as Socks proxy in SeaMonKey and other Gecko based browsers like Firefox by opening "about:config" through address bar and by settings the following values:-
network.proxy.socks_port: 9050

network.proxy.socks:127.0.0.1

network.proxy.share_proxy_settings:true

network.proxy.type:1
In SeaMonkey you can also set the Socks proxy using the menu, Edit ==> Preferences ==> Advanced ==> Proxies ==> Manual Proxy configuration ==> Advanced button ==> Generic proxy. Here we set "Socks Proxy" as "127.0.0.1" and "Port" as "9050.
Screenshot of SeaMonkey showing Socks Proxy settings configured through "about:config" as well as "Preferences".
Screenshot showing setting up of setup Socks proxy in Opera using "opera:config" alias "Preferences" editor.
Is Tor working properly ?
In order to check whether Tor is working properly or not, you can use the link (What's My IP Address?) and check whether you see different ip addresses in the browser each time Tor is restarted.