Tuesday 29 November 2011

Install sun java and plugin on openSUSE 12.1

Install sun java and browser plugin on openSUSE 12.1

 Due to licensing issues openSUSE has dropped sun java from its repositories from openSUSE 12.1 onwards.Read the  release notes here

First you need to determine the OS architecture(32 or 64 bit).
==>To do this you can open terminal(press Alt+F2 and type in "gnome-terminal" and hit return or enter key)
==>In terminal execute the command "arch". It should give you output like "i586" or "i686" [32 bit] (Or) "x86_64" [64 bit]
Based on the architecture the relevant package must be downloaded.

You need  to install
==>jre or Java Run-time Environment is needed for executing jars or running class files on your system.Some application software like openoffice / libreoffice  need this to work properly.
==>Browser plugin is used to run applets on your browser

My Output

The Easy Way
This approach involves downloading the relevant rpms or software packages[Learn about packages] and then installing this using command mode(zypper way) or using YaST or GUI way

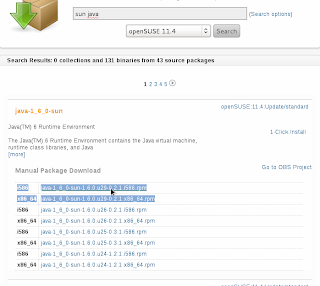
==>Get / download the rpms or packages for sun java jre here

==>Get / download the rpms or packages for browser plugin here
Warning : Don't use the one-click installs in above pages,just download the rpms and install them manually.If you use the one-click installs it will mess up your repositories unless you opt for not subscribing to 11.4 repository

JRE download

Browser Plugin download


Installation

Zypper way
==>Open the terminal
==>Navigate to the directory of the download using cd <space><dirname>
==> Execute the command :-
"sudo zypper in java-1_6_0-sun-1.6.0.u29-0.2.1.i586.rpm java-1_6_0-sun-plugin-1.6.0.u29-0.2.1.i586.rpm"
Note:- You may need to enter admin passcode when prompted

YaST/GUI way

==>Press the left windows key on the keyboard and click on "Applications menu"
==>Open Install / Remove Software under "Applications"
Note:- You may need to enter admin passcode when prompted

==>Click on configuration==>repositories
==>Click "+Add" button in the repositories (configured software repositories) window
==>choose "Local Directory" in the "Media Type"(Screenshot below) window and click "Next"
==>In the next window and  give a name to the repository like "rpms" and then choose the path where your downloaded files/rpms are.The  downloaded path should be something like "/home/<User Name>/Downloads", and enable the checkbox "Plain RPM Directory"then click "Next"

==>You should see a new repository or repo by name "rpms" there.
Click "Ok" button
==>You should come back to the main window.Here you need to click a drop down on the left and navigate to repository and choose the new repository "rpms"
==>Check the packages to install i.e."sun java and plugin" and hit the"Apply" button.After the installation finishes you can check the installation. Relevant screenshots are below.

Install/Remove Software
Media Type
Choose Directory
See New Repo "rpms"
Click on "Groups"
Choose rpms repo and Install JRE

If you liked this post then you might be interested in taking a a look at :-

Things to do after moving to openSUSE 12.1 (Asparagus)


The Hard Way

You can us this link to do a manual / geeky install.

Check Installation

If you are looking to test your installation then you need to open the terminal
an execute the command "java -version"


To check browser plugin Navigate here or here

If the installation is successful you must see something like this :-


Run or Execute jar files
If you looking for launching (or) running jar files then ,look here

Things to do after moving to openSUSE 12.1 (Asparagus)

Things to do after installing / moving to openSUSE 12.1 (Asparagus)
 There are some little things that I did to suit my tastes as well as improve my desktop experience on openSUSE 12.1 This post captures some of those tweaks and customisations that i performed on my desktop.I don't recommend that all the users do this as the desktop distribution is by itself is pretty awesome and amazing .openSUSE12.1 (Asparagus) is  pretty much GNOME 3.2.1 with Kernel 3.1.0 with a dash of YaST / zypper and of course openSUSE branding on some of the software.

  Now its time to bring out the handyman's soul that is in deep slumber within you.Now lets get on with hacking the default installation.The pre-requisites for doing this are getting your own toolbox complete with hand drillers , pliers , wrenches and spanners,ouch sorry,all you need is a big heart before attempting something new.Beware,Some thing might go horribly wrong when you tussle with your system and rub it the wrong way.

Step 1:-
 First step is to improve the desktops multimedia experience.This is required because by default openSUSE doesn't ship codecs for any of the restricted multimedia formats like mp3.To read more about this go here.
There is a famous "one-click" installation for this here . The recommended on-click for gnome desktop is named "Codecs pack for GNOME".That is it, click on the on-click installer and be ready with the trusted mouse and click on "Agree / I trust" buttons the appears endlessly.After the YaST installation exits press "Alt+F2" an key in "r",this will refresh/restart your desktop.

Step 2:-
 Enable nautilus preview or folder/file manger preview so that it will be easier for you to maintain your mp3 collection or preview text files/pdfs files without opening them.I made a detailed post about this here.Don't forget to comeback to this post after viewing it :-)

Step 3:-
==>Restore / Add window minimize and maximize buttons in all windows in GNOME 3 to regain the old touch.Old habits die hard
==>Enable Icons on Menus And Buttons
==>"Use Nautilus As Desktop Manager" brings back the all familiar gnome 2.x desktop back .
 All of this can be done by using the  "gnome-tweak-tool" which is part of the default openSUSE 12.1 distribution.The tool can be launched through quick launch  window which can be accessed through "Alt+F2" and then keying in "gnome-tweak-tool".It is available as "Advanced Settings" in Applications menu .The below screenshots demonstrate the  options that need to chosen.
You may need to restart your  desktop by typing in "r" and hitting return key
 in quick launch window "Press Alt+F2 to open quick launch window"
Restore Maximize and minimize in all windows
 Enable Icons For Menus and Buttons
 Use Nautilus As Desktop manager
Yeah!!! The icons on my Desktop are back . . .


Step 4:-
==>Add and remove items from the favourites menu and rearranging the favourites menu/bar available on the left hand side of the screen under "Activities menu"  of the Top panel.A detailed post is available here
==>To add new launchers to "Applications menu" you may use a tool called
"alacarte" . You can launch "alacarte" through quick launch window "press Alt+F2".
==>Add items to system start-up list.The start up configuration can be accessed through Quick launch window " Type Alt+F2" and then typing in "gnome-session-properties". A detailed post for adding an application to start up menu is available here under sub heading "How to Start Artha along with your OS?". Many other applications like "Tomboy" can e added t the start up list similarly

Step 5:-
We may need to set tracker/indexing engine preferences by keying in "tracker-preferences" and hitting return key in quick launch window "Alt+F2"
One can set options like perform indexing only when computer is not busy and stop indexing when disk space is low etc:This is an important step as this will improve your system's performance.


Step 6:-
Install the various shell extensions and then enable them through "gnome-tweak-tool" or "Advanced Settings" . If the the shell extensions don't appear on the tweak tool then you need refresh the desktop as described above in this post.The recommended extensions are :-
  • gnome-shell-extension-alt-status-menu<==Enables shutdown button in drop down on top left hand side of the screen.
  • gnome-shell-extension-apps-menu <==Adds a gnome2.x style application drop down menu
  • gnome-shell-extension-places-menu<==Creates a "places" drop down menu from the top panel with all the bookmarked folders in nautilus
  • gnome-shell-extension-noa11y <== Removes / hides Universal Access Settings menu from the gnome 3.x top panel of the desktop
  • gnome-shell-extension-weather <== Weather forecast GNOME Shell Extension==>Installation Instructions here
All the shell extensions are available in Main Repository(OSS). Only  noally needs to be installed from a non standard repo.You can get "gnome-shell-extension-noa11y" here and install it through "1-click" installation or disable universal access settings manually.You can refer to this post for more information regarding manual removal of universal  settings menu

gnome-shell-extension-apps-menu

gnome-shell-extension-places-menu


Enable Extensions through "gnome-tweak-tool'


Step 7:-
==>Install Acrobat Reader "acroread" which has a better interface than default pdf reader,evince
==>Replace gimp with pinta if your image manipulation needs are less.Though pinta may have less features than gimp it starts up really quick compared to gimp an also it is pretty light weight application( doesn't hog much memory).Pinta as icon edior
==>Install "Bleachbit". Bleachbit effectively clears all the temporary files from your system.Works like a charm.
==>Install gkrellm.gkrellm is uber cool monitoring tool for Linux.I find it particularly useful in monitoring my internet usage statistics.
==>Install sun java / jre on openSUSE 12.1.To do that go this post
==>Get latest version of opera which happens to be Opera 11.60b1.If you have not tried out opera yet then you are missing something in life.
Install Opera Zypper way
==>Open the terminal
==>Navigate to the directory of the downloaded opera rpms using cd <space><dirname>
==> Execute the command :- "sudo zypper in opera-11.60-1147.i386.rpm"
Note:- You may need to enter admin passcode when prompted
If you need a GUI / YaST way of installation then look here under Installation ==> YaST/GUI way
Note:-opera gtk package is not yet available in the standard 12.1 repos and hence downloading the rpm from opera site.
==>Install Artha which is a off-line dictionary / thesaurus.Checkout Artha here
Pinta
Bleachbit
 Gkrellm-Main Window
Gkrellm-Usage Stats

Saturday 26 November 2011

Audio,video and doc preview features in Nautilus 3.2.1 GNOME 3.2.1

How to activate  audio ,video and document preview in Nautilus 3.2.1 / GNOME 3.2.1/openSUSE 12.1 ?

 I you are searching for a way to activate nautilus based document and multimedia preview features in Nautilus 3.2.1 / GNOME 3.2.1 then you have landed at the correct place.This post talks about activating preview feature in openSUSE 12.1 specific terms. You many need to strain your grey matter a little if you want to implement this on other distributions.


Step1:-
To enable the preview features first you need to ensure that preview functionality is turned "ON" in Nautilus settings


Step2:-
Ensure that you install all the relevant gstreamer plugins  from packman repository using YaST or zypper.The gstreamer plugins you may need are "bad","bad-orig-addon","good","good-extra","ugly","ugly-orig-addon"


Step3:-Install "Sushi".Sushi is a quick previewer for Nautilus, the GNOME desktop file manager.Sushi is available under "OSS repository". This can be done through YaST too.

 All your set ups are done and now . You can test your preview feature by selecting any mp3 file and hitting "spacebar" on the keyboard .You can use preview feature for a lot of file formats like simple text file,pdf documents etc:
Of course you may need to install relevant packages like evince in case of previewing pdf files.You can see images below demonstrating preview feature on mp3,image,pdf and a simple text file.


Nautilus Tip :- Q:How to  delete/move any file/files to Trash or "recycle bin" in GNOME 3.X  / Nautilus 3.X onwards using keyboard?A:Select the required files and press the key combination "ctrl+Delete"

If you liked this post, you may like check out:-
Things to do after moving to openSUSE 12.1 (Asparagus)

Friday 25 November 2011

Create Label or Tag Cloud In a New Page In Blogger

How To Create a dynamic Label or Tag Cloud In a New Page In Blogger?

 In  some of our blogs there would be too many labels that it would be difficult to show all of them in main page of the blog.To solve this issue we can add the label cloud in a new page in our blog.This post aims to serve as a tutorial for doing this.

The following screenshot shows the appearance of the  Labels page or tag cloud page for your blog:-

Step1:-
Step one is to create a new page and name it "labels" .For accomplishing that this you need to
==>Go into "Design Mode in blogger", henceforth will be referred to as "Design Mode" in rest of the post
==>Click on the "Posting" tab.
==>Under this "Posting" tab click on the "Edit Pages" tab.
==>Click on the "New page" button
==>Give a title for he page like "Labels"
==>and then click on "Publish Page" button


Step2:-
   Ensure that in the "design view" of blogger ,otherwise click on the "Pages" gadget and rearrange so that "Pages" gadget appears below the header gadget.Ensure that "Save" the design after editing.
Step3:-
Add the labels gadget. To do that you need to:-
==>Click on "Add a Gadget" link and add a new gadget "Labels" which is available under "Basics" menu.
==>Drag the "Labels" Rearrange as required so that it appears just above "Blog Posts" gadget and below "Pages" gadget

Step 4:-
Edit the code so that the label code appears only in the "Labels page and not the main page of the blog"
==>Click on "Edit HTML" link in "Design Mode"
==>Click on check box "Expand Widget Templates"
==>Search and Locate  your label widget.It should look something like this
<b:widget id='Label1' locked='false' title='Labels' type='Label'>
==>Add the following "if condition" nestle it within   your gadget/widget tags so that the xml structure is well formed and then ensure that the ending if tag is added in the right place as shown below.You can then "Save Template"
 If your xml is not well formed then the page will display an error. My advise is to exit the "Design Mode" and repeat Step 4 otherwise it will mess up your blog.
<b:widget id='Label1' locked='false' title='Labels' type='Label'>
<b:includable id='main'>
<b:if cond='data:blog.url == &quot;URLOFYOURLABLEPAGE&quot;'>
...
...
</b:if>
</b:includable>
</b:widget>
Finally you will have a beautiful tag cloud which you can use to browse your blog. Try out the label tab at the top of this blog to get a feel of it.

Wednesday 23 November 2011

If you had two extra hours in a day, how would you spend it?


 Couple of days ago I joined indiblogger and today I was randomly browsing their site when saw an advertisement @indiblogger seeking entries for a contest titled "If you had two extra hours in a day, how would you spend it?"

I felt like giving it a try and here is my post aimed at the contest.

When i first saw the topic the whole idea of having extra hours in a day seemed ridiculous as we are always running short of time in our day to day lives .But then I realised that this is exact thing that every body needs very badly in their life,those precious costlier than surging gold prices,extra hours.

 This idea seems at first like an idea ripped off from the bonus time allotted at the end of each stage in a video/computer game.Those bonus stages are an awesome idea.You can really increase your points.I would like something similar in real life too.But that would be like asking for too much, ain't it?

   My thoughts drifted to the film 12B which featured Shyam , Jyothika and Simran.The film dealt with two hypothetical situation

one==>in which hero manages his time well and manages to catch a bus for his interview
Two==>in which hero mis - manages his time fails to catch the bus
The point is whoever makes most efficient use of the time succeeds in life,earns laurels and appreciation of the ones around him/her.The film also
talks about the unforgiving,cruel nature of fate but we will leave it at that.

 So what would all of us do  with hour extra two hours of time . Most of us would probably would doze off the extra hours thinking it as a god's gift to provide us  "quantum of relief" from the  rigours of hectic life.

 Some of us would probably be willing to spend us extra hours on personal development like hitting a gym daily for a workout (Or) going or a walk in the fast disappearing parks{which happens to be a reality in chennai as the corporation is busy destroying whatever parks it developed in the pretext of building infrastructure for metro rail} (Or) doing yoga

 Some of us ,especially the  youth(Generation Y) may be tempted  to  spending the the hard earned money at bars/pubs/discotheque etc:for utilising their share of the two extra hours

 Some may opt for spending time in doing things{which usually sits in the farthest corner of mind and keeps bugging us} that they always wanted to do but did not do it for want of adequate time

 Some may turn to visiting places of worship,especially the older generations which obviously is a big no-no for today's generation

 shopaholics would probably be delighted that they can spend more hours in the malls of the big Indian cities.

Bookworms would probably drain away the extra hours by reading more

 As for me I would probably spend my quality time writing more articles for my blog,editing existing posts and experimenting with the whole range of gadgets/themes that are available for the blogs nowadays.

Sunday 20 November 2011

After a long wait finally onto a proper Gnome 3.X desktop openSUSE 12.1 GNOME 3.2.1

 After a long wait , i am finally onto a proper Gnome 3.X desktop which is openSUSE 12.1, GNOME 3.2.1. Man !!!!!! ,it took like ever before the 12.1 release came through. I was so exited when GOME 3.X came out through in openSUSE 11.4  . It really built up the hype for the 12.1 release which is supposed to be a full fledged GNOME 3.X desktop environment.

Gnome System Monitor showing  juicy items like openSUSE release version 12.1,Kernel version 3.1.x,GNOME version 3.2.1


Desktop with one amazing background{that too out of box}
 Application menu or Applications menu
Totem with a Nice and sleek Skin


Very Cool looking iphonesque onscreen keyboard


Cutest YaST yet,cool integration of YaST with GNOME 3.X interface


 I was itching for the first weekend to arrive after the 12.1 release,I was really raring to have a crack at the new OS . Unlike previous upgrades and installations of openSUSE this time I tried doing things a bit different.The first time I installed openSUSE which happens to be version 11.0 I installed it from a boxed DVD from which I obtained along with a computer magazine.
For the  transition from 11.0 to 11.2 I downloaded a DVD ISO and burned it and upgraded the OS.Then from 11.2==>11.3 and then from 11.3==>11.4
and from 11.4 , GNOME 2.x ==> 11.4 , GNOME 3.0.X I used YaST and zypper based upgrade.This time i tried  something different i.e. installed from a live image written on-to a flash drive.

The +ses of 12.1/GNOME 3.2 over 11.4/GNOME 3.0

==>Nasty bug in Nautilus 3.0 which did not allow users to copy paste files from one directory to another using commands ctrl+c and ctrl+v has been fixed in Nautilus 3.2
Nautilus 3.0 bug

==>Much better looking Totem media player

==>GNOME 3.2 has not even crashed once though GNOME 3.0 in early days crashed a lot of times

==>openSUSE 11.2/GNOME 3.2 has "gnome-tweak-tool" {lets you customise gnome 3.x} and "gnome-shell-extension-alt-status-menu" {which provides you a proper shutdown or Power off menu for GNOME 3.X desktops} are installed by default which is big relief as these two tool are more like "the most important tools" on GNOME 3.X desktops

==>As usual the interface is smooth and free flowing and beautiful like a river .The OS feels like a giant iphone ,special mention is required for the iphonesque ultra cool on-screen keyboard.

==>The icing on the cake is the installation was very fast unlike anything that I had experienced before.Probably the credit goes to the flash drive based installation instead of using an optical drive based installation.


==>Shutdown time/latency is vastly improved

The only minus I noticed so far is that sun/oracle jre is not included in the 12.1 repos / repositories .One can only install openJDK implementation from 12.1 repos.