Using Tor on openSUSE 12.2 GNOME 3.4.2
Tor (The onion router) is a anonymizing overlay network for TCP. Simply put, Tor allows one to browse anonymously over the internet.
Tor provides:-
- Virtual tunnels that should theoretically improve privacy and security when browsing over the Internet.
- Low latency anonymous communication system.
- Proxying services to various applications on your machine using SOCKS protocol.
- Necessary abstraction framework that would make it harder for websites to figure out and find the actual geographical location of your machine.
Tor is not:-
- Proxy server.
- Totally foolproof way of staying anonymous online.
How can you help Tor project ?
You can help or contribute back to the project by making the Tor network large enough so that it can handle all the users who want privacy and security on the Internet. Configure your Tor to relay traffic for others.
Install Tor on openSUSE 12.2 GNOME 3.4.2
Step1:-
You may need to "configure community repositories" and include packman repos using YaST.
Step 2:-
We need to install packages called tor (main application) as well as torsocks (enables applications to use "Tor") to use the application efficiently.
Install using CLI
Open application launcher (Alt+F2) and open terminal ("gnome-terminal"). After completion of step 1 all we need to do is install the relevant packages using zypper as shown below.
$sudo zypper in tor torsocks
Notes:-
sudo - runs command as super user,
zypper - package manager on openSUSE,
in - instructs zypper to install the packages
Install using GUI
To locate YaST installer on GNOME 3.X
desktop, you can use the left "win" key or "Alt+F1" key combination to
open "Activities" window. In this window you can start typing a search
query like "install" when YaST installer will show up grouped under
"Applications" as shown below.
After opening YaST you can select the relevant packages and click on "Apply" button to finish the installation.
Starting Tor
Start Tor as daemon:-
If you want to start Tor as a daemon / service (running in background) then you can follow the following steps:-
Open YaST
To locate YaST administrative tools on GNOME 3.X
desktop, you can use the left "win" key or "Alt+F1" key combination to
open "Activities" window. In this window you can start typing a search
query like "yast" when YaST settings application will show up grouped under
"Applications" as shown below.
Open RunLevel Edior
In YaST "Administrator Settings" window you can search for "RunLevel" editor and open the same. This is a System services tool which can be used to set Tor as a daemon.
Setup Tor Daemon
After opening System Services you need to switch to "Expert Mode" by selecting the radio button at the top of the tool. Then we need to locate the "tor" service and set it up to start at appropriate RunLevel, using the check boxes at the bottom of the tool and click "Ok" button. This will ensure that the next time system starts / boots up, "Tor" would already be running.
Starting Tor from Shell Activities
If you don't want "Tor" to start along with the system and want to start it as and when its is required, then you can easily add it to "Activities" menu or launcher.
First we open command launcher (Alt+F2) and launch "alacarte" menu editor.
In Alacarte we can add a relevant menu item as shown below. To check status of Tor when it starts up, it is better to set the application "type" as "Application in Terminal".
To locate "tor" on GNOME 3.X
desktop, you can use the left "win" key or "Alt+F1" key combination to
open "Activities" window. In this window you can start typing a search
query like "tor" when "Tor" will show up grouped under
"Applications" as shown below.
Setting up browser to use Tor
Use Torify command
After starting Tor as a daemon or through GNOME Shell Activities, we can use the commands "torify" to enable almost any application to use Tor proxying service and connect to the internet. The command to open w3m text browser using Tor is as follows:-
$torify w3m http://ip.nefsc.noaa.gov/
Screenshot showing w3m opening a webpage on the left and Tor running on the right inside GNOME terminal.
Configure Socks proxy in various browsers
By default Tor is accessible through port "9050" and network address "127.0.0.1". It is easy to Setup Tor as Socks proxy in SeaMonKey and other Gecko based browsers like Firefox by opening "about:config" through address bar and by settings the following values:-
network.proxy.socks_port: 9050

network.proxy.socks:127.0.0.1

network.proxy.share_proxy_settings:true

network.proxy.type:1
In SeaMonkey you can also set the Socks proxy using the menu, Edit ==> Preferences ==> Advanced ==> Proxies ==> Manual Proxy configuration ==> Advanced button ==> Generic proxy. Here we set "Socks Proxy" as "127.0.0.1" and "Port" as "9050.
Screenshot of SeaMonkey showing Socks Proxy settings configured through "about:config" as well as "Preferences".
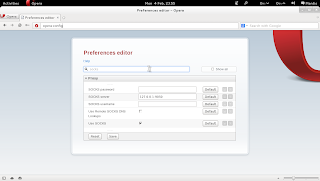
Screenshot showing setting up of setup Socks proxy in Opera using "opera:config" alias "Preferences" editor.
Is Tor working properly ?
In order to check whether Tor is working properly or not, you can use the link (What's My IP Address?) and check whether you see different ip addresses in the browser each time Tor is restarted.


No comments:
Post a Comment